Thursday

9 ways to use speech/thought bubbles on your projects


Speech/thought bubbles can add whimsical fun to your projects especially if you use them in a humorous way. *winks* Here are 9 ways to incorporate them on your projects.

A-card-for-the-Fall-Coffee-Lovers-Blog-Hop
A card for Fall Coffee Lovers Blog Hop

A coffee/tea cup with a lovely sentiment.:)

The-Tupperware-party
The Tupperware Party
Things the subject may be thinking...

A little love for my sister
A cute "scene" in a thought bubble.
When-I-went-shopping-in-my-scrap-pile
When I went shopping in my scrap pile
A simple "hi"from one birdie to another.

This-week's-card-from-scraps
This week's card from the scrap pile
A little love from an elephant to a birdie.

Frankenmouse
The one about the Frankenmouse
Explaining the subject's "actions".

Hello-hello-card
Batch processing...is the way I roll
LOVE love in a thought bubble.

Dream
The story about the mid-sleep position
What the kids could be dreaming about...

Happy-birthday-card
Do you love abstract patterns?
A birdie singing Happy Birthday!

There you have it. 9 fun ways to use speech/thought bubbles on your projects. Do you use them on your projects?


Share/Bookmark

Pin It

Tuesday

The one about the "elevated" dessert


The-one-about-the-elevated-dessert

So nephew #1 has been "boarding" with us for the last few weeks and of course, the overzealous aunt (aka me) has been baking up a storm to feed the kid to maintain her "fave aunt" status.


However, one lazy Sunday, the aunt "cheated" by making her nephew a dessert with ready-made supplies. And called her concoction an "elevated" dessert. *LOL*


Well, the nephew certainly enjoyed his "elevated dessert" which was a scoop of raspberry ripple ice-cream, honeycomb Tim Tams (biscuit), a banana and a sprinkling of roasted cashew nuts. *winks*


Playing along with Let's Get Sketchy.


Share/Bookmark

Pin It

Monday

Reworked: mixed media girl on canvas


Reworked--mixed-media-girl-on-canvas

Apparently you are supposed to keep ALL of your old artwork to see how far you've evolved in your artistic journey. Well, I most certainly am trying to erase all traces of my earlier cringe-worthy work by re-working them. *LOL* 

Like this girl that I drew back in October 2015. Can you believe how far I've come since then? *winks*


Honestly, I just don't have the space to keep all of my artwork. But I don't like to waste stuff either. So I've been reworking my artwork to make them more reflective of my current style.


Yep, I just slapped on some acrylic paint to cover up the "old" face and started all over.


Here are the art supplies I used to re-paint the girl's face.

What about you? Do you try to rework some of your older pieces to make them more reflective of your current style?


Share/Bookmark

Pin It

Thursday

The one about the lame mooncake-making session...*winks*


The-one-about-the-lame-mooncake-making-session

So last weekend there was a mooncake-making session at my local mall and I "made" nephew #1 go for the short session.


Now he thought that the mooncake-making session was a little lame (yes, photo #1 was totally "staged" for the camera) but got a little more excited when he was holding the finished product (photo #2). Then when he finally got to eat it (it needed some chilling in the fridge), he said that it was totally "worth it". *LOL*


Really had a lot of fun pulling bits and pieces from my paper scraps for this layout. :)

Playing along with Sketchabilities.


Share/Bookmark

Pin It

Wednesday

So the room wall has finally been painted!


So back in May, I asked you to help me pick a wall colour for my room...and I'm pleased to say that it's finally done! Yay! *High fives all around*


Not that the actual painting took that long (10 hours) but you know I had to gather all the supplies, clean the walls, shift the furniture and brace myself for the tough job ahead. *LOL*


Since I was moving to a lighter colour, I had to paint over the original colour several times to cover up the dark blue. Of course, once I started, I started having second thoughts since I've had the original wall colour for 12 years.


It took 4 coats to cover up that dark blue! At this point, I was thinking a white wall is looking pretty good! *winks* But I persevered and finished with two coats of sweet Wildflowr Blue. :)
I love it! What do you think?


Share/Bookmark

Pin It

Monday

Revisiting old techniques - a girl from my art journal


Revisiting-old-techniques--a-girl-from-my-art-journal

When I first started my drawing journey 3 years ago, I was really into drawing whimsical girls on messy backgrounds. Then I sort of got sidetracked into drawing the eye with pencils and coloured pencils for most part of the last year or so.


I decided to revisit my old "style" and draw a whimsical girl on my latest art journal page....to see if I still enjoy the old techniques I used to employ.


The background was first "messied up" with acrylic paints, inks, spray mists and random doodles. Then I sketched the girl's face, painted her face with acrylic paint, drew in her features with inks, coloured her face with watersoluble crayons and added details with coloured pencils and paint markers.

It was fun revisiting old techniques I used to enjoy.

What about you? Do you revisit old techniques you used to enjoy?


Share/Bookmark

Pin It

Wednesday

Workspace Wednesday: Bangkok Edition


Workspace-Wednesday-Bangkok-edition

Hello friends! Greetings from Bangkok, Thailand! Here is my multi-tasking workspace. :)


Here is the mixed media eye I managed to draw and paint...:)

Happy rest-of-the-week friends!


Share/Bookmark

Pin It

Tuesday

The one about the 3 day Fathers' Day celebration


The-one-about-the-3-day-Fathers'-Day-celebration

This year we had a public holiday on the Friday before Father's Day on Sunday so we had a 3 day Fathers' Day celebration.:) 


He had breakfast at McCafe, mum cooked his favourite spicy food and sweet desserts.


We even went out to catch a movie and of course, had more of his fave local food.


So the new word dies I bought from the previous week's trip to Australia are in play here.:)


I also tried to utilize the leftover Thickers collection stash for my titlework. *winks*


Playing along with Stick It Down.


Share/Bookmark

Pin It

Monday

Yet another reworked monogram


Yet-another-reworked-monogram

As you know, I've been an avid collector of the Y monogram (for obvious narcissistic reasons) and have decorated quite a few over the years. One of my faves was the one covered with Golden gold mica flakes, you know back when I was totally obsessed with gold. But for some reason the embellishments kept falling off it despite numerous re-glueing attempts. Well, nobody has got time for that. RIP old gold monogram, here's your reincarnation. *LOL*


Quite possibly the fastest makeover ever. Just added a gold trim at the edges and some gold bling and it's a "royal" monogram! *winks*
For-the-love-of-gold-monogram
For the love of gold

Here's the previous monogram..and back when I overdid the photo saturation. Hahaha...

What do you think of my reworked monogram? 


Share/Bookmark

Pin It

Thursday

A decorated paper bag for an Aussie birthday gal (a tutorial)


A-decorated-paper-bag-for-an-Aussie-birthday-gal-(a-tutorial)

So last week, when I was in Sydney, I arranged to meet up with my bloggy pal Lizzy Hill to visit her at her new digs and check out the Op Shops. Now Lizzy and I met in person for the first time back in 2013 when I was last in Sydney. She was a regular bog commenter so I wrote her and asked if she wanted to meet up to go art supply shopping. We met at the train station and after ascertaining that I wasn't a psychopathic killer, promptly called her husband to prepare lunch and invited me to her home for lunch and to check out her scraproom. :)

We've been in regular contact ever since then. Yes, true friendships can be forged over the internet. *LOL*

Anyway, she mentioned that it was her mum Kay's birthday and asked if her mum could join us for a girls' day out. Since Kay was a regular commenter on my Facebook Fan Page, I was of course happy to meet her. And what's a birthday without a pressie right?


I got her a Kikki K leatherbound notebook and a pack of Uniball sparkly pens which fitted nicely in a box I had previously decorated. So I decided to make a coordinationg paper bag to house the box.

I started by measuring, cutting and adhering the patterned paper to the paper bag.


Next, I adhered pearl trim to soften the edges a little.


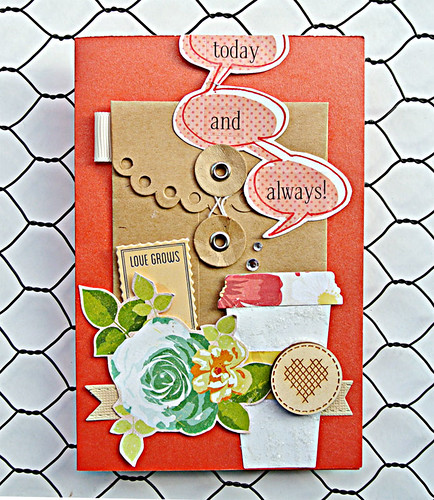
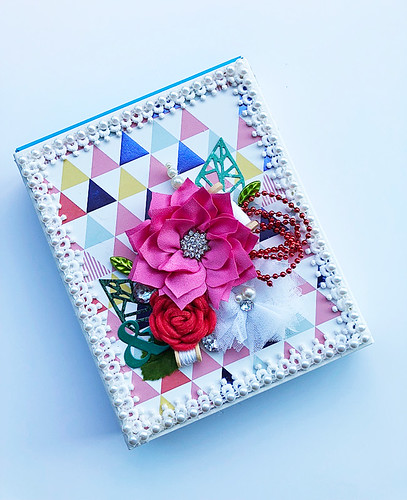
I used a Maya Road kraft envelope as the base for my embellishment cluster....


And as usual went ham on piling on the embellishments. *winks*


Even the copic marker came out to play....I dyed my white thread pink to coordinate with the embellishments.


I finished with some sparkly bits of course.


Here is the bag hanging from my chair.


The-last-decorated-box-of-2017
The last decorated box of 2017
And here is the previously decorated box to coordinate with the decorated paper bag.


And here I am with the Aussie birthday gal Kay along with her decorated bag and matching box set. Does she look happy? :)

P/s: It was winter last week down under...and ridiculously cold. I was wearing 4 layers including thermal wear. ;)


Share/Bookmark

Pin It
>
Related Posts Plugin for WordPress, Blogger...

LinkWithin

Pin It