Thursday

How to get more out of your mixed media art supplies


                    “I suppose it is tempting, if the only tool you have is a                                   hammer, to treat everything as if it were a nail.” 

                                                                                          Abraham Maslow

I think this sentiment sums up why I'm attracted to creating mixed media art....the endless possibilities/probabilities that might emerge from "throwing" various media at a substrate; discovering new techniques from happy "accidents", using your knowledge of media to "salvage" poorly executed techniques or just building up the layers to create your own brand of art.

I have, over the last few years of playing with mixed media, experimented with all kinds of art-making tools and products. Some of them really resonated with my artistic ambitions; others challenged me to re-evaluate my approach to mark-making and a few have made me feel less than adequate in my abilities.

But the most important thing I have learnt through experimentation is how to get more out of my mixed media art supplies. Hope these tips can help you do the same in your artistic journey.


1. Get to know your art supplies.

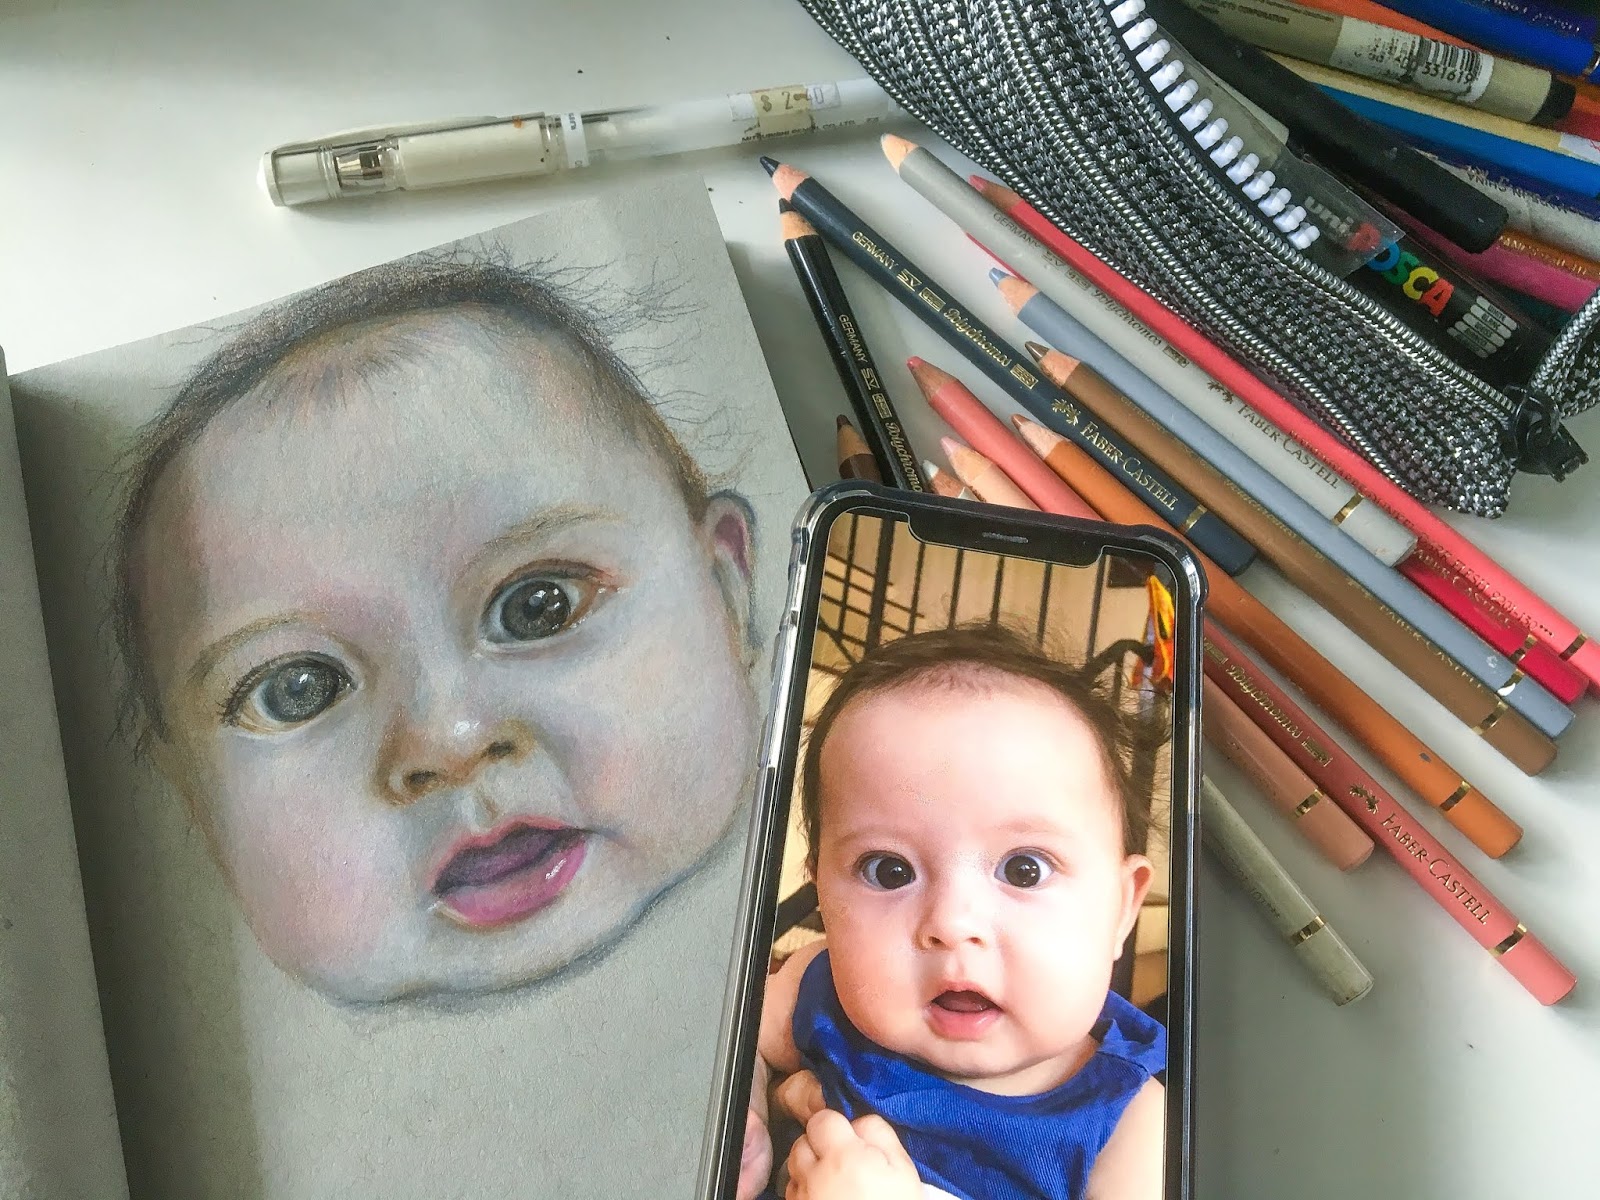
Yep. Understanding how your art supply works is key to utilising them to your advantage. Do they like water? Do they play well with other mediums? What kind of substrates do they like best?

Remember that manufacturers come up with a certain way of using an art supply but it doesn't mean that it is the only way the supply can be used. Often, users of an art supply think of other interesting ways that supply can be used. 

Of course, if it is a medium that is totally new to you, you might have trouble thinking of the multiple ways to use that said supply. No worries. The internet is your friend. Google reviews on the product or watch YouTube videos to get inspiration on how other art enthusiasts are using that supply. Or if you prefer to read books, head to your local library and check out some books on that particular medium. Then try it out for yourself.


2. Choose quality over quantity.

It is so tempting to get every single colour of a product especially when you've been inspired by a tutorial you've just seen and really want to try out that particular technique.
Don't.

Buy a few of your fave colours, go home and play with them. You can always go back for more. You sure don't want to be stuck with 100 colours of a product that you might not like using. When you curate your art supplies, you will always have a collection that you enjoy. For years.

Don't be tempted by how "cheap" a product is. While price may not always be an indication of quality, when it comes to art supplies, it kind of is. Pure colour pigments are expensive and are reflective in their prices. Quality products will ensure the longevity of your work....you don't want to have spent hours on a project only to have the colours fade away quickly because they are not lightfast.

If you have an art supply store that you frequent, ask to try out a product before you purchase or even ask for samples. Pictured are some of the samples I got from my local art supply store. :)


3. Learn colour theory.

Take time to learn about the basics of colour theory. The human mind responds to different colours so understanding colours can help you convey your creative ideas, express your emotions and spark interest in your art piece.

Once you learn about how to combine colours and create colour harmony, you can layer your media and experiment away! 

What about you? How do you try to get more out of your mixed media art supplies?

Share/Bookmark

Pin It

Wednesday

Workspace Wednesday: Meet my makeup shelf :)


Back in June 2017, with 2 hours to kill before a musical, I walked into a Myer departmental store in Melbourne, struck up a conversation with a sales associate at Laura Mercier and started a new obsession...with makeup. :)

I listened attentively while she explained how to play with dark (to recede) and light (to bring forward) colours...and that I can wear any colour that I want as long as I could find/create the right tone for my skin colour.

As I applied the techniques that she taught me to my face, I also worked the same techniques to my portrait drawings. It is interesting how improvements in one aspect of your life (my facial makeup skills) can lead to improvements in another (dark/light values in my drawing/painting). I would forever be grateful to this sales associate...(Okay, I did buy 4 items from her...she was very good at her job! *LOL*)

Anyway, meet my makeup shelf. Just ONE shelf in my cupboard devoted to my makeup (skincare has its own shelf). There's no need to KonMari my collection because it has been carefully curated. I am big on sampling and I do a ton of research before I spend my money on beauty products because I am very conscious of what goes on my skin. :)

What about you? Do you have a makeup shelf?


Share/Bookmark

Pin It

Tuesday

Mixed Media Tuesday: Another huge eye on canvas painting


Hello friends! Presenting another huge eye on canvas paining (20x20 inches)...:)


I have been enjoying the process of painting these huge eyes on canvas. As always, I started with scrunched up wrapping tissue on canvas, then gessoed and  layered with paints and inks. Then I finished by painting in my huge eye. :)


I really like the ink drips and splatters on the background.


What do you think?


Share/Bookmark

Pin It

Monday

So the Yam men are not great at carrying kids! *LOL*


Apparently, the Yam men are not very good at carrying kids. *LOL*


And of course, I had to scrapbook the photo evidence.You know...because if it wasn't scrapbooked, it didn't happen! *winks*


I had to place Nephew E in Nephew #1's arms to get this photo. Hahaha!


And of course after I took this photo of my dad with Nephew E, the kid was on the floor seconds later! *LOL*


I found a folder with my old sticker stash and went a little crazy with them here! ;)


Playing along with Stick It Down.


Share/Bookmark

Pin It

Wednesday

Workspace Wednesday: drawing my niece Luna


Hello friends! Just a quick share on what I’m currently working on...a sketch of my niece Luna (my cousin’s kid). Yes, I finally got to meet her during CNY. Isn’t she adorable? :)


Share/Bookmark

Pin It

Monday

Make Stuff Monday: CNY 2019 edition


Hello friends! Previously I shared with you some of the decorations I made for CNY 2019. Today I just wanted to share how everything came together. :)


I recycled last year's mini ang bao lanterns I made (one last hurrah for them before they go into the recycle bin) and hung them on the railing. The plant has a red ribbon tied around it for a bit of a festive flair. *winks*


Here is the CNY snack area in the dining room area.

I had to get creative with things I already had around the home so that I did not have to buy too many decorative pieces. Every year is a different animal year in the Chinese Lunar calendar so with 12 animals, it means you have to keep animal-specific decorative pieces for 12 years before you can use them again. I try to buy the generic stuff so that I can use them for a few consecutive years.


Here you see the hanging lanterns I made. :) 


A decorative nook with things found around the house...:)

There you have it, a quick look at how my CNY 2019 came together. Tomorrow is the last day of the CNY 2019 and then all the decorations have to removed/kept/recycled. I am so NOT looking forward to that...*LOL*

Happy week ahead friends! 


Share/Bookmark

Pin It

Thursday

Tutorial Thursday: DIY chicken wire frame


DIY chicken wire frame

Hello friends! Happy Valentine's Day! Today I'm sharing an easy DIY chicken wire frame. :)

DIY chicken wire frame

I started off with this wood frame from Daiso. I wanted to put framed art in it but it came with a flimsy acetate instead of glass cover so I decided that I would "rework" it into a chicken wire frame instead. I painted it with two coats of chalkboard paint.

DIY chicken wire frame

Next I cut the chicken wire to size and adhered it to the back of the frame. Since I don't own a stapler gun, I went with hot glue. After that I "covered" up the unsightly glue marks by gluing some blue ribbon to the back. (Not that anyone sees the back anyway...but you know, I'm extra, I would know!*winks*)

DIY chicken wire frame

Next I decorated the frame with some vintage lace and pearl trim.

DIY chicken wire frame

I finished by creating a ribbon "handle" and adding some floral embellishments.

DIY chicken wire frame

I think it turned out quite pretty...should I make more??? *LOL*


Share/Bookmark

Pin It

Tuesday

Layout Tuesday: A day in Orchard Road with nephew #1


So back in December, I brought nephew #1 out with me to Orchard Road (the Singapore version of Rodeo Drive in California or Champs Elysees in Paris) because I wanted to do some shopping.


Now, like all teenage guys, the dude HATES shopping. But I promised him that food would be involved so he got a little excited. I mean, he even wore long pants instead of bermuda shorts. He said he had to dress "nice" because he didn't want to look like the help...hahaha. Ahhh...proud aunt moment. He actually listens to me! *winks*


Our first stop was at a MOS Cafe where he had a huge burger. Then we did a little shopping....which meant I found him a seat somewhere, parked him there with free WIFI and snacks for 20 minutes and did my super quick shopping.


Then I brought him for my fave childhood activity (which I used to enjoy with my late grandpa)....supermarket food-tasting. It was 10 days before Christmas so there were lots of good stuff to taste!


Playing along with Let's Get Sketchy.


Share/Bookmark

Pin It

Monday

6 Ideas for gifting a little love...Valentine's Day 2019 edition


With Valentine's Day in just a few days, I thought I would round up a few quick and easy projects to help you spread a little love to family and friends. :)

A little love for my sister
1. Upcycled brown paper bag.

This can be quickly put-together with some cute paper and fabric scraps, twine and button. 

Come-join-me-for-afternoon-tea6
Come join me for afternoon tea
2. Upcycled box and brown paper packaging.

If you have a little more time on your side, why not go a little more elaborate? Upcycle a clear box to house a package wrapped in brown paper packaging.

A-card-for-the-Fall-Coffee-Lovers-Blog-Hop
A card for the Fall Coffee Lovers Blog Hop
3. A card to go with a beverage.

Sometimes, you don't need a huge gesture to show someone that you are thinking of them. Buy them a thoughtful beverage and add a card to tell them that they are in your thoughts. :)

Altered-box-project-for-Maya-Road-and-Xyron-swap-by-Yvonne-Yam
An altered box project for Maya Road


4.  A decorated gift box.

A decorated gift box always makes the gift extra special. Because the box is an extra gift. :)


Quick-projects-from-paper-scraps2
Quick projects from paper scraps
A-mixed-media-tag
Tips and tricks for altering stuff


5. Go for a tag.

A simple tag that conveys your sentiment. That the recipient can use as a bookmark or re-gift with a pressie.


6. A decorated paper bag.

Always useful to have a few of these around. Super practical. Portable and useful. Try something cute.Or something sweet. 

There you have it. 6 ideas for gifting a little love this Valentine's Day.
What are your fave ways for gifting a little love?

Happy week ahead friends! :)

Share/Bookmark

Pin It
>
Related Posts Plugin for WordPress, Blogger...

LinkWithin

Pin It