Wednesday

The great pretender


The-great-pretender

If you have been reading my blog for a long time, you might remember how "unnatural" my dad used to be about posing for the camera. Now, he's actually getting really good at it.


Case in point:

We were trying out this new flavour of potato chips (salted egg flavour is the latest craze in Singapore) and my dad gave it the thumbs-down in the first photo...and a pained expression when we made him eat it for the camera! *Hahaha!* Yep. The great pretender. 

Is your dad as hilarious as mine? *winks*


I kept to a muted colour palette to make the funny photos of dad in a bright pink shirt "pop". ;)


Playing along with The Studio Challenges.


P/s: Happy Halloween!

Share/Bookmark

Pin It

Tuesday

Yet another mixed media eye on canvas...*winks*


Yet-another-mixed-media-eye-on-canvas

Recently, I've been on a roll to complete my half done projects/revamp old projects. Like this 12x12 canvas. That had been sitting in a dark corner of my cabinet, unfinished and neglected for the last few months.


It had a misted stencilled background...so I went in with new paint colours and ink markers.


Of course, I had to draw an eye...you know, with my eye obsession. *LOL*


Yep...another mixed media eye on canvas. :)


Share/Bookmark

Pin It

Monday

Roast chicken again?


Roast-chicken-again?

Apparently so. I have had to make roast chicken 5 times in the last two weeks. 

My sister texted, "I'm ordering pizza for dinner tonight. May not have enough for everybody. Why don't you make something? Like roast chicken?"

My nephew (while eating roast chicken), "I could eat this everyday."


Seriously. Even the crab is puzzled as to why the Yams love roast chicken so much. *LOL*


It started with my mum buying me the WMF roasting pan which I had been eyeing for a while. And then it seems that every time I'm at home, there's a chicken in the fridge waiting to be roasted. *winks*


So my goals each time I roast are to get the chicken skin crispier and the breast meat more juicy than the previous attempt. And of course, to fit in as much vegetables as possible. Because a one-pan meal makes it much easier for cleanup. :)


What about you? What dish do you have to make over and over again?

Playing along with Sketchabilities.


Share/Bookmark

Pin It

Friday

Decorated box and gift bag for a visiting friend...a tutorial


Decorated-box-and-gift-bag-set-for-a-visiting-friend

So last week, I got a message from a friend from India who said she was in town and wanted to meet up. Of course, I had to whip up a little something for her, right? 


I started with this kraft bag and box (corporate gift packaging with no brand logos are the best...*winks*).


I measured and cut a 12x12 sheet of patterned paper for both the box and the bag.


Then I adhered them to the bag and box.


Next comes the fun part of course...auditioning elements and decorating the box and bag.


Here is a shot of how they looks before the finishing details.


I finished with die-cut words and bling.


I love the baby blue with the kraft....so pretty!


I'm thinking the recipient likes them??? What do you think?

Ps: Some of you might recognize her...our bloggy pal Spardha from The Lazy Owl Designs. :)


Share/Bookmark

Pin It

Wednesday

My creative workspace at night


Here is a look at my creative workspace at night.

It's always going to be a work-in-progress as my style evolves and let's get real here, when I get more stuff. Afterall, I'm a maximalist trying to be a minimalist...*LOL*


Share/Bookmark

Pin It

Tuesday

My crazy real family


My-crazy-real-family

Well, there are some things in life that you can't change, especially when it comes to family. You just have to accept them as they are. Crazy. Real.


And always ruining a good photo opportunity with their antics.


Here we are celebrating nephew #2's birthday...and I either got signages covering the faces (nephew #3 and niece) or sullen faces.


My sister-in-law makes a rare appearance (she never wants her photo taken) but of course, isn't even looking at the camera. The birthday boy is holding a "cool" sign but looks totally bored. The niece has recently taken to sullen looks in photos because her mother told her that her teeth look like vampire fangs. *LOL*


Playing along with Let's Get Sketchy.


Share/Bookmark

Pin It

Monday

Drawing nephew #1 with coloured pencils


Drawing-nephew-#1

So I'm venturing into drawing the male species now apparently. *faint applause*
And "victim" #1...err I mean male subject #1 is none other than nephew #1. :)


Just to prove that the kid wasn't strong-armed into it, here's a photo of him with his in-progress likeness. *LOL*


I started off with a pencil sketch (on Stathmore Toned Gray A5 sketchbook) that looked nothing like him (let's not include an incriminating photo..*winks*) before getting in with some coloured pencil action. I whipped out my Holbein Artists Colored Pencils for this.


It took a really really long time (a few hours each night for a week or so) to "complete" this drawing because I wanted to only use coloured pencils instead of "cheating" with mixed media supplies. 


Yes, coloured pencil is a very slow medium to work with because it takes a lot of layers to create tonal effects.


"That actually looks like me!" exclaimed nephew #1.


Well, I'm off to find my next male"victim" to draw. :)

Happy week ahead friends!


Share/Bookmark

Pin It

Thursday

10 Ideas for incorporating black and white photos with coloured photos on your layouts


You know how much I love to incorporate both black and white photos and coloured photos on my layouts. Sometimes it's because I don't have very well-taken shots - turning them into black and white tends to eliminate lighting problems - other times, it's because I have similar consecutive shots and want to differentiate them.  Or sometimes I just use the contrast as a design element to create interest on my layouts. Here are some ideas for incorporating black and white photos with coloured photos on your layouts.

The-one-about-carrying-Zoe-(and-not-making-her-cry)
The one about carrying Zoe (and not making her cry)
1. Use the contrast in photos to depict two separate time frames.

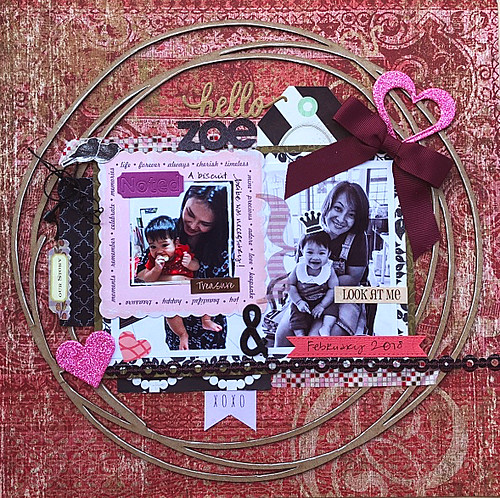
On this layout, the coloured photo features me with my niece Z while the black and white photo depicts my sister E with my niece Z. The photos were taken a day apart with the coloured white taken at night (note light reflections on hair) while the black and white photo was taken the next day in natural daylight.

Since it was difficult (time-consuming) to adjust the photos to "match", I just printed them in different colour formats and used embellishments to create a somewhat cohesive layout.

Someone-had-2-mains-for-dinner
Someone had 2 mains for dinner (not me!)

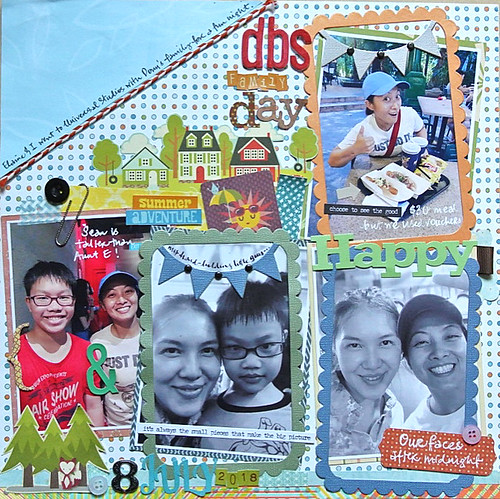
2.  Do a "before" and "after".


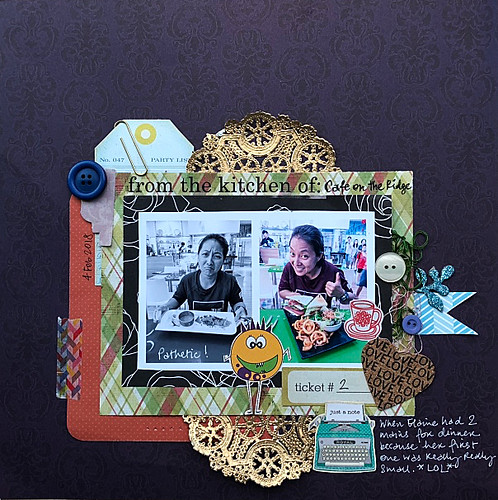
This layout features my sister E looking very "sad" in the black and white photo because her main arrived much smaller than expected while the coloured photo features her looking much happier with the considerably bigger second main she ordered.

The-heat-wave-adventure
The heat wave adventure
3. "Save" a decent photo from lighting issues.

I love the photo of my sister and I except for the glaring light in the background which got considerably toned down once the photo was converted to black and white. Not perfect but our faces still looked decent [that's my story and I'm sticking to it! *LOL*]


The-one-about-the-vidal-sassoon-hair
The one about the vidal saasoon hair
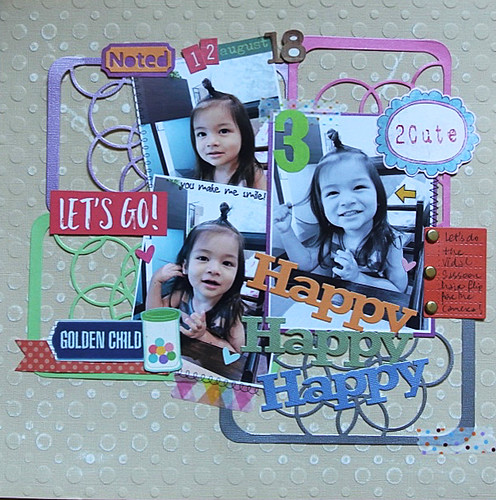
4. Make one in a series of photos the focal point with the contrast.

Here I wanted to feature several consecutive shots of my nephew E before we got to "the ONE".  :)


We-went-to-Universal-Studios-Singapore
We went to Universal Studios Singapore!
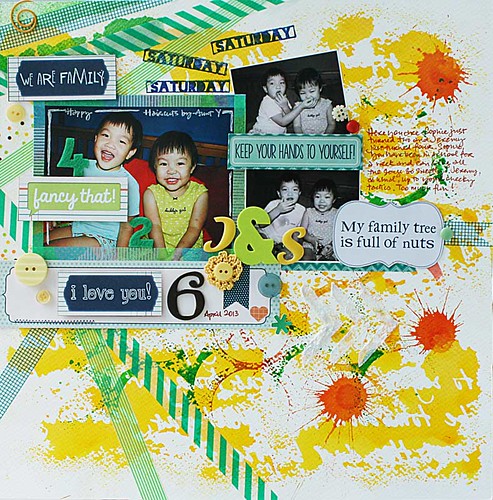
5. Use black and white photos to tone down a colourful layout.

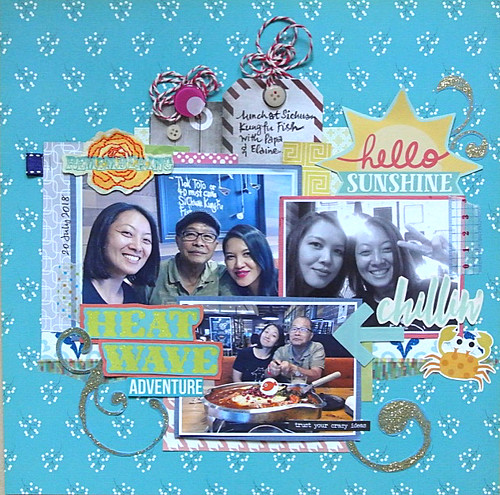
Sometimes when you try to fit a few large photos (4x6) on a single page, along with a whole lot of other colourful elements, the eye can get a bit lost...help it along by toning down the layout with some black and white photos.


Chocolate-spells-love-in-any-language
Chocolate spells love in any language
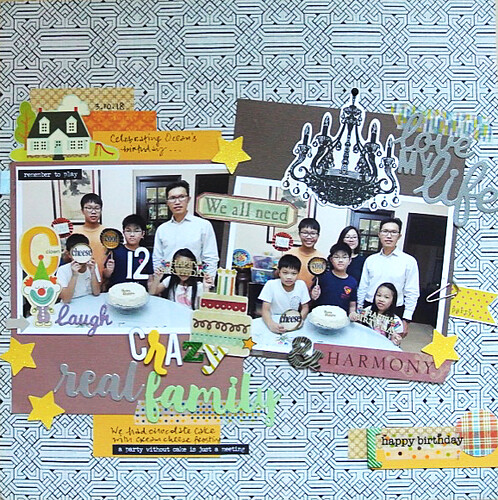
6. Create a "dreamy" feel with your not-so-perfect photos.

Here we had some lighting issues with the photos we took at nephew #1's birthday party which I discovered only after we ate the cake (hahaha!). Thanks to Photoshop, I did salvage some photos to scrapbook. I lowered the contrast levels for a "dreamy" feel to the photos and then used bold colours on the rest of the layout. Could you tell???

The-one-about-the-lemon-curd-tarts
The one about the lemon curd tarts
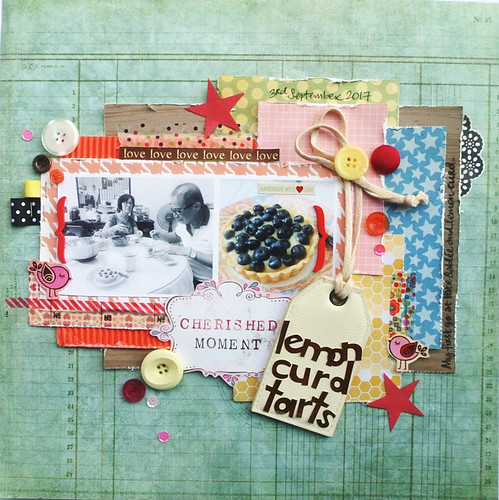
7. Downplay a "not-so-great" shot.

Here on this layout, I had a shot of the folks eating the lemon curd tarts that wasn't that great but since it helped to tell the story a little better, I had to incorporate it. I just toned it down by converting the shot to black and white and reducing the contrast levels.

The-Tupperware-party
The Tupperware Party
8. Salvage an outtake.

Well you know my struggles with taking photos of the Gangster Gang (aka niece + 3 nephews) so I usually have more outtakes than decent shots. Here, nephew #1 was still smiling happily at the camera so I "salvaged" the photo by framing his face...and you can still see the rest of the background action with nephew #2 and the niece.*winks*


Afternoon-tea
Afternoon tea
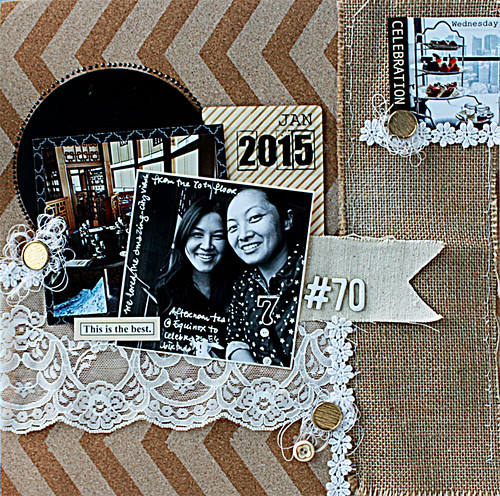
9. A black and white photo can really "pop" on a neutral background.

When the rest of your elements are fairly neutral, incorporating a high contrast black and white photo can really make the photo stand out.

We-are-family
My new "skill" ,....and a challenge winner!
10. Play with the photo sizes to help draw the eye to the focal point.

Print your focal point in larger size to really help the eye zoom in on your main photo. Here I printed the outtakes of nephew #3 and the niece in black and white in a smaller size so as to not detract from that cute main photo. But the outtakes do help to tell the story on my layout  (plus they were so cute!) so I incorporated them. :)


There you have it. 10 ideas for incorporating black and white photos with coloured photos on your layouts. Which one is your fave?


Share/Bookmark

Pin It
>
Related Posts Plugin for WordPress, Blogger...

LinkWithin

Pin It