Tuesday

My CHA 2017 mixed media canvas for Maya Road


A-mixed-media-canvas-for-Maya-Road-for-CHA2017

Hello friends! Here is my mixed media canvas for Maya Road for CHA 2017. :)


The 6x8 canvas was covered with remnant lace, gessoed and then misted and gessoed again.


I tried to showcase a range of Maya Road products - diecuts, tassels, pins, blooms, charms, blooms, resins, wood tokens, buttons and leaves.


Happy week ahead friends! :)


Share/Bookmark

Pin It

Thursday

A glitzy XO bottle


A-glitzy-XO-bottle

After emptying the contents of a bottle of Martell XO brandy into 2 fruitcakes (my most expensive cakes to date..*winks*), I was left with a really lovely glass bottle which you know, I just HAD to decorate. :)


I went with the lace, pearls and blooms combination. 

Then I decided that it would be perfect as a decor piece for my grandaunt's 90th birthday celebrations.


So I went to get these paper mache numbers and a can of gold spray paint (the fastest way to cover anything fast!). Once that was dry, I went in with my fave Golden large gold mica flakes to up to glitz factor. That was of course, before I found out from the art store that Golden has decided to discontinue this product! *sad music plays in the background*


Here is my sister holding the glitzy XO bottle like some beauty pageant contestant who just won the Miss Congeniality prize *LOL*.


Share/Bookmark

Pin It

Monday

Wood pallet for Maya Road CHA 2017


Wood-pallet-for-CHA2017

Hello friends! Maya Road design team members had to do a wood pallet featuring ourselves for CHA 2017 (aka Creativationand this was what I did. :)


I used chalkboard paint on my pallet and then gave it a shabby chic finish with some sanding. 


I covered a Maya Road kraft envelope with some remnant lace and added pearl trim to pretty it up. Then I went a little crazy with my embellishment cluster.:)


Happy week ahead friends! :)


Share/Bookmark

Pin It

Friday

Quick projects from paper scraps...


Quick-projects-from-paper-scraps

These days, I've been enjoying the little fussy-cut "creatures" from my paper scraps. Like making a quick card with these cute monsters....


And even taking out my star punch for a spin...

Items taken from the paper scrap pile: 10!
Items still left in the said pile: a gazillion!


Of course, the postman arrived with a parcel... which called for the making of a cute tag...*winks*


Items taken from the paper scrap pile: 4
Items still left in the said pile: a gazillion minus 4

Happy weekend friends! :)


Share/Bookmark

Pin It

Tuesday

The one-eyed girl in my art journal


The-one-eyed-girl-in-my-art-journal

I have finally kept up with art journaling for a whole year! That deserves a round of applause *clap clap*, right? Especially since it only took years for me to get here...*LOL*


There are many one-eyed girls in my art journals, partly because I don't want to cover too much of the background up and partly because symmetry is impossible if you don't do the eyes simultaneously. But let's go with artistic choice to make it sound more artsy fartsy, shall we? *winks*


The background was created by soaking up the residual mists from other projects and testing new mediums and stencils. The face was drawn with Sennelier Oil Pastels, inspired by the colours on the background.


P/s: I am travelling this week and feeling a little under the weather. I will catch up with your blogs soon friends! :)


Share/Bookmark

Pin It

Thursday

The Tupperware party


The-Tupperware-party

So the other day we had a Tupperware party...eh, actually it was a last-minute birthday party for nephew #1. Because the grandpa had to rush off for his tennis game, we did not have time to take the baked goodies out of the Tupperware containers! *LOL*


As usual, it was hard to get the kids to gather for a photo. Except for nephew #1 who has been well-trained by his paparazzi aunt [aka me..*winks].


Check out that chocolate birthday cake...I didn't even have time to remove the baking paper along the edges....*hahaha*


I even took out my border punch for this layout! Yay...go me! *winks*


I really had fun using my fussy-cut paper scraps...


Still a long way to go to using up those paper scraps though...;)


Share/Bookmark

Pin It

Tuesday

The layout with lots of stuff...


The-layout-with-lots-of-stuff

Meet my layout with lots of stuff on it...*winks * 

I was sorting out my paper stash and the scraps were driving me crazy. So I challenged myself to use them ALL on my layout. All? I didn't even make a dent in the scrap pile. *LOL*


Anyway, my sister went skiing in Canada during the Christmas/New year holiday season and only returned after her birthday. So we had a family celebration for her before she left.


It was my first time preparing a birthday celebration breakfast....I kept it simple even though I made everything from scratch (and it took forever for an amateur cook...hahaha). Of course, now that I'm into baking/cooking, I need to invest in some lovely serving dishes...note that the square cake is on a too-small round plate. It was either that or serving it in the baking tin. *LOL*


Playing along with My Creative Sketches.


Share/Bookmark

Pin It

Thursday

A mixed media canvas inspired by Iceland


A-mixed-media-canvas-inspired-by-Iceland

I've always wanted to visit Iceland - to take a dip in the Blue Lagoon (Iceland's famous thermal pool) enjoy the water's stunning hues and its anti-aging properties (apparently, you leave the place looking younger! *winks*) and of course, catch the Northern Lights if I'm lucky. 

The lovely Tina Walker has organized a group of us to create art inspired by Iceland....and I created a mixed media canvas inspired by the colours of the Aurora Borealis. :) 


I started wrapping tissue and remnant lace + gesso on the base of my canvas. Next I used various shades of blue, green and purple mists. Once that was dry, I added liquid inks to intensify the colours before adding gesso to bring out the textures of the paper and lace.


I finished with some lace, beads and blooms in various textures to create depth and interest on my canvas.


Check out the amazing array of projects by the artists participating in this Inspired by Iceland Art Challenge.


Share/Bookmark

Pin It

Wednesday

A fun decorated pallet for Maya Road (a tutorial)


Good-tidings-wall-hanging-by-Yvonne-Yam-for-Maya-Road

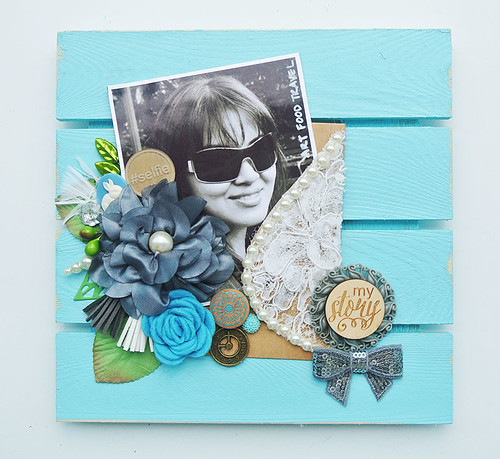
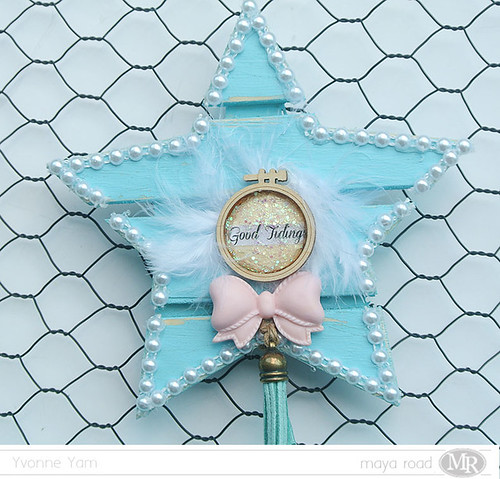
I have been having fun with these DIY wood pallets from Maya Road like this star one. :)


I started by painting it with my fave chalkboard paint. I usually resort to chalkboard paint when I'm lazy. It is essentially gesso coating and it looks good on porous surfaces such as wood. (If you are using regular acrylic paint, you should use a coat of gesso first to ensure the paint adheres to your surface.)


Once the paint was dry, I sanded it for a distressed look....especially the parts where the paint was applied unevenly...*winks*


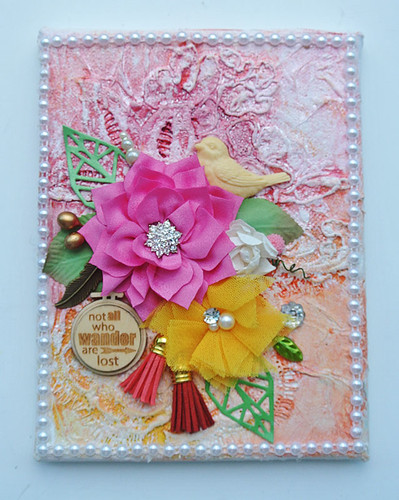
Then I adhered the flat-back pearl trim to the edges. I've been using this on everything recently. *LOL*


I backed the mini embroidery hoop with a scrap piece of paper and added a sticker. Then I covered the whole thing with crackle accents. It usually takes a few days in my climate for it to cure fully and to see the crackles.


Once the top layer was dry, I added some glitter paint for a little sparkle.


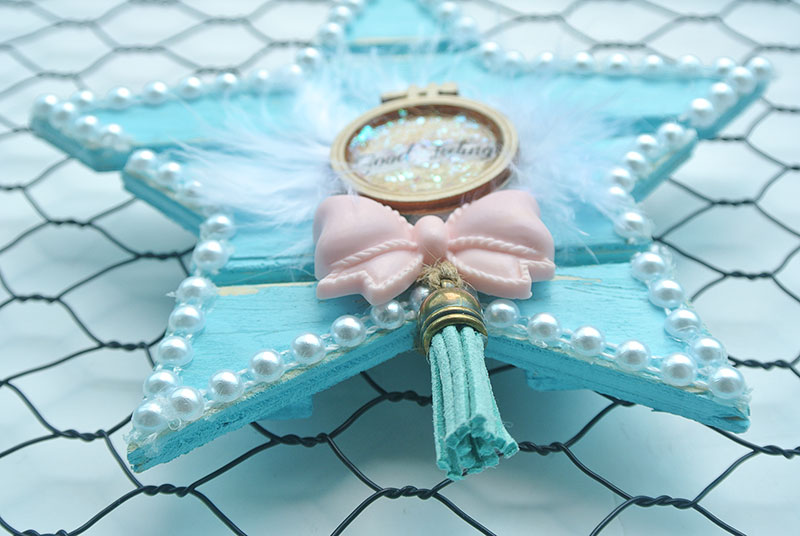
Then it was time to embellish! I started with some white feathers for soft texture and interest.


Next I added my decorated embroidery hoop, a resin ribbon and a leather tassel.


Now I have a cute little wall hanging. :)

Share/Bookmark

Pin It
>
Related Posts Plugin for WordPress, Blogger...

LinkWithin

Pin It