Tuesday

Card with scraps on a bag


Decorated-box-and-gift-bag

So I made a card with my paper scraps and discovered that the bag of the card was a little torn. *sad music plays in the background*


At this point, I had a couple of options:
1. Replace the card base
2. Use it as a box decorator
3. Make it into a large tag
4. Add it as a card to a paper bag


I went with option #4 because I love that the kraft paper bag is slightly larger than the card and created a sort of mat for my card design. :)

What about you? Have you ever completed a project that you could not use as it and had to alter it somehow?

Share/Bookmark

Pin It

Monday

When this cutie came for a visit


When-this-cutie-came-for-a-visit

So the other day my cousin, her husband and this cutie came for a visit. :) 


Of course, he made a beeline for the stairs...because apparently toddlers cannot resist stairs! *winks*


We also played dress-up...he got to don his cousin's angel wings....


And played "cupid" for a few minutes (you know, just enough for me to take some photos...*LOL*)


I really wanted the photos to stand out in this layout so I went with a subtle colour palette with some pops o blue and green.


Playing along with Stuck?! Sketches.


P/s: Happy week ahead friends!

Share/Bookmark

Pin It

Friday

The mish mash card from my paper scraps...


The-mish-mash-card-using-my-paper-scraps

It sounds silly but I get immense satisfaction from using up my littlest bits of paper scraps. :) 


Like when I was thinking of a sentiment for this card...and used the "what's up" text from the branding strip of a Basic Grey patterned paper. Zero waste baby! *winks* 


Sometimes a girl just wants to use her flamingo chipboard with her fussy-cut sheep so she does! *LOL*


Share/Bookmark

Pin It

Thursday

Someone is Discipline Monitor...*winks*


Someone-is-Discipline-Monitor

So my niece S is now in primary school. And gets to wear some fancy sash (like some beauty queen...hahaha) because she is Discipline Monitor. Yep, they start the "indoctrination process" the moment they go to school. *LOL*


Of course, the Discipline Monitor was caught playing and messing up my lanterns during Chinese New Year. Evidently, not very disciplined, I must say....(the irony...;)


Does it look like I'm trying very hard to fit in my paper scraps and embellishments? 


I'm playing along with the fun recipe challenge over at The Studio Challenges which is to incorporate as many of the following as possible:


Mists
Stamping
Ribbon

Stitching

Purple
Flowers
Wood veneers
Aqua colour
Enamel Dots
A heart


How many did I incorporate???


Yep. All. Yay. Go me! :)


Share/Bookmark

Pin It

Tuesday

This week's quick decorated paper bag


This-week's-quick-decorated-bag

Well, after Christmas, the decorated bag pile has dwindled a fair bit and it's time to make more! *winks*


I started by measuring and cutting patterned paper to fit my sturdy black YSL paper bag.


My highly neglected Martha Stewart punch was used to create some pretty detail along the top edges of the patterned paper. The papers were then ran through the Xyron Creative Station for an even layer of adhesive.


I glued on some pretty trim at the bottom edges for extra texture and interest.


Then I created an embellishment cluster using some  Maya Road goodies.


There you have it ...a quick decorated paper bag to add to my pile! 


Share/Bookmark

Pin It

Monday

Another girl from my sketchbook


Another-girl-from-my-sketchbook

Hello friends! Just sharing another coloured pencil girl from my sketchbook. It took a while to get here...


Here's how she looked when I started...(the lighting is a little off...the paper is gray)


And here's how she looked midway....


And how she looked before I went in to refine the details... 

Happy week ahead friends!:)


Share/Bookmark

Pin It

Thursday

The stuff in my "save-it-for-a-rainy-day" boxes...*winks*


If you didn't already know, I have trouble throwing out stuff...you know, just in case. *LOL* So I store them in my "save-it-for-a-rainy-day" box/es. 

Ready to see the stuff in my boxes??? *dramatic music plays in the background*


Are those scallop shells? Yes. Those would make a great front and back cover of a mini beach vacation album right? I mean, I will get to them one day. I think. *winks*. And there's a mobile phone cover, old belt buckles, broken jewellery parts, electronic parts, old leather shoe bits...

Yep. Others see them as junk but I see them as possibilities...

I mean, I really use them in my projects...


A-mixed-media-canvas-that-lights-up
The mixed media canvas that lights up
For instance, I used one of those wheels from broken toys on this project...


Quick-paper-bags-with-found-objects
Quick paper bags with found objects
One of the old leather shoe straps was on one of these paper bags...

Mixed-media-canvas-with-found-objects1
Mixed media canvas with found objects
Mixed-media-canvas-with-old-lighting-parts
Getting to know my creative process
And I have used old lighting parts on these mixed media canvases...


What about you? Do you have a "save-it-for-a-rainy-day" box???


Share/Bookmark

Pin It

Tuesday

Quick postal-friendly decorated box...


Quick-postal-friendly-decorated-box-

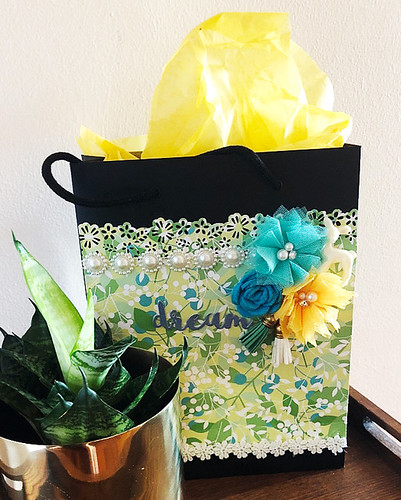
As much as I enjoy my dimensional and fanciful decorated boxes, sadly, the time has come for me to make some postal-friendly ones.  Mum has declared a "no more boxes for me" policy because 80% of my decorated boxes are hers (20% are given away with pressies in them). In all fairness, she's still using them all...even the ugly ones from my early crafting days. She has run out of stuff to store in the boxes! *LOL*

Well, I guess my bloggy pals will now get goodies in postal-friendly decorated boxes then.  Because I'm not giving up on decorating boxes! *winks*

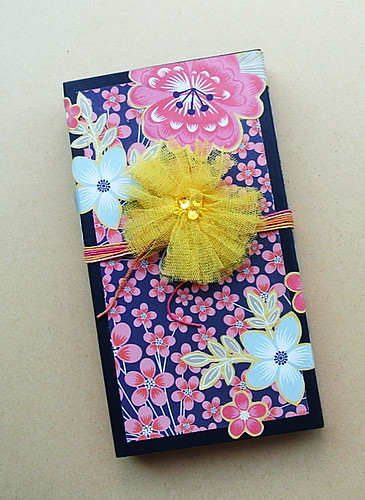
1. I started with a lovely Kikki K pull-out box.  I love how the pink flowers on the blue background contrasted with the checked design on the pull-out tray.

2. I cut the papers to size and ran the pieces through my Xyron Creative Station for an even layer of adhesive. Then I adhered the pieces to the box.

3. I fussy-cut some flowers and adhered them to the top and sides of the box.

4. I tied some twine around the box. 


Of course, it was just tooooooo flat for me. So I added a tulle bloom to finish off my box.  I glued the bloom to a paperclip so it is detachable.


Now, on to filling it with some goodies and sending it out!

Hope your week has been awesome so far!


Share/Bookmark

Pin It

Monday

The one about carrying Zoe (and not making her cry)


The-one-about-carrying-Zoe-(and-not-making-her-cry)

The last time I saw my niece Zoe (my cousin's daughter) was when she was a month old...which was back in July 2017. Now you know I have a thing for babies (ahhh...that baby smell) so I was pretty excited to see her when we went to my grandma's for the annual Chinese New Year reunion dinner. Of course, my uncle said that it would be impossible for me to carry her now that she recognizes faces and would cry if I tried...(insert sad music).


But you know me...would I give up on a chance to carry a cute little baby? Nah. 

Turns out that Zoe could be "bought"! *winks* All I did was play with her for a bit...gave her her fave biscuit and then I got to hold her! (insert triumphant music)


When I saw her again the next day, she was happy to see me and gave me the sweetest smile! :) Don't you just love a gummy (no tooth yet) baby smile?? My sister E looks so sweet in the photo too! 


Now the first photo was taken at night while the second was taken the next morning in daylight on different phones...since I couldn't get the lighting in the photos to match, I went with a coloured photo and a b/w photo instead. 


Finally used this circle chipboard in my stash on a layout...have been using it as a mask for misting for 3 years! *LOL*


Playing along with Stuck?! Sketches.


Share/Bookmark

Pin It
>
Related Posts Plugin for WordPress, Blogger...

LinkWithin

Pin It