Monday

The reworked Christmas tree


The-reworked-Christmas-tree

So I've never actually decorated a Christmas tree. Like ever. I was still using the one my bestie from secondary school made me years ago because it was small enough to fit into a bag and into my cupboard when I was done. All I had to do each year was take it out of the cupboard, fluff it up a little and plug in the lights and my Christmas tree was all set up! *winks*

But this year, it was clearly showing its wear and I even bought another one to replace it (see previous post Christmas projccts 2018). Of course, I had a change of heart and decided to see if I could rework it and give it maybe a few more years. *LOL*
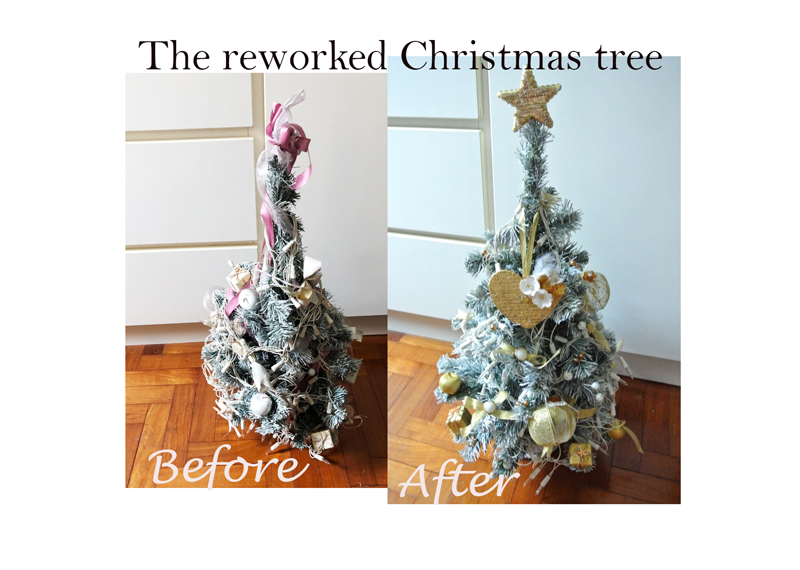
Now the tree was previously decorated with ornaments then spray-painted with white paint for a snowy effect. I managed to remove the hanging ornaments that had broken pieces/were discolored and what was left on the tree was sprayed painted "presents", apples and berries (Photo on the left).

My mum recently went to a Malay wedding and came back with 3 door gifts (they held candy) that  were perfect for ornaments on my tree.


The inspiration for the gold and white theme reworked tree came from this gorgeous handmade ornament from my bloggy friend Lisa Bzibziak


So I went in with the gold paint, bling and glitter of course. ;)
It took way longer than I anticipated but I love my reworked Christmas tree that looks really pretty when it's all lit up at night, in my room :)

P/s: Merry merry Christmas my friends! Enjoy the rest of 2018 and I will see you in 2019! Happy holidays! :)


Share/Bookmark

Pin It

Thursday

Christmas projects 2018


Christmas-projects-2018

Hello friends! As you know, I started on my Christmas projects very late this year but I still wanted to challenge myself to go with a theme...okay, okay to just use up my Photo Paper Play Mad 4 Plaid  Christmas paper collection. :)

So I present to you this year's handmade Christmas projects minus the handmade cards which have already been mailed out (and hopefully have reached the recipients ) and the clay Santa tealight holder (which is a prop).


Following my many attempts at snow globe making (as shared in my last post), I decided to just decorate the jar lid. 


Having decided that I will use stuff from my stash for all my Christmas projects except the absolutely necessary stuff (like the distilled water, glycerin and faux mushrooms), I was happy to find a stash of faux grass styrofoam "stones"(I used one in the snow globe project) that I could use as the grass patch for my red "mushrooms...and my Santa figurine (from a Christmas logcake).


I used a bigger one so that the moose (from The Gangster Gang's  (aka niece + nephews) toy stash could be part of the Christmas scenery. *LOL*


I also used one on my Christmas tree...can you spot it?


Yep...it is a whimsical tree! *winks*


Then there is also the throw-everything-on-a-box kind of gift box. Yes, I went overboard a little. Hahaha! 


Here is another upcycled box. With errr...fewer adornments. ;)

So right now all that is left is some baking to do.
What about you? Are you all set for Christmas?

P/s: The other projects have been shared in previous posts.


Share/Bookmark

Pin It

Monday

How to make a snow globe - tips and tricks (a tutorial)


How-to-make-a-snow-globe---tips-and-tricks

Every year  I tell myself to try out a DIY snow globe and I finally did! *pats self on back for actually doing it* 

There are just a few steps:
1. Glue elements to lid of glass jar.
2. Fill jar with water. Add glycerin. Add glitter. Stir mixture.
3. Screw back jar lid.
4. Enjoy your DIY snow globe.

How-to-make-a-snow-globe---tips-and-tricks


Tips and tricks (I learned the hard way!)

1. Distilled water 
You can use tap water if you like but distilled water has no minerals so you get a nice clear display).

2. Glycerin 
The addition of glycerin makes your "snow" flow slower.

3.. Waterproof glue for best results
Now this is really important because I started glueing down my elements with Glossy Accents and my elements started floating the moment I poured in the distilled water. 

How-to-make-a-snow-globe---tips-and-tricks

Interestingly, there are a lot of glues that are water-resistant but few are waterproof. Now, I didn't want to make a trip to the craft store so I winged it with my hot glue gun. 

4. Glitter
I just went with whatever glitter I had at home but you could try styrofoam bits if you have them at home.
How-to-make-a-snow-globe---tips-and-tricks
However, I did learn that there is such a thing as too much glitter which could totally get Santa and his goat into a glitter blizzard. *LOL*

5. Glass jars
At first I went with the standard jam jars but you can't really fit in much or see much. I like the large Nutella jar.

6. Ornaments for your globe
I went with recycled Christmas cake decorations and raided the Gangster Gang's (niece + nephews) toy box for some animals.
How-to-make-a-snow-globe---tips-and-tricks
Now, please do a water test on your "decorations" because incorporating them into your globe because I added some red  "mushrooms" and my water turned pink!

Overall, it was really fun albeit frustrating experience making a DIY snow globe. Have you tried making a snow globe?


Share/Bookmark

Pin It

Thursday

This kid (Nephew #1) drives me nuts...sometimes. *winks*


This-kid-(nephew#1)-drives-me-nuts

Yep. The kid (aka Nephew #1) is still here. Staying with us. Since September this year. Torturing his aunt (aka me) every night (when she's at home) with his incessant questions. And she has to be constantly be on her toes with each response lest it leads to more profound questions. *LOL*


Apparently, I am supposed to know everything. *winks*


But sometimes he's sweet and asks if I need a back massage. Or I can get him to fill up my water mug. Child labour can be pretty useful...hehe.


Playing along with Let's Get Sketchy.


Share/Bookmark

Pin It

Wednesday

When I wanted a die-cut but...this happened *winks*


Yes friends. This really happened. I wanted a die-cut to finish a project...and somehow it turned into a 5 hour die-cut marathon session. Clearly I have issues. *LOL*


And of course since I didn't want to waste any of the die-cutting scraps...this was followed with a serious punch-out session. This is normal behaviour for a crafter right? *winks*


Share/Bookmark

Pin It

Monday

Two more quick upcycled Christmas gift boxes


Two-more-quick-upcycled-Christmas-gift-boxes

Last week, I shared a quick upcycled Christmas gift box that I made using one of the three empty boxes my sister passed to me.  Here are the other two that I decorated.:)


Here is the empty box before the makeover. A really smart cardboard box design with handles for easy portability. 


Happy week ahead friends! :)


P/s: Can you tell that I'm just trying to use up this Christmas paper pack from Photo Play Paper? *winks*

Share/Bookmark

Pin It

Friday

The one about the Big Breakfast


The-one-about-the-big-breakfast

So the other day we went to McDonald's for breakfast and mum tried Big Breakfast for the first time.


When it came, she was most disappointed. She said it looked pathetic and unappetising. Plus it came cold because they didn't heat it up! *horror*


Here she is looking much happier after they came back with a slightly better version. *LOL*


Is the Big Breakfast in your region much more appetising than in Singapore? It's $7plus for the meal. Such a rip-off in my opinion for what you get. *LOL*


Playing with The Studio Challenges gold challenge. The patterned paper has gold-embossed details. I also added gold washi tape and gold brads.


Happy weekend friends!


Share/Bookmark

Pin It

Wednesday

A quick Christmas card


A-quick-Christmas-card1

Hello friends! This year I'm all about super quick Christmas cards that are postal-friendly. Every year my cards go out to the post office on the 4th of December because that's when postage rates for cards are half-priced! *woohoo!*


Enjoy the rest of your week friends! :)


Share/Bookmark

Pin It

Tuesday

A quick upcycled Christmas gift box


A-quick-upcycled-Christmas-gift-box

So the other day my sister happily passed me 3 of these cute empty cardboard boxes.

"I know you like empty boxes." she said.
"Eh...no. I like to upcycle boxes. But I would prefer them with gifts in them actually." I replied.

*LOL*


Oh well. The box is perfect for little Christmas gifts....like a mug with a hot chocolate + marshmallow pack. :)
Playing along with the Coffee Lovers Fall/Winter Blog Hop.


Share/Bookmark

Pin It

Monday

A girl from my travel sketchbook


A-girl-from-my-travel-sketchbook

Meet the girl from my travel sketchbook.
It was one of those sketches that started with a quick eye sketch (on the plane) that turned into a face sketch.

And then of course, I went all out into colouring of course.*winks*


Happy week ahead friends! :)


Share/Bookmark

Pin It
>
Related Posts Plugin for WordPress, Blogger...

LinkWithin

Pin It