Thursday

Fun colour combo on an upcycled mooncake box


Fun-colour-combo-on-an-upcycled-mooncake-box

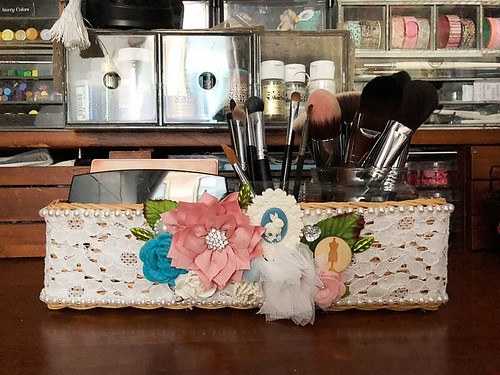
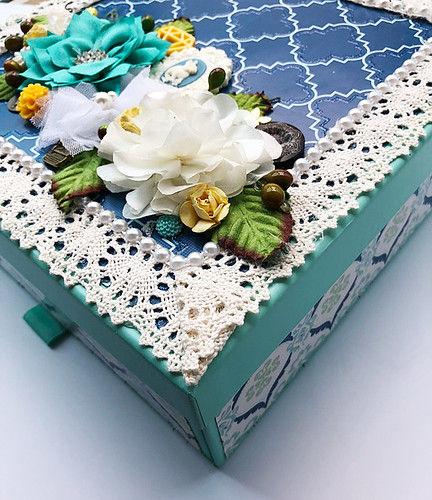
This was one of the loveliest mooncake boxes I'd gotten this year. The aqua box opens up via a pull-out drawer.  I decided to use a fun colour combo to decorate the mooncake box.:)


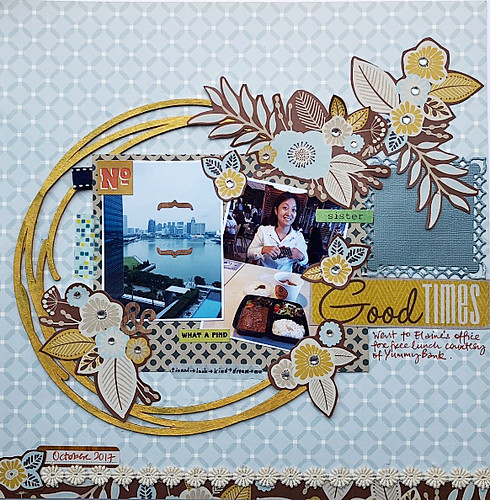
For the cover of the box, I created a "frame" with patterned paper and added a decorative lace plus pearl trim border before embellishing with pretty embellishments.


It was a fairly quick project since I used patterned papers from a DCWV stack (everything is coordinated). I just picked the ones I wanted, cut them to size and run them pieces through my Xyron Creative Station for an even layer of adhesive.


Then I whipped out my hot glue gun and just went crazy with the embellishing. I'm glad I was a little adventurous with this fun colour combo....those pops of yellow just make me happy! *winks*


Share/Bookmark

Pin It

Monday

The one about the free lunch


The-one-about-the-free-lunch

My sister is the "deal" queen. She's always discovering new value-for-money or even free deals! Last month, we enjoyed a free lunch courtesy of Yummy Bank. :)


Okay, so the view from her office is way better than the lunch. But it's free! *LOL*


Trying out a subtle colour scheme for a change....It's so hard! I soooooo wanted to add bright colours. 


I tried to compensate with gold-painted chipboard and clear bling. Did it work? *winks* 


Playing along with Stuck?! Sketches.


Share/Bookmark

Pin It

Wednesday

Makeup organizer


Makeup-organizer

So friends, I'm a little late to the game but I've just discovered the wonderful world of makeup! Now, I've been wearing the really basic stuff - a light foundation with high SPF, a little shimmer on the lids (you know I love my glitter!), a neutral blush and lipstick. But apparently, I've been missing out on stuff like bronzers, contouring and highlighting kits, eye liners and mascaras, finishing powders, concealers et cetera. 

Eh, I've amassed quite a few things in the last 3 months.*winks* 

Say hello to my makeup organizer. :)


It's just one of those old baskets lying around the house. The fabric covering it was looking a little worn so it was time for a makeover! Plus it was perfect for storing my makeup palettes and brushes. I covered it with remnant lace fabric...


And then embellished with my fave Maya Road embellishments.


Yeah, my niece S and I are addicted to watching YouTube makeup tutorials on Saturdays. The poor kid has to wait like a decade before she can touch the stuff though...*LOL*

I'm sure I will outgrow this little basket makeup organizer soon though. You know how I am when I get obsessed...and makeup is essentially art supplies for the face right? *high fives all around*

P/s: Sorry for the late post this week, having some technical issues uploading my camera photos to my Mac. These are iPhone photos.


Share/Bookmark

Pin It

Thursday

How to use seemingly disparate elements on your layouts (part 2)


I love using bits of found and random stuff on my projects and try to make them "work" somehow. I shared my tips on how to use seemingly disparate elements on your layouts back in August. Here is Part 2.

My-little-helper
My little helper

1. Use a dark grounding colour to help guide the eye across the layout.

On this layout, I repeated the black paper strips as markers to guide the eye across the photos right down to the titlework and journaling.

Three-boys,-a-girl-and-a-fire-hydrant
Three boys, one girl and a fire hydrant
2. Create a "frame" with your elements.

Here I used the chipboard pieces - the hexagon ones and the birdies - to "frame" my photos.

Layered-stencils-layout-by-Yvonne-Yam-for-The-Crafter's-Workshop
Mixing the new with the old
3. Go with the visual triangle.

On this layout, I played with the visual triangle in a couple of ways  - a. I placed the photos within a triangle; b. The fussy-cut big blooms form a triangle to "frame" the photos; c. There are triangles in the misted background design. 


At-last
At last
4. Play up a shape by repeating it on your layout.

Repeating a shape on your layout helps to tie everything together somehow. Here I used the circle shape - in the photos, the buttons, the circles on the misted background, the circles on the polka-dotted washi tape. 


Why-we-need-an-umbrella-indoors-The-McCafe-Story
Why we need an umbrella indoors: the McCafe story
5. Make it look like an advertisement.

Incorporate a product shot (the food) and a user shot (my mum), throw in a testimonial ("It's so sunny in here!"), a summary of the main selling features (#1 - 3), a caption to draw the viewer in (The McCafe story) and finish with some happy elements (bird and flowers) and colours.


The-red-bean-cake
The story about the red bean cake
6. Use one colour to guide the eye.

It may not be obvious here since my layout is so colourful but I used the hot pink throughout the layout as a visual marker for the eye (the chipboard flowers, the ribbon center and sides, the scroll chipboard, the ticket tab).


Layout-by-Yvonne-Yam-for-Maya-Road-Ruby-Rock-It-Swap
A layout by Yvonne Yam for Maya Road/Ruby Rock-It swap
7. Go with the pinboard format.

You know how it is with your inspirational board at home - you just put stuff you like on it. Apply it to a layout and you have a bunch of random stuff that somehow works together! *LOL*


There you have it. Another 7 ways to use seemingly disparate elements on your layouts. Do you use any of them?


Share/Bookmark

Pin It

Monday

Quick Christmas gift bags


Quick-Christmas-gift-bags

Well, it's that time of the year again. When I go "shopping" in my cupboards and start wrapping up my Christmas gifts. Yep, I'm one of those who does my shopping for gifts throughout the year, rather than during the holiday season. 


This is also the time of the year when I clear my inventory of boxes that I've collected during the year (from consumer packaging). If the gift fits in a box, it gets wrapped up in the box. If it is odd-shaped, I have these upcycled Christmas gift bags handy. :)


This year, I'm sticking to traditional Christmas colours because I really want to use up these Photo Paper Play patterned papers. I did jazz this one up with washi tape, ribbon...


And glitter paint!


Of course, a little "bling" for the other bag.

Have a great week ahead friends!


Share/Bookmark

Pin It

Friday

Chocolate spells love in any language...


Chocolate-spells-love-in-any-language

So we celebrated yet another birthday in the Yam family. Nephew #1's birthday. Notice the same banner in the photo as when we celebrated nephew #2's birthday last month? Yep, it has been up for a whole month! *hahaha*


Since chocolate spells love in any language *winks*, I went with a chocolate cake. Evidently, the right choice judging by the beaming birthday boy. :)


Of course, the first thing the Gangster Gang (aka nephews + niece) asked was, "Where are the pigs?"
That's because I had previously showed them a picture of the Pigs in Mud Kit Kat Birthday Cake. Yeah, the fave aunt kinda "underperformed" here. *hangs head in shame*


But you know me...it was no basic cake - it was a 3 layer chocolate mousse cake! The kit kats were just there to hide my lousy icing skills. Seriously, icing a cake is really hard...so I always describe my cakes as rustic-looking. *LOL*


Well, the rustic-looking cake was a hit! *high fives all around*


And I did finally get a decent shot of the Gangster Gang using the classic works-all-the-time trick...."no chocolate cake for you if I don't get a nice photo!" 

Yep, always works. With chocolate. And cheese. 


Playing along with Stuck?! Sketches.


Share/Bookmark

Pin It

Tuesday

The pile-it-on card


The-pile-it-on-card

So this was one of those cards that started out really simple....at least in my mind...*LOL* But then I kept piling stuff on it.


Like at first I just wanted to incorporate the deer but then I thought it might get lonely so I added a bear (it's vegan!...hehe).


Then I added the twine and it called for some buttons...and then lace trim. You know how it is. *winks*


I tried stamping and totally screwed up so I added the wood token to cover it up. *Shh...don't tell on me.*


So there you have it, my pile-it-on card. ;)

Happy week ahead friends!


Share/Bookmark

Pin It

Friday

22 ways to rock the grid-style format


A grid-style format  is my fave go-to layout format styles especially when I have to fit in a bunch of photos on a scrapbook layout. It is composed of a series of intersecting vertical and horizontal lines that help guide the eye across the layout in a natural way. We see this format in a lot of print advertisements and web pages.

Here are 22 ways to rock the grid-style format on your  scrapbook layout....

The-one-with-a-lot-of-brads
The one with a lot of brads


Board-game-fun
How to scrap the not-so-great photos
New-friend
Someone got a new friend


One-minute
One minute photos

Fun-monsters
Fun monsters


Follow-the-signs-layout-by-Yvonne-Yam-for-The-Crafters-Workshop
Follow the signs

Party-time
A challenge to not get my hands "dirty"

Rice-only
Rice only?

Shy-guy
The one about the shy guy


Where-is-the-bus
On a bus adventure


Saturday-photo-love
Want to win a shopping spree at Top Dog Dies?


Master-of-disguise
Meet the master of disguise


Great-outdoors
Projects for Made With Love

Never-a-dull-moment
Never a dull moment when these two are around


Happy-SRM-stickers-layout
Happy miss sunshine with her milk-drinking pig!

The-best-ride
The story about the cable car ride


Clay-dinosaurs
The one about the clay dinosaurs

Star-tortoise
The story about the star tortoise


Funny-story
Funny story


New-playground
The new playground


Boys-rule
I love hanging out with the boys!


Cute Sophie
That sweet smile and flat nose

So there you have it, 22 ways to rock the grid-style format on your scrapbook pages. I know I cheated a little by tilting some of the photos to create more interest but for most part, you can "see" the grids. It is one of the most versatile layout formats you can use on scrapbook pages and it looks even better double-page spreads.

What about you? Do you enjoy the grid-style format?


Share/Bookmark

Pin It
>
Related Posts Plugin for WordPress, Blogger...

LinkWithin

Pin It