Thursday

Baby girl gift box (a tutorial)


So one of my cousins (who married a French dude) is having a baby girl....so I got her a few baby pressies (you know me, always to striving to be every kid's fave aunt...*winks*) that of course, had to be housed in a cute gift box too. :)


I started with a pink gift box from Kikki K that I covered with pink baby girl patterned paper (I knew I was hoarding this for a reason! Haha!). I measured the papers, cut them to size then ran them through my Xyron Creative Station for an even layer of adhesive. Next I went in with some Maya Road pearl trim along the edges of the box.


I really wanted to use this ornate Maya Road frame so I decided to make my own little embellishment using a birdie sticker (poor birdie had to be cut down to size to fit the frame) and Ranger Glossy Accents.


Next I added coloured threads to the mini spools.


Once I was happy with the embellishment cluster arrangement, I stuck them down with a hot glue gun.


It turned out quite sweet, eh? :)


Share/Bookmark

Pin It

Monday

The one about the photobomber...


The-one-about-the-photobomber

When we went to Universal Studios last month, the Gangster Gang (aka niece + nephews) went to Raptor Training School (you know, training a very fake dinosaur with a clicking device and hand movements......yes, nephew #1 was rolling his eyes at how lame it was! *LOL*)


Of course, they graduated with "flying colours" *winks* and I asked the training instructor to take a photo with them. 


This cute kid who also "graduated" from the class was quick to jump in front of the Gangster Gang the moment I whipped out my phone to take a photo! Hahahaha!

And the photobomber's stance is right on point!


Check out the second photo with the puzzled expressions on #2, #3 and #4's faces! Of course, #1 is still smiling sweetly at the camera (he was trained by the best...aka me!)


Playing along with Sketchabilities


Share/Bookmark
Pin It

Friday

What's new in my life (July/August 2018 edition)


Hello friends! I'm still fiddling around with the art supply placements in my creative space but I think I'm almost done. And since there appears to be some empty space...


I got me some new pens! *winks*

And since it can get lonely crafting by myself...I now have a Digital Assistant to tell me weird things I want to know but am too lazy to check on Google. *LOL*

I'm currently obsessed with this pair of shoes I got from Zara (when I was in Taipei last month). Yes, you can tell that I like drama in my shoes too! :)

Of course, since I love drawing and colouring eyes...I can't neglect the ones on my face right? Meet my new eye shadow palettes (aka art supplies for the eyes). :)

What about you? What's new in your life?

Happy weekend friends!:)


Share/Bookmark

Pin It

Thursday

Quick decorated kraft bags...a tutorial


Quick-decorated-kraft-glassine-bags

I am packing a gift box of scrappy goodies for a friend I'm meeting next week and decided that everything in the decorated box needs to be packaged in decorated kraft bags as well. You know, because I'm so extra. *winks*

Here's a quick tutorial on how I made these super quick decorated kraft bags.


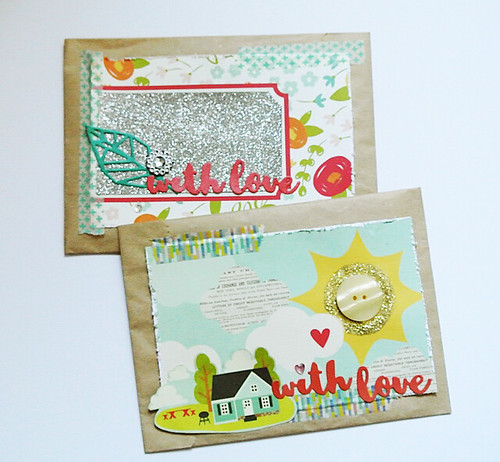
I made the kraft bags reusable by sealing the opening with washi tape and also attaching the "decorated" portion with washi tape to the kraft bags so that the recipient can re-use the kraft bags as they are or add their own design to them


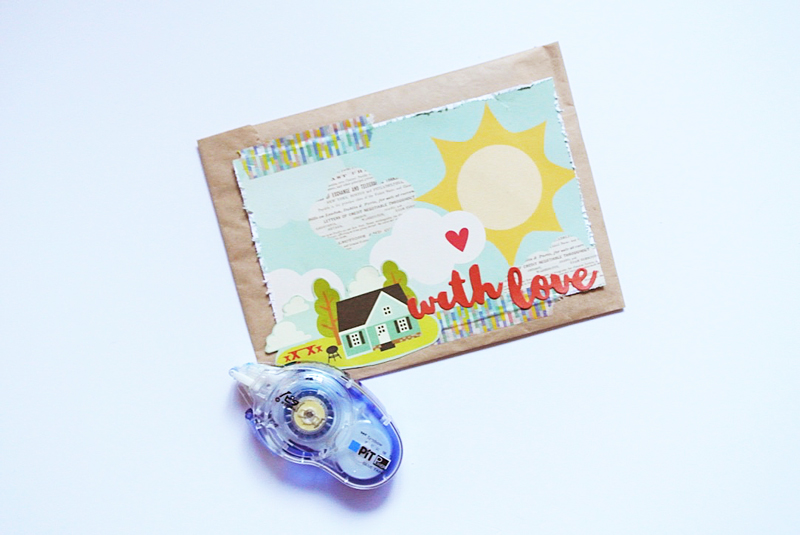
Pick a fun piece of patterned paper, cut to size and distress the edges to create a little texture.


Next, I attached the patterned paper piece to the kraft bag using washi tape. 


Then I added another piece of patterned paper and the die-cut "with love".


I finished this bag with a heart bling, a button and gold glitter.


For this second bag, I kept it even more simple but used the same "elements" to create a little cohesiveness between the decorated kraft bags.


As with the previous bag, I started with a piece of patterned paper that I distressed to create texture.


Next, I adhered to the kraft bag using washi tape.


This time, I skipped the glitter glue and went with glitter cardstock instead. I went with a leaf die-cut as an extension of the patterned paper design and used the "with love" die-cut sentiment to ensure cohesiveness between the two decorated kraft bags.


I finished by adding some bling.

There you have it....quick decorated kraft bags. :)


Share/Bookmark

Pin It

Tuesday

I may have a thing for purple lips...*winks*


I-may-have-a-thing-for-purple-lips

So I may have a thing for purple lips, methinks. 
Just the other day, I bought two purple lipsticks.  Not that I'll be wearing them much. They make me look errr...unapproachable. Okay, that's putting it mildly...I look scary to me. Like if I saw myself, I would rather get lost than ask me for directions kind of scary. *LOL*


Since I can't pull it off in real life, I shall live my purple lips vicariously through my sketchbook. *winks*


Here are the supplies I used for my purple lips.

What about you? Can you pull off the purple lipstick look? ;)


Share/Bookmark

Pin It

Monday

We went to Universal Studios Singapore!


We-went-to-Universal-Studios-Singapore

Yep...last month we went to Universal Studios Singapore for a night of fun (5pm -1am)!


Nephew #1 is officially taller than his aunt E! Nephew #3 still wants to hold my hand most of the time. :)


Check out the pathetic dinner we had that cost S$30 (US$22) - 2 hot dogs on buns, 2 sodas and 2 small packets of Lay's potato chips! Luckily we had coupons to cover the cost!*LOL*


I had a field day using The Crafter's Workshop die-cuts from last week's marathon die-cutting session....perfect for "framing" photos. :)


The sticker stash also saw some action! *winks*


Playing along with Let's Get Sketchy.

Happy week ahead friends! :)


Share/Bookmark

Pin It

Wednesday

The world's most overloaded Raskog cart...*LOL*


Hello friends. Meet my hardworking Raskog cart - possibly the world's most overloaded Raskog cart ever. Not only does she hold a three-tier stand of mediums on her top layer but she also has added weightage on the sides of every layer.

I know. I have serious issues. *LOL*


Share/Bookmark

Pin It

Tuesday

The one about the Vidal Sassoon hair...*winks*


The-one-about-the-vidal-sassoon-hair

So I got to spend time with nephew E last Sunday...he was showing off his Vidal Sassoon hair flip move to me. *LOL*


Isn't he cute??? And so generous with his kisses that day too. *winks*


I decided to challenge myself to use as many die-cuts as I could on this layout.*High fives all around*


I found some "never-used-before" dies in my stash and went for a marathon die-cutting session while catching up on a whole week of Masterchef Australia.:)


Playing along with The Studio Challenges.


Share/Bookmark

Pin It
>
Related Posts Plugin for WordPress, Blogger...

LinkWithin

Pin It