Tuesday

The lazy crafter's decorated box (a super short tutorial)


The-lazy-crafter's-decorated-box

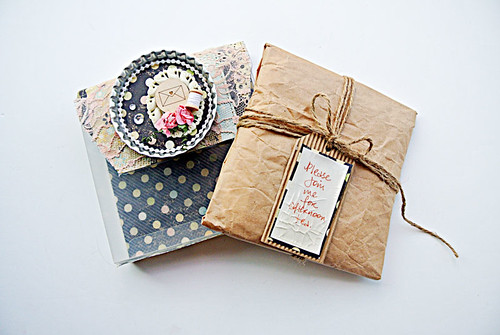
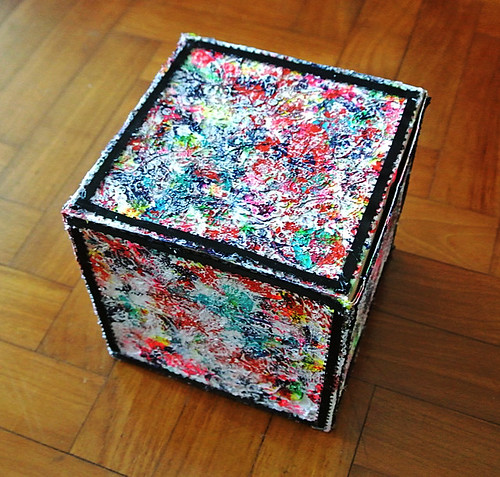
Let's get real. Sometimes you just don't want to spend too much time decorating a small box.  That would be given away. I'm talking about me of course...you know the lazy crafter..always thinking of ways to significantly shorten the labour process. *winks*


First, let's meet the box - a sturdy one I got from my recent stay at the ShangriLa Hotel in Kuala Lumpur. It's the Welcome box filled with dark chocolates that you get in your hotel room. (Well, you know my love for sturdy boxes...evidently it had to come back with me on the plane...*LOL*)

So I trimmed a piece of patterned paper from my stash and ran it through my Xyron Creative Station for an even layer of adhesive.


I used a Maya Road diecut as a base structure and covered it with Ranger Stickles in gold. It's a quick way to make a project look like you put in just that little bit of effort. Because glitter always makes everything look better. :)


Add two cute ducks, recycle an "Open me" sticker from happy mail packaging and the lazy crafter's decorated box is complete. :)
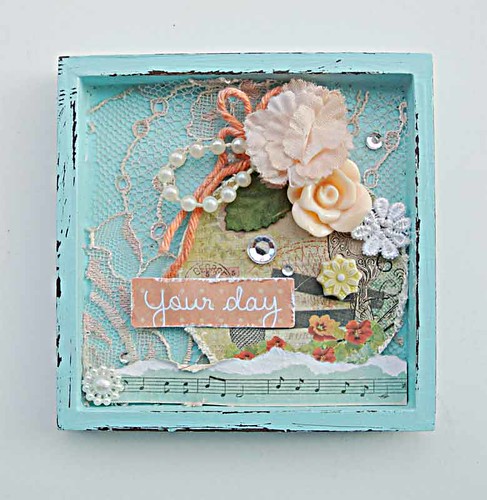
Isn't it cute???


Share/Bookmark

Pin It

Monday

First attempt at a ballpoint pen eye drawing using Staedtler ballpoint pens


First-attempt-at-a-ballpoint-pen-eye-drawing using Staedtler ballpoint pens

I was inspired to attempt a ballpoint pen drawing after seeing some incredible artwork done with ballpoint pens. (Yep, I did my first drawing on a credit card bill envelope...you know me, I recycle everything...*winks*)

First-attempt-at-a-ballpoint-pen-eye-drawing using Staedtler ballpoint pens
I picked up this pack of 10 colourful ballpoint pens from Staedtler (S$5 from Popular Bookstore).

First-attempt-at-a-ballpoint-pen-eye-drawing using Staedtler ballpoint pens

So...my initial thoughts on ballpoint pen drawing?

It isn't that easy to layer on the inks...you would need a scrap piece of paper to clean the pen nibs as you can get a bit of buildup once you start drawing. You need to start with the light colours because once you go dark, there's no going back. Keep your pen strokes consistent to avoid the messy pen stroke disaster I created. If you want to give this a go, buy a larger variety pack....several tones of each shade can help create depth in your drawings. I think I might bring some colourful ballpoint pens on my next flight. :)

Happy week ahead friends!


Share/Bookmark

Pin It

Friday

10 fun ways to use twine on your projects


Twine is such a fun way to add a bit of texture and a pop of colour to a project without adding bulk. Here are some ideas on how you can utilise twine on your projects. :)

Layout-by-Yvonne-Yam-for-Maya-Road-and-Simple-Stories-blog-hop
Double page spread for Maya Road/Simple Stories Swap

1. Tie across your photos for a decorative edge.

This is a great way to create unity and cohesiveness between pages on a double page spread.


Sail-away-on-a-carefree-day
Sail away on  carefree day

2. Use it on a tag on a card.

Loop your twine for a decorative finish.

Shabby-chic-magnet
Shabby chic magnet

3. Let it be part of your embellishment cluster.

Add a little twine to create texture and interest on your embellishment cluster.

Come-join-me-for-afternoon-tea6
Join me for afternoon tea

4. Wrap your package with twine.

Plain old (recycled) brown paper packaging looks a whole lot better with twine and a little tag.:)

Layout-for-Maya-Road-by-Yvonne-Yam
An obsession with frames

5. Use your twine for a photo banner.

Create a fun photo banner with twine. :)

Altered-box-project-for-Maya-Road-and-Xyron-swap-by-Yvonne-Yam
Altered box for Maya Road/Xyron Swap

6. Try making a  "twine on a spool" embellishment.

Such a simple way to add a whimsical element on your project.

Baby-boy-paper-bag
Baby Boy Paper Bag for LESSology

7. Braid your twine to make paper bag handles.

Customize your paper bag handles to match your decorated paper bag.

The-lazy-person's-wreath...
The lazy person's wreath

8. Use it to make a decorative wreath.

It is time-consuming but totally worth the end results.:)

Dinner-layout-by-Yvonne-Yam-for-Maya-Road
When art imitates life

9 Use them in multiple rows for a cool textured border.

Try 2 different colours of twine for a "patterned" paper look.

5-minute-Christmas-card
The 5 minute Christmas card

10. Create a mini wreath on a card.

Twirl some twine into a circle and you have yourself a cute "wreath" in seconds. Perfect for a 5 minute Christmas card.


There you have it....10 fun ways to use twine on your projects. What is your fave way of using twine?


Share/Bookmark

Pin It

Thursday

A girl from my sketchbook


A-face-from-my-sketchbook

These days when I get on the plane, the first thing I do (once I'm all settled and buckled up of course!) is to flip the airline magazine and find a muse to draw on my flight.  

You know copying is not my forte (*winks*) so I just use the photo reference to guide the face shape, the placement of the eyes, the angle of the chin...etc.

Now if you have ever tried coloured pencil drawing, you would know that it takes a really really long time.  The first picture in the collage shows the progress I made on a 4.5 hour flight...including a meal, a short nap and 4 episodes of Designated Survivor. *LOL* The next few pictures shows the progress over several days. :)


What about you? What's the first thing you do when you are all seated on the plane? 


Share/Bookmark

Pin It

Tuesday

The "heat" wave adventure *winks*


The-heat-wave-adventure

So last Friday, my dad, sister and I had a little "heat" wave adventure at Sichuan Kungfu Fish - a restaurant that serves spicy Szechuan food. 


You know I love "heat" in my food (even though I know when I meet my bloggy friends in real life, we'll probably be sticking to ketchup...lol) so I was looking forward to the Mala soup base.


The fish came in a fish-shaped pan with a burning flame to keep the dish hot. Check out my dad "fishing" with his chopsticks! *winks*


The verdict? It was spicy but not "tearingly" spicy.  :)


Playing along with Sketchabilities.


Share/Bookmark

Pin It

Monday

The Plain Box Society (a tutorial)


The-plain box society-by-Yvonne-Yam  

So I've joined a bunch of creatives led by the awesome Tina Walker to decorate a plain box with StencilGirl stencils.:)

Now, all we had to do was use a StencilGirl stencil to decorate a plain kraft box...seems simple enough but to tell you the truth, I struggled with this project. And the amount of time we were given to complete this project made it worse. As in we were given months to do it....and my ideas would change from day-to-day and as people shared their awesome projects on a private FB group, the project got a little more daunting.

I did wait till two weeks before the project deadline to start work on my project because a looming deadline always gets my adrenaline pumping...*LOL*

In the end, I decided on "making" my box practical so that I could fill it with something and give it away. :)


The plain box was very lightweight so I went in with a layer of scrunched up wrapping tissue and gesso to add a little bit of texture as well as "strengthen" the box in preparation for the addition of mediums.

Let the surfaces dry naturally. (I know lots of artists use a heat gun to speed up the process but do it in small bursts if you need to and don't get the surface too heated up because you might inhale the chemical fumes.)


Once the gesso has dried, I went in with the StencilGirl Medallion Stencil and Golden Fiber Paste. The Golden Fiber Paste has the look of handmade paper and offers a rough, flexible surface that readily takes in wet media.


Then it's free play with the acrylic paints!


Once the acrylic paints were dry, I went in with some gesso to really bring out the raised textures on the box.


I finished with black ribbon border on each side of the box.

I love that it folds flat and I can store it in my gift box drawer, all ready for the next "I need a gift box" emergency. :)

Check out the other projects!


Share/Bookmark

Pin It

Thursday

7 ways to use mists on your projects


I love using mists on my projects. They are a great way to create interest without bulk and the metallic ones add a lovely finish to your completed work. Of course, getting overzealous with your mists creates muddy colours so use them sparingly. *winks*

Here are 7 ways to use mists on your projects....

My-fun-family
My fun family

1. Ink splatters

Ink splatters add dynamism to your project without detracting from your main subject matter so try a few of them on your projects.

My layout is already very colourful but the ink splatters really help to convey the birthday party vibe.


Fall-inspired-mixed-media-tag
Fall-inspired mixed media tag

2. To intensify the colours already present on your projects.

Keeping to the same colour family creates harmony on your projects and is a great way to further intensify the colours already present so you end up with a really eye-catching finished product.


So-we-won-tickets-to-see-Kooza
So we won tickets to see Kooza
3. To serve as a colorant for adding fun elements to your background.

Add some fun stencilled background with mists to add a whimsical touch to your background.

These photos were taken at a circus so I thought a mish mash of unexpected elements played well to the theme.

More-messy-backgrounds-in-my-art-journal1
More messy backgrounds in my art journal

4. To add tons of colour to your background.

Wait for each layer to dry before adding more mists and you can get a really artistic and colourful background.


Celebrating-July-mahjong-marvels
Celebrating July's mahjong marvels

5. To add texture and interest without bulk.

Layer on a few stencils and create interesting backgrounds that look textured but don't actually add bulk to your finished project. Perfect for relatively flat layouts. :)

Best-wishes-mixed-media-card
Another overdone card

6. For a lovely overall sheen on your project.

You can add a subtle sheen to your projects with some light misting in the background.


A-latte-love
A latte love card

7. Create your own "patterned" paper.

Don't have any patterned paper that matches your embellishments? Create your own with stencils and mists that coordinate with your embellishments. 


There you have it. 7 ways to use mists on your projects. How do you use mists on your projects?


Share/Bookmark

Pin It

Wednesday

Workspace Wednesday: new additions! *winks*


Hello friends! I was in Taipei last week...you know, the land of cute stuff?? And as hard as I tried, I could not resist picking up some cute stuff. Can you spot them on my desk??? *winks*


I bought a LINE Friends dustbin! I got Cony - the white rabbit! Isn't she cute??? Of course, I haven't actually thrown any rubbish in it because I don't want to get her dirty! hahaha!


And a couple of cute pens! Yes...just 3!


And two cable protectors like this one.  (Yes...I love my rabbits!)

What about you? Have you added some cute stuff to your stash recently???


Share/Bookmark

Pin It
>
Related Posts Plugin for WordPress, Blogger...

LinkWithin

Pin It