Showing posts with label drawing. Show all posts

Thursday

My attempt at a quirky bird *LOL*


No my friends, your eyes are NOT playing tricks on you. Your gal here has attempted a quirky bird in here art journal, totally inspired by @willowing. *winks*


I know that it's so different from my usual style. The quirky bird is so 2-dmensional and anatomically inaccurate. I did try to give her a little more dimension though some shading. Can you tell? *winks*


Of course my birdie had to wear mascara to define her lashes. *LOL*


I started with a rough pencil sketch, went in with watercolours for a base coat of colours, then went in with acrylic inks for more intensity inn the colours. I finished with paint markers and colours pencils. 

What do you think? 


Share/Bookmark

Pin It

Wednesday

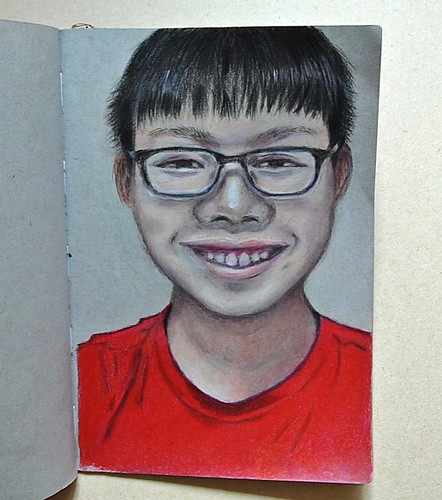
Another self-portrait from my sketchbook


I haven't been drawing much of late. This was a self-portrait I started back in December 2019 (over a few lunch breaks aka art-on-the-go sessions) and finally added the finishing touches over lunch yesterday. *winks*


I struggled a lot with this one due to my lack of practice...can you tell? *LOL*


Definitely working on mastering hair in 2020. Usually I'm too tired from "fixing" the face...*hahaha*

(Prismacolor Premier Colored Pencils and Uniball Signo White pen on Strathmore toned gray sketchbook.)

Hope you are having a great week so far my friends! :)


Share/Bookmark

Pin It

Thursday

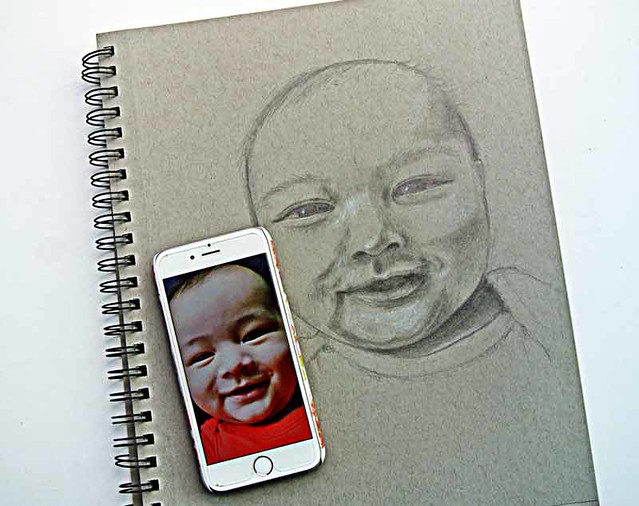
The process of drawing my niece Luna in my sketchbook (tutorial)


Back in February, I shared that I was drawing my niece Luna in my sketchbook. Just discovered the process photos on my phone (when I got a warning that I'm running out of storage on my iPhone and got busy deleting my many food photos...you know, the bulk of photos on my phone..*winks*) so I'm sharing them today.

Disclaimer: I didn't go to art school...learned how to draw from a few online classes, reading a bunch of old art books at the library and practising on my own for the last few years. I wasn't the kid who was always sketching. I learned how to draw as an adult. So my "process" may not reflect the proper way one should approach a drawing. 


I started with a rough sketch in graphite pencil. Lots of artist books will tell you that the more accurate your sketch, the easier it would be to complete your drawing. And I agree. But that takes a long time for me so I just wing it and go for rough placement of features. *LOL*


Once I'm happy with my sketch, I take a kneaded eraser and go over my sketch to lighten the pencil marks because graphite does not play well with coloured pencils. Then I go in with my coloured pencils to draw the eye...because that's my fave feature. :)


I like to work on toned paper (this one is Strathmore Toned Gray sketchbook) rather than white paper because it saves time. The toned colour provides the baseline for the midtones that allows you to push either darker or lighter values in your drawing. If you work on white paper, you have to work from light to dark which takes a lot more time. (Now you know why artists tone their white canvases before painting..;)


At the beginning of your drawing, you want to be light-handed with your coloured pencils. Coloured pencil drawing is a rather slow medium and requires many layers of pigment to reflect the colour you want from your drawing. 

Also, when you colour lightly, you can easily erase your mistakes without ripping a hole in your paper. 

Understanding basic colour theory will help you greatly in choosing the mix of colours to use. I used the Faber Castell Polychromos for this sketch.


I like to repeat the use of certain colours throughout my drawing so that there is cohesiveness and harmony in piece.


If you like a smooth paint-like finish to your drawing, you can burnish your drawing with a colourless blender or a solvent (rubbing alcohol, acetone nail polish remover, odourless mineral spirits or turpentine) before fine-tuning the details. It would remove the graininess of your drawing. Personally, I don't like using the solvents and burnishing is hard labour. Plus I actually like the raw grainy look of a somewhat "unfinished" drawing like all of mine...hahaha. 


For the highlights, I like to use a white paint marker/gel pen.


If you were wondering why I didn't complete the drawing based on the photo, it's because I got tired. I mean this took many many days. Plus nobody will know that once I cut the piece out from my sketchbook and put it in a nice frame. Except you. But you won't tell on me because we are friends right???


Share/Bookmark

Pin It

Monday

Drawing nephew #1 with coloured pencils


Drawing-nephew-#1

So I'm venturing into drawing the male species now apparently. *faint applause*
And "victim" #1...err I mean male subject #1 is none other than nephew #1. :)


Just to prove that the kid wasn't strong-armed into it, here's a photo of him with his in-progress likeness. *LOL*


I started off with a pencil sketch (on Stathmore Toned Gray A5 sketchbook) that looked nothing like him (let's not include an incriminating photo..*winks*) before getting in with some coloured pencil action. I whipped out my Holbein Artists Colored Pencils for this.


It took a really really long time (a few hours each night for a week or so) to "complete" this drawing because I wanted to only use coloured pencils instead of "cheating" with mixed media supplies. 


Yes, coloured pencil is a very slow medium to work with because it takes a lot of layers to create tonal effects.


"That actually looks like me!" exclaimed nephew #1.


Well, I'm off to find my next male"victim" to draw. :)

Happy week ahead friends!


Share/Bookmark

Pin It

Just a girl from my sketchbook


Just-a-girl-from-my-sketchbook

The best advice I got on drawing faces actually came from a beauty consultant at a Laura Mercier counter. Of course, she was teaching me how to "draw" on my face to enhance my features. I took the principles I learned about highlighting and contouring my physical face and applied them to my drawings. :)


Anything that is light and bright draws your eye in...anything that is dark recedes to the background.
Some in-progress shots. 


There you have it. Just a girl from my sketchbook.


Happy week ahead friends!


Share/Bookmark

Pin It

Thursday

An unhealthy obsession with watercolours...


So I may have an unhealthy obsession with watercolours....*winks*

I can pinky swear that I have not bought any watercolours since my trip to Japan earlier this year .... but that's because I bought a whole lot when I was there *see picture for evidence*.

Yes, that's just the stash I got in Japan...I also have the German Schmincke, the French Sennelier, the American Daniel Smith...and a whole lot of those craft-grade stuff too. Hence, an unhealthy obsession with watercolours.

An-unhealthy-obsession-with-watercolours1

What watercolours offer is the captivating interplay of brilliantly transparent pigments in water spreading over white watercolour paper. Sometimes you lose control of them like in my eye painting when I spilled water over the iris when it was still wet...*dramatic music plays in the background*.

Purists say that it is an unforgiving medium because when you go too dark, it is hard to "lift" the pigment off the paper. And that the white should not be painted in as an afterthought, it should be the white from the paper. Yes, you have to control the amount and flow of water, the transparency of the pigments and keep parts of the paper white.

Luckily, I'm a mixed media kind of girl so I saved my painting with coloured pencils and a white acrylic marker....who has time to apply masking fluid, right? *LOL*

What about you? What is your unhealthy obsession??


Share/Bookmark

Pin It

Tuesday

Coloured pencil eye drawings


Coloured-pencil-eye-drawings

Hello friends! Just wanted to share some coloured pencil eye drawings I did recently. :)


Yes, if we ever meet in person, please pardon my intense gaze into your eye...I'm just checking out your iris! *LOL*


I wasn't one of those kids who drew and coloured everywhere they went but I'm an adult who does that now. How's that for a delayed childhood activity? *hahaha*

Share/Bookmark

Pin It

Monday

A sad girl in watercolour...


A-sad-girl-in-watercolour

Meet my sad girl in watercolour. At least this time, it was intentional. *winks*


Of late, my drawn/painted girls have started to look the same to me and I wanted to challenge myself to try something different.


And of course, try it in just one medium - watercolour.


Which was quite challenging for me since I always use one medium on top of another to cover up my mistakes. *LOL*


Still lots of room for improvement but at least she looks a little different from the other girls in my art journal. :) 

Happy week ahead friends! 


Share/Bookmark

Pin It

Tuesday

Drawing practice


Drawing-practice

So my cousin's husband has been flooding his social media feed with pictures of this little cutie. How adorable is this little boy, right? Well, his auntie [aka me] decided to attempt to do a pencil drawing of him. I say attempt because I know it doesn't really look like him...*LOL*


My mum was like..."Why did you make the 5 month old kid look like an old man?"

Haha...oh well, I guess it's back to more drawing practice. :)


Share/Bookmark

Pin It

Monday

The eye: 2 ways


As you know, I have an eye drawing obsession. I love how detailed you can get with the iris and the reflections. :) Last month, I went back to basics and learned how to draw the eye with graphite pencils on gray toned paper [along the way, I got side-tracked and drew a bunny, a dog,  a cat and a fox - see them on my Instagram account]. It's amazing what one can achieve with just a few pencils, a tortillon and an eraser.

If you are interested in drawing an eye with graphite pencils, have a look at this video tutorial by Matt at The Virtual Instructor...


I like that he not only demonstrates his techniques but also shares why each step is important in building up a range of values to create a realistic-looking eye in graphite. I have learned a lot from his video tutorials.


But you know I can't stay away from colours for too long so I tried an eye with Rembrandt soft pastels, blending with a tortillon and my fingers. And added the eyelashes with a pastel pencil.

Again, I was inspired by Matt at The Virtual Instructor...check out this awesome video tutorial.


Yes, I know my eye drawings are nowhere like Matt's...even the angles are different but you know how I am about copying stuff...*winks* For me, I like to learn techniques and implement them in my own way. 

Happy week ahead friends...I was travelling last week so I'll catch up on your blogs this week!


Share/Bookmark

Pin It
>
Related Posts Plugin for WordPress, Blogger...

LinkWithin

Pin It