Showing posts with label coloured pencil drawing. Show all posts

Thursday

Thursday's desk- back to colured pencil portraits


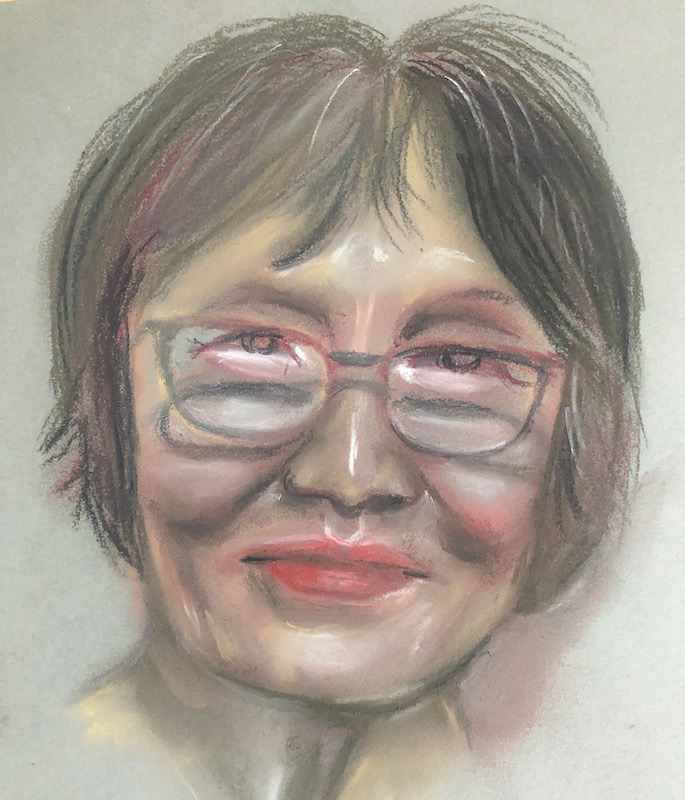
So this gal is dipping her toes back into coloured pencils portraits...and the progress is slow. *LOL*

But it's a new sketchbook and the hardest part (the first page) is done. Let's fill up this sketchbook! :)


Share/Bookmark

Pin It

Monday

Silkie Chicken in coloured pencils


Saw the Silkie Chicken at the zoo recently...so I tried drawing one in coloured pencil on grey toned paper. :)

Share/Bookmark

Pin It

Wednesday

Workspace Wednesday - a face from the sketchbook


I haven't been drawing much in the last few months. Yep...my 100 portraits project for 2020 is a total bust. I think I did like 20. :(

Prior to the whole COVID 19 pandemic, I would draw at a cafe for a bit after a late lunch while finishing my cup of tea. Now that we have been home for the last 8 months, there would always be something else to do in the house - fix something, vacuum, cook et cetera. Lots of distractions.

Plus, I wanted to do 100 portraits of family and friends. The need for resemblance in my drawings to real life people made the task seem harder so the lazy person in me just avoided it altogether. 

Today, I went back to my usual cafe to find a little inspiration to start again. It has been 8 months since I've last been here. Just a quick sketch...a loose drawing with no likeness to anybody in my life. Just to get back into the rhythm of drawing again. This is the product so far.

What about you? Is there one aspect of your life you feel uninspired/unmotivated by?


Share/Bookmark

Pin It

Monday

The self-portrait that took forever


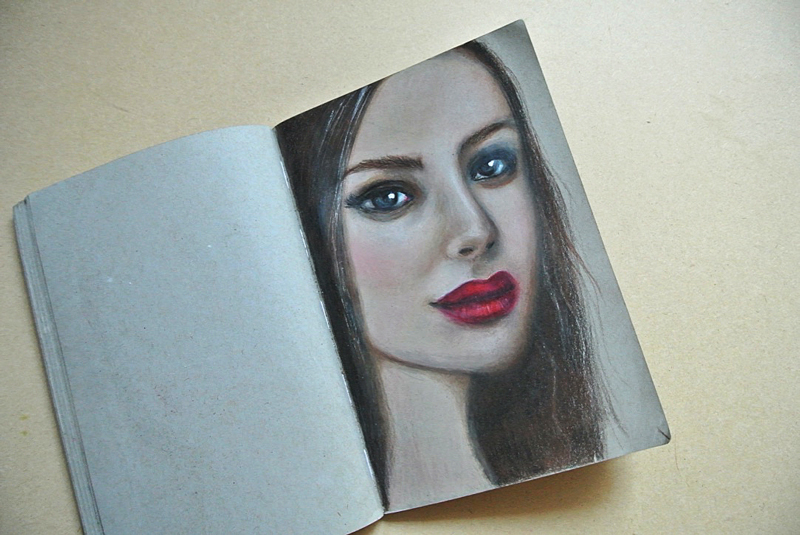
Ever had a project that took forever to complete to satisfaction? Well, meet the self-portrait that took forever. *winks*

The problem wasn't the actual portrait drawing but the colours I chose. I went with really cool-toned colours and ended up looking a little vampirish. *LOL*

Once I added some warm tones, it started to look less vampirish and more human, albeit a human with an overzealous application of blush. *LOL* But I'm pretty happy with the eye brows...they look like mine. ;)

Happy week ahead friends! :)


Share/Bookmark

Pin It

Tuesday

Another portrait practice - playing with shadows


So I have always stayed away from sketching shadows because I find them really hard! And the faces tend to end up looking like they have "dirt" on their faces..*winks* But I decided to give it a go. Props to you if you can identify who this person is.  Because she couldn't recognize herself in the drawing but when I showed her the reference photo, she said  it looked like the photos! *LOL*


Share/Bookmark

Pin It

Wednesday

The process of drawing my nephew Gan Solo


New year, new nephew. Friends,  meet my nephew Solomon, son of my cousin A and his Vietnamese wife....or as my corny cousin affectionately calls his son, Gan Solo (yep...Star Wars reference..*LOL*).


I started with a quick sketch using a coloured pencil (Faber Castell Polychromo).


Once I was happy with the general placement of features, I darkened the drawing further with the same coloured pencil.


Next, I worked on the mouth...


Then I gave him some colour on the cheeks...


And gave him some hair...;)


Getting in on the details...this took me over a week to draw (a few hours each day)...


And it looks nothing like the reference photo...hahaha!

What do you think?


Share/Bookmark

Pin It

Thursday

Another self-portrait from the sketchbook


Apparently this is the year of self-love or narcissism judging by the number of self-portraits I've been sharing. *winks*


I started with a single coloured pencil sketch with my non-dominant hand...


Then I went in with the colours...


A little more progress...


Fine-tuning the details...with minor adjustments made to the lips, eyes and cheekbones.


Share/Bookmark

Pin It

The process of drawing my niece Luna in my sketchbook (tutorial)


Back in February, I shared that I was drawing my niece Luna in my sketchbook. Just discovered the process photos on my phone (when I got a warning that I'm running out of storage on my iPhone and got busy deleting my many food photos...you know, the bulk of photos on my phone..*winks*) so I'm sharing them today.

Disclaimer: I didn't go to art school...learned how to draw from a few online classes, reading a bunch of old art books at the library and practising on my own for the last few years. I wasn't the kid who was always sketching. I learned how to draw as an adult. So my "process" may not reflect the proper way one should approach a drawing. 


I started with a rough sketch in graphite pencil. Lots of artist books will tell you that the more accurate your sketch, the easier it would be to complete your drawing. And I agree. But that takes a long time for me so I just wing it and go for rough placement of features. *LOL*


Once I'm happy with my sketch, I take a kneaded eraser and go over my sketch to lighten the pencil marks because graphite does not play well with coloured pencils. Then I go in with my coloured pencils to draw the eye...because that's my fave feature. :)


I like to work on toned paper (this one is Strathmore Toned Gray sketchbook) rather than white paper because it saves time. The toned colour provides the baseline for the midtones that allows you to push either darker or lighter values in your drawing. If you work on white paper, you have to work from light to dark which takes a lot more time. (Now you know why artists tone their white canvases before painting..;)


At the beginning of your drawing, you want to be light-handed with your coloured pencils. Coloured pencil drawing is a rather slow medium and requires many layers of pigment to reflect the colour you want from your drawing. 

Also, when you colour lightly, you can easily erase your mistakes without ripping a hole in your paper. 

Understanding basic colour theory will help you greatly in choosing the mix of colours to use. I used the Faber Castell Polychromos for this sketch.


I like to repeat the use of certain colours throughout my drawing so that there is cohesiveness and harmony in piece.


If you like a smooth paint-like finish to your drawing, you can burnish your drawing with a colourless blender or a solvent (rubbing alcohol, acetone nail polish remover, odourless mineral spirits or turpentine) before fine-tuning the details. It would remove the graininess of your drawing. Personally, I don't like using the solvents and burnishing is hard labour. Plus I actually like the raw grainy look of a somewhat "unfinished" drawing like all of mine...hahaha. 


For the highlights, I like to use a white paint marker/gel pen.


If you were wondering why I didn't complete the drawing based on the photo, it's because I got tired. I mean this took many many days. Plus nobody will know that once I cut the piece out from my sketchbook and put it in a nice frame. Except you. But you won't tell on me because we are friends right???


Share/Bookmark

Pin It

Monday

Mixed Media Monday: Sketching with my non-dominant hand


Artist Ivy Newport likes to start her portrait-sketching with her non-dominant hand because it is looser and you can get more organic lines. Something about drawing what you see rather than what you know. So I decided to give it a go in my latest self-portrait drawing.

Brace yourself friends...it ain't pretty! *LOL*


I gave you fair warning didn't I? *winks*

Let's look at the positives shall we? It clearly looks like a face. So 1 point for Team Yvonne's Left Hand. The placement of the features is pretty spot-on too. Mind you, no erasing was involved. Another point for Team Yvonne's Left Hand, agree? Hehehe.

And it took like five minutes. Because Team Yvonne's Left Hand isn't that adept at holding a coloured pencil and wanted to get it done quickly. Seriously though, Team Yvonne's Right Hand isn't that great at sketching either.

I must agree that the lines are pretty organic... the brain focuses on the reference photo and just commands the eye-to-left-hand to just draw what you see.


Here's a look at how Team Yvonne's Right Hand tried to "save" the sketch. ;) Still using that single coloured pencil.


A little more progress...


Here is the arsenal of supplies I used for this monochromatic portrait.

So, have you tried using your non-dominant hand for art?


Share/Bookmark

Pin It

Thursday

Self-portraits from the sketchbook


Hello friends! Just a quick share of (some attempts at *LOL*) self-portraits from my sketchbook. People who flipped through my previous sketchbook kept asking about the random people I drew...so this year, I shall try to draw actual people I know. Like myself. *winks*

As always, the initial sketch always makes me cringe. Then when I add in some colours, I feel somewhat decent at drawing. Hahaha!


Yes, I'm also trying different facial angles so that I can improve on my lights and darks.
In case you were wondering, I'm never "done" with my sketches. Sometimes when I discover a new "technique", I go back to my old sketches to refine them further. 

P/s: Hope you are having a great week so far. :)


Share/Bookmark

Pin It

The girl from my sketchbook who drove me nuts!


The-girl-from-my-sketchbook-who-drove-me-nuts

Meet the girl from my sketchbook who drove me nuts. Seriously. 

For some reason, she never looked "right" to me. At first I thought it was her eyes. Then her lips. Then her jawline. And her hairline. *LOL*


After multiple layers of coloured pencils, I think she now looks somewhat decent (that's my story and I'm sticking to it!*winks*).

What about you? Have you ever worked on a project that drove you nuts because you just couldn't get it "right"?


Share/Bookmark

Pin It
>
Related Posts Plugin for WordPress, Blogger...

LinkWithin

Pin It