Showing posts with label decorated paper bag. Show all posts

Monday

Make Stuff Monday - an upcycled kraft decorated paper bag


Happy Monday friends! Had a large Kraft paper bag in my stash that was screaming to be decorated *winks* so here it is!


It was a surprisingly hard bag to decorate because all my embellishments look so small on it....*LOL*


But I slowly layered my way through....


And I do love the end product.

What do you think?


Share/Bookmark

Pin It

Thursday

Tips on paper bag decorating (Part 3)


Hello friends! It's been a while since I shared Tips on paper bag decorating Part 1 and Part 2. And here is Part 3!


1. Work with the existing design of the paper bag.

Especially when the paper bag is this cute to begin with. Just keep the base design and cover up the brand name with some simple elements.:)


2. Try a splattering of little elements across the bag.

Sometimes there isn't a need for a main focal point. Just place the elements in a way that would draw the eye across. On this bag, I added texture, interest and flow just by tearing the top of the patterned paper and putting small elements across it to guide the eye.


3. Repeat elements help to create a cohesive look.

Sometimes you tend to go overboard with the decorative elements (talking about me of course...*winks), but you can ensure a cohesive look and feel with repeated elements placed in a "triangle". I repeated the birds and butterflies on this bag. 


4. Keep it simple.

There isn't a need to use many elements to decorate a paper bag, especially a small one. Here I only decorated the bottom half of the paper bag, using the top half as my "white space" to give the design a little more "drama".


5. Use a graphic design to draw the eye.

Here the bold patterned paper helped to ground the elements and lead the eye to the focal point. By adding elements to "close" the triangle, the overall design feels more cohesive and complete.

There you have it. Tips on paper bag decorating (Part 3). 


Share/Bookmark

Pin It

Monday

Make Stuff Monday..this week's upcycled decorated paper bag


Happy Monday friends! Here is this week's upcycled decorated bag. :)


Just a mish mash of bits and pieces from my stash. Even the Stickles came into play. :)


Share/Bookmark

Pin It

Wednesday

Wednesday's fun upcycled paper bag project


Yes friends...it is yet another Fresh paper bag....made a little prettier. *winks*


Been enjoying the horizontal clustering of elements of late...have you noticed? *LOL*


Share/Bookmark

Pin It

Thursday

Thursday's decorated paper bag project


 Just a quick decorated paper bag project to share today...:)

I started with this sturdy black paper bag from Shu Uemura.


The patterned paper seemed quite busy so I went for a sprinkling of small colourful elements instead of one focal point.  

Share/Bookmark

Pin It

Wednesday

The cute paperbag makeover


The other day we tried Chagee tea and got the cutest paperbag ever! 


This was what I started with...just had to cover up the brand name....


Added some fun bits along with some shimmering spray to finish. All done in 10 minutes! *high fives all around*


Share/Bookmark

Pin It

Monday

Make Stuff Monday - a quick upcycled decorated paper bag


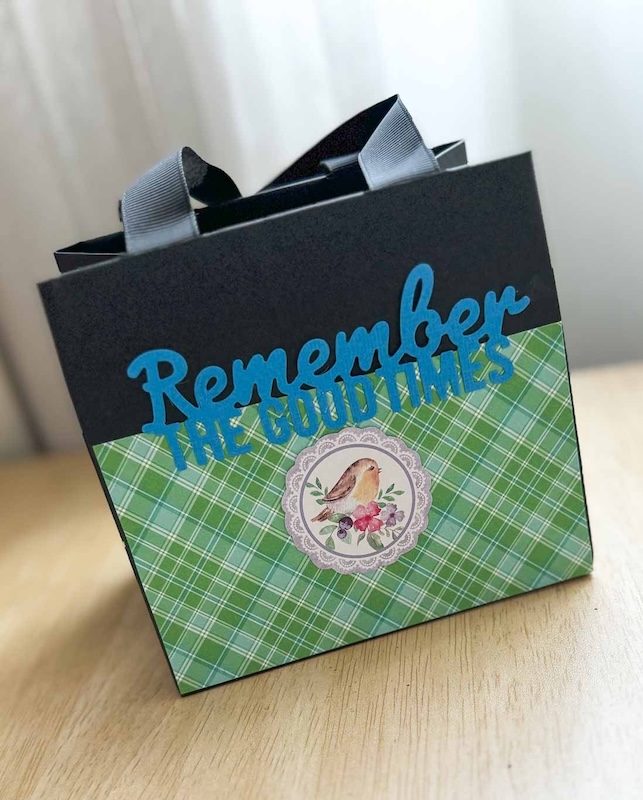
In today's Make Stuff Monday, I'm sharing this quick upcycled decorated paper bag. :)


I started with this sturdy dark grey paper bag from Drunk Elephant. The inside of the bag is lime green so I went with a matching patterned paper for a coordinated look and feel.


Mainly flat elements for easy storage and transport. Finished with pearl mist of course. *winks*


Share/Bookmark

Pin It

Make Stuff Monday - quick decorated mini paperbag


I had fun with this quick decorated mini paperbag. :)


Patterned paper as my mat, a fussy-cut element (two birds and a birdcage), two text elements and some pearl mist and I'm all done. 

Happy week ahead friends!


Share/Bookmark

Pin It

Make Stuff Monday - a decorated mini paper bag


 Happy Monday friends! Here is this week's decorated mini paper bag!


I started with this cute mini paper bag.


Love how this came together really quickly with just 3 elements...patterned paper, fussy-cut bird and die-cut text. :)

Happy week ahead friends!


Share/Bookmark

Pin It

Make Stuff Monday - 1 bag 2 ways


Just this past weekend, mum and I attended a Laneige x Sephora event and two cute little gift bags which I had to decorate immediately of course *winks*.


Here's a look at what the cute paper bag looked like before the transformation. 


Here is bag #1.


And this is #2.

There you have it...1 bag 2 ways. :)

What do you think?


Share/Bookmark

Pin It

Wednesday

Workspace Wednesday - decorated paper bag for a sweet friend


Met up with a sweet dear friend today and prettied this Fresh bag so that I can gift her some goodies. :)


Kept the elements relatively "flattish" for easy transport and storage...


The usual mist mash of materials...


Fun mix of elements...


And here is the friend who was the recipient of said bag (she didn't want her face in the photo..*LOL*).


Share/Bookmark

Pin It

Monday

Make Stuff Monday - 1st decorated paper bag of 2024


And just like that we are a week into the new year. For today's Make Stuff Monday, I'm sharing my first decorated paper bag of 2024! :)


I started with this sturdy paper bag which I got when I attended a recent event at Sephora.


I really like the background paper so I just inked the edges and created my "scene" with the busy background.


I tried to break up the busy background with a cardstock base. Yep, even took a scissors to distress the edges to go with the whole vintage vibe.


Happy week ahead friends! :)


Share/Bookmark

Pin It
>
Related Posts Plugin for WordPress, Blogger...

LinkWithin

Pin It