Monday

A challenge to not get my hands "dirty"...


Party-time

So I challenged myself to work on a layout without getting my hands "dirty"...aka no mists, paints or inks...old school scrapbooking.


Since the DCWV patterned papers came from a pack, they were all coordinated so it was quick to put this page together. The one for my background even had glitter on it...gotta love a paper that does all the hard work for you...*winks*


The part that took the longest time was the machine stitching...and only because I had to rethread the bobbin...why can't bobbins hold more thread, right?
Playing along with Let's Get Sketchy.


Share/Bookmark

Pin It

Friday

The Great Outdoors photo display for Xyron and Paper House


Great-outdoor-photo-display
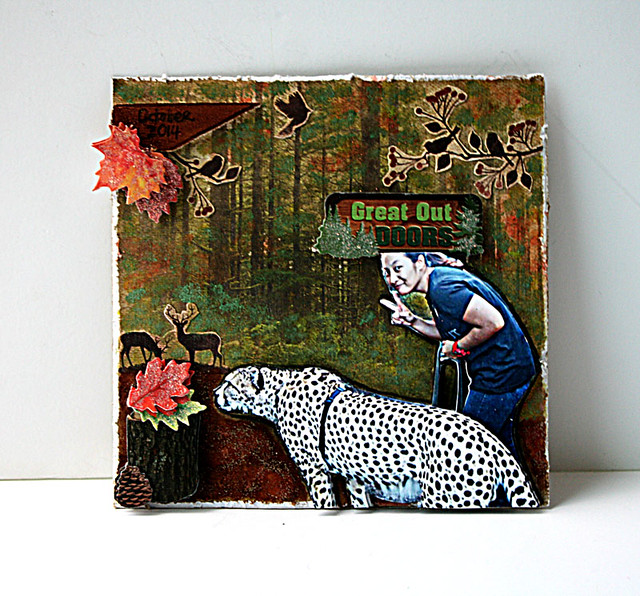
This whole week, the team at Xyron is joining the folks at Paper House Productions for a fabulous creative blog hop. I made a 6x6 photo display featuring my sister walking her "pet" at an African Safari...*winks*. Read on for a quick tutorial.
I started by cutting a piece of cardboard to 6x6 and running it through the Xyron 9" Creative Station for an even application of adhesive. Then I adhered the Paper House Productions patterned paper (The Great Outdoors mini paper pad) to the cardboard and distressed the edges for some texture.
The photo was fussy-cut and adhered to the base with the Teresa Collins Mega Runner. A graphite pencil was used to outline the silhouette and blended with a tortillion. This helped to create the illusion of depth.

I fussy-cut another piece of the same photo and propped it up with 3D foam dots. Then I decorated with Paper House Productions The Great Outdoors dimensional stickers. I also fussy-cut some elements from another sheet of patterned paper and adhered to the base with Teresa Collins Clear Hold Adhesive.

Then I pulled the elements together by painting the "scene" with Silks Acrylic Glazes.


Don't forget to leave a comment at the Xyron blog for your chance at a great giveaway! :)


Share/Bookmark

Pin It

Thursday

Monogram tag


Monogram-tag


I love monograms. 


Good thing my first and last names both start with "Y" so I can scatter my decorated monograms all over the house without raising any eyebrows. *winks*


If you love monograms, come join in the fun with LESSology Challenge #42: Monogram.


Share/Bookmark

Pin It

Tuesday

Incredible adventure mixed media canvas


Incredible-adventure-mixed-media-canvas

Art is an incredible adventure...you never know what you can do unless you give it a try.


For me, it relates to stamping. I can never stamp nice crisp images...and believe me, I've bought every tool and tried every trick in the book...I always have to touch up with a marker...*LOL*


The foray into mixed media gave my stamps a new lease of life because imperfect stamping became a deliberate attempt at giving random texture...*winks*


Of course, my first attempt at stamping this lovely lady directly on the canvas was an epic fail. So I tried on a piece of wrapping tissue..[almost perfect, I can live with that!] and then adhered it to the canvas with gel medium. After that, it was colouring and embellishing time! :)


Share/Bookmark

Pin It

Monday

The towel dropping incident...*winks*


Dare-to-be

Earlier this year, littlest nephew J was into his "flasher" phase. Every photo will involve him err...flashing his torso....*winks*


In this series of photos, he was happily posing with his towel after a bath...


And yes, we had a towel dropping incident! *LOL*


Had a little fun on the background with several layers - Dylusions mist, Ecolines and gesso with The Crafter's Workshop stencils.


Playing along with Stuck?! Sketches.

Share/Bookmark

Pin It

Thursday

Vintage-inspired mixed media canvas...a tutorial


Mixed-media-canvas-by-Yvonne-Yam-for-The-Crafters-Workshop-and-Viva-Las-Vegastamps

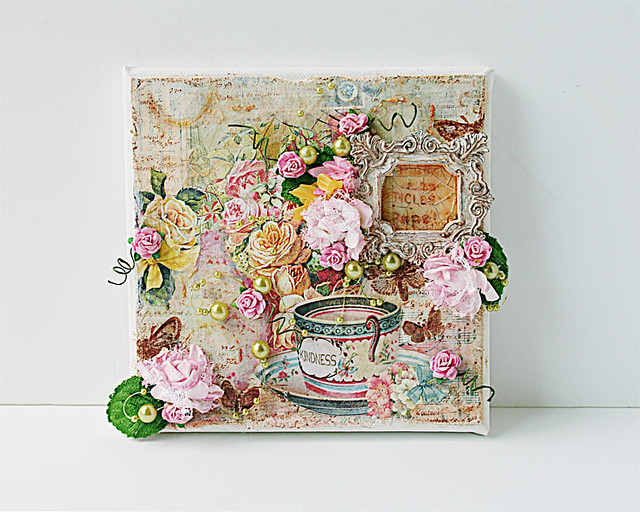
So this week is all about stencils and stamps over at The Crafter's Workshop as we partner with Viva Las VegaStamps. I created a 6 x 6 mixed media canvas. Read on for the tutorial. :)


I started with a 12x12 sheet of Blue Fern Studios patterned paper which I cut down to slightly smaller than 6x6 and distressed the edges. Then I applied a coat of clear gesso all over. The collage of patterns was way too distracting so I applied a layer of Liquitex Super Heavy Gesso on parts of it to tone it down. [If you don't have super heavy gesso, just use a few coats of regular gesso till you get the look you want...but wait for each layer to dry before applying another...it tends to look very opaque when it's wet like in this photo.]


Next, I applied a tea stain all over to "age" the paper. This was Rooibos tea so it's a little orangey. You can dilute with water. For a really light tea stain, try Earl Grey. I usually just use whatever tea I'm drinking that day. *winks* 


Then it was stamping time! I was a little overzealous as usual and went a little overboard with my stamping...but there's a little bit of "open" time before the ink dried so I could rub off/lighten parts with a wet rag. Once I was happy with the stamping, I heat set with my heat tool.


I applied Liquitex glass bead gel with The Crafter's Workshop stencil. After that I blended everything in with Silks Acrylic Glazes, pulling the colours from patterned paper.


I added a Prima resin frame and "aged" it with Silks Acrylic Glazes. A thick layer of Crackle Glossy Accents was added...love how the cracks add to the vintage feel. :)


Then I embellished with paper blooms and pearls.


There you have it...a vintage-inspired mixed media canvas. What do you think?


Share/Bookmark

Pin It

Tuesday

Rice only?


Rice-only

My niece is always the first at the dining table when dinner is served. 


" Do you want chicken?"
"No!"
"Do you want fish?"
"No!"
"Do you want vegetables?"
"Nol"
"Rice only?"
"Yes!"


Yes...all the glorious food on the table and she wants plain white rice. Yeah, not even gravy. Weird, eh? *LOL*

Playing along with Stuck?! Sketches.


Share/Bookmark

Pin It

Monday

The one about the shy guy...


Shy-guy

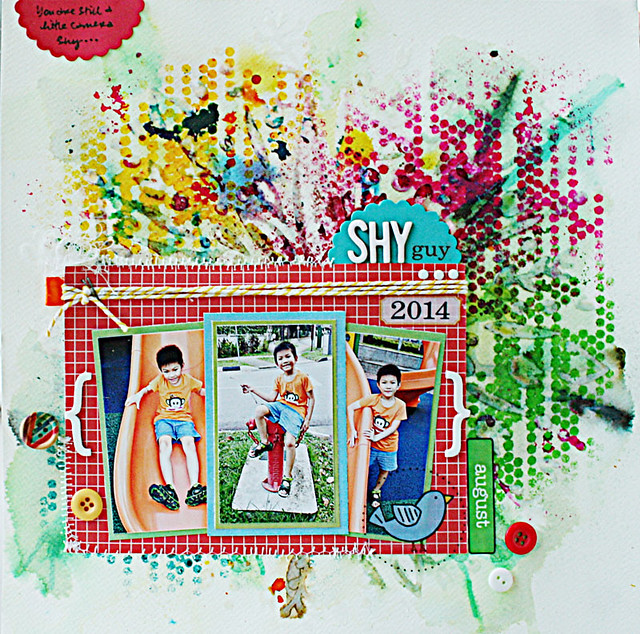
Nephew #2 is a shy guy. He's a little awkward in front of the camera unlike his siblings. *winks*


He is trying though...because he really wants to make the cover of a magazine. *LOL*


The background of this layout was one of my experiments gone awry. I applied gloss medium with The Crafter's Workshop stencil, then went to play with my Ecolines [liquid watercolours]. I was a little overzealous with my water spritzing and made a huge mess...so I chucked it aside. Yesterday, I decided to "save" it by applying some Dylusions mists with another The Crafter's Workshop stencil.
Now, it looks like a really abstract background that I think I can live with...what do you think?


*Edited* I won the challenge over at Off The Rails Scrapbooking! :)


Share/Bookmark

Pin It

Friday

An altered clock for Xyron, Core'dinations and Petaloo blog hop....a tutorial


At times it is a lot more economical to buy a finished product and then alter it to suit your taste. Like this clock I altered for the Xyron, Core'dinations and Petaloo blog hop.


It was a pretty clock to begin with but it needed some texture don't you think? *winks*


I cut some Core'dinations cardstock and then used the Core'dinations Sand It tool.


Then I added some pretty Petaloo Fancy Trim and adhered them with Xyron/Teresa Collins Clear Hold Adhesive.


For the pendulum, I adhered a piece of DCWV patterned paper with Xyron/teresa Collins Clear Hold Adhesive.


The edges were outlined with a black Sharpie and a white pen. Then I added Petaloo blooms from the Penny Lane Garden Collection.


Next I coloured some American Crafts thickers with a black Sharpie and outlined with a white pen. These were then glued to the clock using Xyron/Teresa Collins Clear Hold Adhesive.


There you have it...a really simple altered clock that anybody can try at home. What do you think?

Don't forget to comment on the Xyron, Core'dinations and Petaloo blogs for your chance to win some goodies! :)


Share/Bookmark

Pin It
>
Related Posts Plugin for WordPress, Blogger...

LinkWithin

Pin It