Showing posts with label xyron. Show all posts

Wednesday

An upcycled paper bag for the Maya Road & Xyron Design Team Swap


Maya-Road-Xyron-design-team-swap-altered-paper-bag-by-Yvonne-Yam

Hello friends! There is a Maya Road & Xyron Design Team Swap all week long. Do drop by the Maya Road blog to leave a comment for your chance to win a $15 gift certificate to the store!

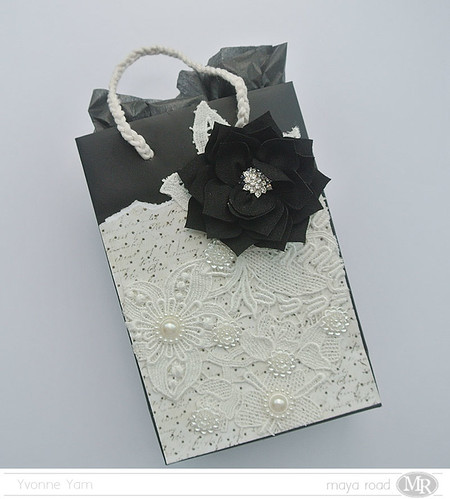
My project is an upcycled paper bag. Here is a short tutorial.

____________
I was generously sent the new Creative Station Lite by Xyron [To date, one of the most generous manufacturers to design for ever. I remember fitting myself in one of those boxes of goodies they sent...that was how big the box was...*winks*] which is now my fave desktop companion. :)
_________

I started with a sturdy paper bag from YSL (I love the highlighter which conceals my dark eye circles so that no one thinks a panda is out on the loose...*LOL*), Prima patterned paper and some remnant lace. Once I cut the paper and lace to size, I ran them through the Xyron Creative Station Lite for an even layer of adhesive and a lot less mess.


I added a little more textural interest with these new pearl bits from Maya Road


They are lightweight with a pearlized sheen. You know I'm in love with these right? ;)


And who wants plain handles when you can have plaited ones right? 


I finished off with the Shimmering Pointed Petal Flower in Emo Black as my focal point for a really classy-looking gift bag.

What do you think?

Share/Bookmark

Pin It

Monday

Teaching aid magnets with Xyron


Photo of magnets in use in the classroom taken by my mother

This month, the Xyron design team got to pick their fave Xyron product and create with it. Mine is my trusty 9" Creative Station. I turned my mother's food teaching aids into magnets. [My mother teaches Home Economics in case you were wondering...]


It's a relatively simple project albeit time-consuming. I started with these food picture aids which I fussy cut.


Then I ran them through the Xyron 9" Creative Station with the magnetic cartridge. The magnetic cartridge laminates the front of your feed and adds a magnetic sticker to the back. You could create teaching aid magnets with letters or pictures for young kids.

P/s: My mother is eyeing my magnetic cartridge for some other projects...she says I should order more of them. *LOL*


Share/Bookmark

Pin It

Tuesday

A Christmas wall hanging for Xyron...a tutorial


Christmas-wall-hanging-for-Xyron-by-Yvonne-Yam

Hello friends! Today I want to share an easy-to-do and lightweight wall hanging that you can add to a corner of your home for a little festive cheer! Read on for the tutorial. :)


I started off with this empty DVD container. The lid was covered with some MT washi tape.


Using a roll of washi tape as a template, I wrapped some Maya Road paper twine cording to form a wreath.


Then I glued my ribbon and the Santa ornament from last year's Christmas cake using the Teresa Collins Clear Hold Adhesive.


Next I punched some stars out of American Crafts glitter cardstock.


Then I ran the punched stars through the Xyron 3" Sticker Maker which I adhered to the paper twine cording.


I used my Crop-a-dile to punch two holes on the lid so that I can string the cords of stars.


I needed something to anchor the ends of the cords so I ran these festive leaves [thanks Mitra Pratt!] through the Xyron 3" Sticker Maker.


And adhered them to the ends of the cords.


I finished the project by adding some bling, Golden Gold Mica Flakes and colouring the washi tape with Wink of Stella brush in clear for a shimmering finish. :)


Share/Bookmark

Pin It

Thursday

A Christmas gift box using a packaging box and Christmas cake decorations for Xyron.


Upcycled-Christmas-gift-box-for-Xyron-by-Yvonne-Yam

One of the best things about the holiday season is the gift-giving. I love the sheer delight on the recipient's face when they receive a Christmas present. Today I'm sharing a simple gift-wrapping idea using a packaging box and decorations from last year's Christmas cake. Read on for the quick tutorial. :)


I started by measuring and cutting American Crafts glitter cardstock to fit the top and bottom of the Clinique packaging box. The pieces were then ran through the Xyron 9" Creative Station for an even application of adhesive.


Next I gathered my embellishments from last year's Christmas cake along with some gauze and adhered to the box with Xyron/Teresa Collins Clear Hold Adhesive.


Can you tell that the gauze is supposed to be snow? *winks*


Of course, it wasn't glittery enough so I had to add some Golden gold mica flakes! *LOL*


Share/Bookmark

Pin It

Friday

The Great Outdoors photo display for Xyron and Paper House


Great-outdoor-photo-display
This whole week, the team at Xyron is joining the folks at Paper House Productions for a fabulous creative blog hop. I made a 6x6 photo display featuring my sister walking her "pet" at an African Safari...*winks*. Read on for a quick tutorial.
I started by cutting a piece of cardboard to 6x6 and running it through the Xyron 9" Creative Station for an even application of adhesive. Then I adhered the Paper House Productions patterned paper (The Great Outdoors mini paper pad) to the cardboard and distressed the edges for some texture.
The photo was fussy-cut and adhered to the base with the Teresa Collins Mega Runner. A graphite pencil was used to outline the silhouette and blended with a tortillion. This helped to create the illusion of depth.

I fussy-cut another piece of the same photo and propped it up with 3D foam dots. Then I decorated with Paper House Productions The Great Outdoors dimensional stickers. I also fussy-cut some elements from another sheet of patterned paper and adhered to the base with Teresa Collins Clear Hold Adhesive.

Then I pulled the elements together by painting the "scene" with Silks Acrylic Glazes.


Don't forget to leave a comment at the Xyron blog for your chance at a great giveaway! :)


Share/Bookmark

Pin It

An altered clock for Xyron, Core'dinations and Petaloo blog hop....a tutorial


At times it is a lot more economical to buy a finished product and then alter it to suit your taste. Like this clock I altered for the Xyron, Core'dinations and Petaloo blog hop.


It was a pretty clock to begin with but it needed some texture don't you think? *winks*


I cut some Core'dinations cardstock and then used the Core'dinations Sand It tool.


Then I added some pretty Petaloo Fancy Trim and adhered them with Xyron/Teresa Collins Clear Hold Adhesive.


For the pendulum, I adhered a piece of DCWV patterned paper with Xyron/teresa Collins Clear Hold Adhesive.


The edges were outlined with a black Sharpie and a white pen. Then I added Petaloo blooms from the Penny Lane Garden Collection.


Next I coloured some American Crafts thickers with a black Sharpie and outlined with a white pen. These were then glued to the clock using Xyron/Teresa Collins Clear Hold Adhesive.


There you have it...a really simple altered clock that anybody can try at home. What do you think?

Don't forget to comment on the Xyron, Core'dinations and Petaloo blogs for your chance to win some goodies! :)


Share/Bookmark

Pin It

Monday

A shaker card...


Shaker-card

Sometimes, I get off my "lazy ass" and actually start using my stash...and tools. Like on this shaker card. :)


I actually dusted off the cobwebs on my Cuttlebug and used a Spellbinders die along with my trusty Xyron Mega Runner


I powered up the sewing machine too...*winks*


And since I had the Cuttlebug out, might as well do a little embossing right? 


Of course, it was all too pretty and clean...so I went in with The Crafter's Workshop stencil and Liquitex resin sand medium and Ranger distress ink in Antique Linen to "dirty" it up a little. 


Share/Bookmark

Pin It
>
Related Posts Plugin for WordPress, Blogger...

LinkWithin

Pin It