Tuesday

How to make a simple embossed card with Ujjwal Gupta! :)


Today's guest is Ujjwal Gupta of Handmade with love. I "met" Ujjwal sometime last year when she started participating in my guest blogger challenges. Her style epitomizes simple elegance. I love that she exercises restraint rather than pile on the embellishments. Her cards have a clear, often graphic focal point that draws your attention and makes you think "Hey, why didn't I think of doing that?" Today she shares a tutorial on embossing with scor-tape and is hosting a challenge with an awesome prize for the winner! :)

But first, let's take a look at her gallery of work!


Hello, I’m Ujjwal living in Pune, India and I am super excited to be a guest blogger on Yvonne's blog today. I am almost like the rest of the crafters around, seriously addicted to Crafts, admiring, hoarding and most defiantly buying ( things that I don't need but MIGHT need :D ). I got married to a wonderful guy10 months back and life has been a beautiful journey ever since.My DH is most supportive, encouraging and ever so patient with my crafting needs(I am not sure if its the same when I go on my crafting shopping spree!)
I have been into card making and crafting since I was a small kid but it got serious when I discovered blogging one year back and started my own blog in feburary 2010 and there has been no looking back since then. I have met some very talented people..made wonderful friends and learned a lot.
I am a full-time working software professional and I am not really sure if I really love my job ( except for the part that it pays and I can buy all the crafting goodies :D) because my heart is always in crafts.
I am glad to have been given the opportunity to be featured here today. Looking forward to all the fun and crafting!

Although I love experimenting with different techniques and styles of crafting, over the years I have found myself to be most comfortable being simple. No heavy layering, No complicated sketches, simple color schemes & no heavy embelishments. So my challenge for you all is to make simple cards. But wait thats not all - to add some more fun I want you to add some sort of embossing to your projects  (which is my new found love :D). 


Here is the card I created and a short tutorial I prepared.


Step 1: Once you have decided on the layout and design of your project, gather you supplies.

For this card: scor tapes (1/4” and 1” wide), dimensional adhesive, cardstock, ranger embossing   tinsel in red, Colorbox white ink, skipping stone stamp set (Grunge), felt flower embellishment, heat tool


Step 2: Apply the scor tape on the cardstock as per your choice of design.
             Remove the tape backing and sprinkle embossing powder/tinsel.


Step 3: Once you have applied the embossing powder/tinsel as per your requirement, heat the embossing powder using a heat tool.
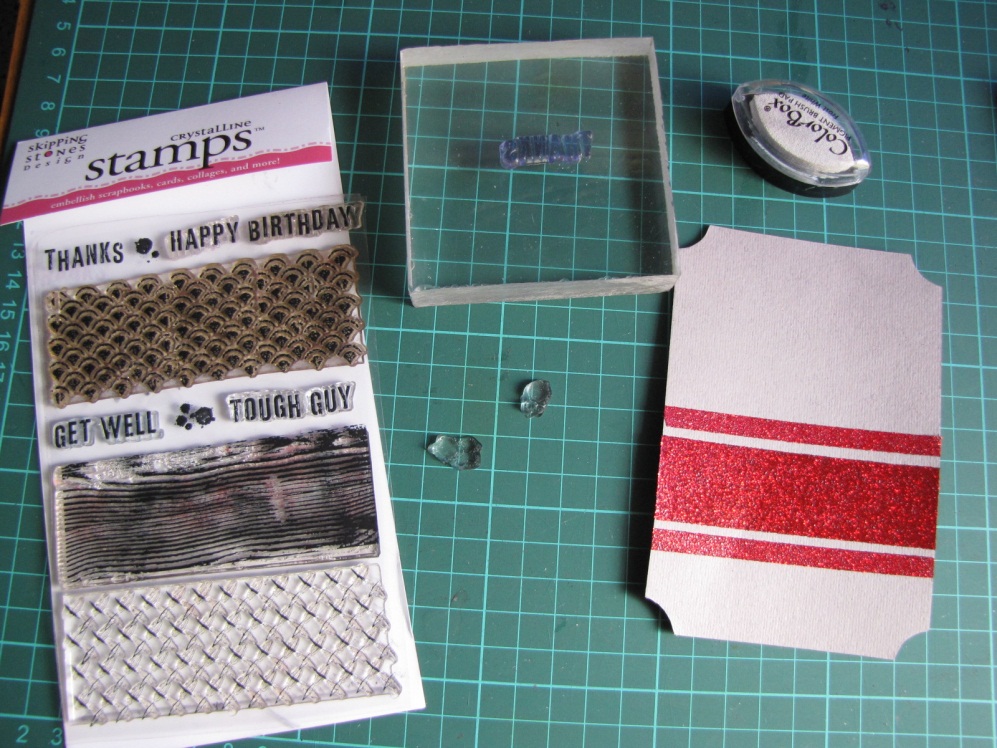

Step 4: After the embossing is completely heat set, work on the stamping part of your design.

I used Skipping Stones Stamp set and white pigment ink to stamp my images.


Step 5: Put you card together.
             I used some 3D Foam adhesive to add some dimension to the top layer.

**********************************************************

A pretty easy way to add a little extra sparkle to your project! Are you ready to play along? Your challenge if you choose to accept it, is to create a simple card featuring either dry or wet embossingShare your new simple and embossed cards via Inlinkz (located at the end of the post) by Friday July 1st

As always, please leave a little love for my guest Ujjwal. :)

Share/Bookmark


Pin It

Monday

Quaint little place


Quaint little place

Back in March, I stopped by a quaint little place for lunch [en route to the Blue Mountains]. The place was actually closed but I used my charm *winks* to get the chef to re-open the kitchen. *LOL*


A little fussy-cutting, paper-pleating and stamping on an ice-cream stick.

I was inspired by the sketch at Sketchy Thursdays and the challenge at Scrapbookers Anonymous to use mini paper pads. I used my 8 X 8 Graphic 45 paper pad.

Supplies: Graphic 45 patterned paper. Prima canvas letters, Making Memories stamp, brads, wrinkle ribbon, distress inks, tag, butterfly embellishment, thread.

P/s: Don't forget about my guest Kirsty's crepe paper challenge...it ends on Friday! :)

Share/Bookmark
Pin It

Friday

An altered jar....and a giveaway winner! :)


Altered jar

Today's project is an altered jar I whipped up for the challenge at City Crafter Challenge Blog. :)

******************************************************

Thanks for the feedback on what you like about my blog in my giveaway post....I'm pretty surprised that you really enjoy the guest posts, tutorials and challenges because I get the least number of comments on those posts. Really. 

 I used random.org to pick a winner....


Congratulations Sharon!  Please send me an email so that I can get your gift certificate sent out to you! :)

Supplies: Wrapping tissue, burlap, alcohol inks, trim, faux bird, stickles, tulle, button.

P/s: Don't forget about my guest Kirsty's crepe paper challenge!!! :)

*Edited* This project was spotlighted at the City Crafter challenge blog!

Share/Bookmark
Pin It

Thursday

OLP


Happy summer

Okay, apparently I'm suffering from OLP (Opening Line Paralysis) because it took me 30 minutes to write this line! *LOL*

Just a quick card to share based on the sketch at Card Patterns.

Supplies: Patterned papers are from Imaginisce and Echo Park Paper, Martha Stewart Edge Punch, Baker's twine, wrinkle ribbon, bottle cap embellishment (click to go to tutorial).

*******************************************************************************

And a big "thank you" to those who played along with my guest Elizaveta's vintage-inspired challenge.

The winner is Kishley!  Congratulations! Please send me an email with your mailing details! :)

P/s: I would really love for you to play along with my guest Kirsty's crepe paper challenge! :)

*Edited* This card was featured in the CARDS challenge gallery! :)

Share/Bookmark
Pin It

Wednesday

My creative process for a layout! :)


QVB

Some of you asked me to share my creative process for a layout. Here is a short tutorial using the sketch and inspiration bits from the Sketchy Thursdays GDT challenge. :)

Step 1: I choose the papers I want to use (I usually cut out the back of papers if layers overlap), then add various colours of mist.


Step 2: I prep my photos by matting some of them on cardstock scraps that match the colours of my papers.

Step 3: I adhere the photos on my base papers and start adding embellishments. 


Step 4: I add some handstitching, stamping and titlework.


Step 5: I add my journaling and I'm done! :)

Supplies: Studio Calico add-on kit : Sunny Clearing, Heidi Swapp chipboard, Sharpies, ribbon, trim, Technique Tuesdays and Fontwerks stamps, baker's twine, thread, bling.


P/s: Are you in the running for my giveaway?

*Edited* My layout made Top 5 in the Sketchy Thursdays GDT contest! :)

Share/Bookmark
Pin It

Tuesday

Mixed tape


Happy birthday card

So I was totally stumped when I was about to colour this mixed tape image....*LOL*
[yes, I did a google search!]

Just a CAS card using the masculine theme from Bows and Berries and incorporating the sketch from CAS-ual Fridays.


Supplies: Kraft cardstock, pom pom trim, copics, brads, Tim Holtz texture hammer, paper piercer, SRM sticker, Distress Ink in antique linen.

P/s: I would love for you to play along with my guest Kirsty's crepe paper challenge! :)

Share/Bookmark
Pin It

Monday

How to create your own custom background using a toilet roll tube and mists! :)


Classical conditioning

Hello friends! :) Today I want to share a short tutorial on how I created the background for this layout  inspired by Sketchy Thursdays- using a toilet roll tube and some mists. :)


Step 1: Cut little "rings" from the toilet roll tube.


Step 2: Arrange the "rings" on base cardstock. Spray various mist colours.


Step 3: Remove "rings" for your very own custom background. :)


So doable, eh? :)

Supplies: Sassafras and Prima patterned paper, Heid Swapp chipboard, Sharpies, buttons, popsicle stick, baker's twine, American Crafts badge, Gauche Alchemy embellishments, doiley, transparency, ribbon and trim. 

Share/Bookmark
Pin It

Friday

A giveaway! :)


Thank u

Happy Friday! :) As a "thank you" for supporting my craft adventures, I would like to offer ONE of you, my sweet blog pals, a $20 gift certificate to the Gauche Alchemy store! :)

(pictured are my faves - Pink Parts and Lady Marmelade Orange Mixed Media Kits)


What do you have to do to be in the running for this giveaway?

Jump through a flaming hoop? Dress in an outlandish outfit and juggle some oranges?
That would really entertain me...*LOL* but no need for that...

Just leave me a comment on this post with a little feedback on what you like about this blog and how I can make it even better. I'll pick a winner next Friday! :)

Supplies: My Mind's Eye papers, American Crafts puffy stickers, Bazzill white cardstock, crochet flower and spiral felt flower (click for link to tutorial).

P/s: I would love for you to play along with my guest Kirsty's crepe paper challenge! :)

Share/Bookmark
Pin It

Thursday

The answers to your questions.


The fun stuff book cover

Hello friends!:) Today's project is a 6 x 6 acrylic piece. The wood frame was upcycled from packaging.

A big "thank you" for stopping by and commenting on my week-long upcycled projects. :) It was a lot of work putting it altogether because I don't craft in a linear fashion and I tend to work multiple projects at a go. And stopping in-between to take photos really threw me off my rhythm...*LOL* [I'm going to try videos next. I think. *winks*]

Apparently I was very thorough in my tutorials because there were very few questions! *LOL*
I did want to address some of the questions/comments that were posted though.

1.What adhesive do I use?

For the flat stuff, I like to use Tombow Mono Multi.

 Photo via Tombow.

For the dimensional stuff, I use Therm-O-Web's Zots.

Photo via Therm-O-Web.

And to really secure everything, I add Inkessential's Glossy Accents.


Photo via Inkessentials.

I would gladly use glossy accents as an adhesive on everything. Seriously. If only it wasn't so expensive. *LOL*

2. Do you throw anything away?

Yes I do. Unfortunately. I wish I had space! :(
The recycle truck comes by every fortnight so anything bulky that I intend to upcycle must be utilized by then (either projects in progress or significantly cut down to size so that it fits whatever storage space I do have) otherwise it goes with the truck (and I feel that I've let Mother Earth down )!

I try my best to bring in less "stuff" into the house though...like not taking shoeboxes when I buy shoes. And I use a "make it acid-free" spray on my projects because most packaging materials aren't acid-free.   Most of the altered items I make are given away...yes, I'm surprisingly not attached to them at all...(even the published ones)...so if you really want something, you might get it if you ask...*winks*

3. Where do you get your ideas from?

Hmmm...I'm always brimming with ideas. Maybe it's because I read a lot? *winks*

Seriously though, I got eco-conscious after reading about how non-biodegradable plastic bags kill marine life (they are often mistaken for food) and started researching about green living. I'm particularly drawn to artists who are able to use discarded materials to construct works of art. The fashion industry is also doing its part with zero-waste design (constructing garments without wasting fabric). So, I'm just trying to doing my bit for the environment. And hope you are inspired to do the same. :)

Supplies: 6x6 acrylic, Stazon, My Little Shoebox papers, stickers.

P/s: Don't forget about my guest Elizaveta's vintage-inspired challenge...it ends on Friday! :)

Share/Bookmark
Pin It

Wednesday

Crazy about dinosaurs


Dino mite

My nephews are really crazy about dinosaurs. Bring them to the library and they head straight for the shelf with the books on dinosaurs. Don't ask me how many times we've watched Ice Age 3: Dawn of the Dinosaurs. *LOL* Their dinosaur figurines are among their most treasured toys.


So I got pretty excited when I saw that my friend K had the Cricut cartridge for these cuties...[Hey, I've got to work hard to maintain my fave aunt status! *LOL*]


A little stickle-action for a sparkly finish...and some Gauche Alchemy fibers for some texture.


I was inspired by the sketch at Sketchy Thursdays, this fortnight's song at Scrapping The Music and the challenge at TAAFOMFT on fave toys.

Supplies: Cardstock, cork paper, stickles, thread, Gauche Alchemy embellishments, googly eyes, Cricut diecuts, thread, white pen, stickers.

P/s: I would really love for you to  play along with my guest Elizaveta's vintage-inspired challenge! :)

Share/Bookmark
Pin It
>
Related Posts Plugin for WordPress, Blogger...

LinkWithin

Pin It