So I made a mini album last weekend. This road trip album was inspired by these cute papers from My Little Shoebox [You can tell how much I love them!]...for a road trip that hasn't happened yet...I've long admired those who bring a semi-completed album on their travels and just add photos, journaling and ephemera on the trip. Now I'm one trip ahead! :)
Wednesday
Tuesday
True love endures
Hello friends! Just wanted to share this little project I made last night...True love endures...certainly true for my mother's friend, Auntie E who just celebrated her 50th wedding anniversary...:) The frame for this layout is actually this box..
Lots of upcycling in this project...I used wrapping tissue for the base of the box...and doilies..a single sheet of patterned paper (Webster's Pages), bottle cap, pearls, tulle and lace...pins and stickers...
All flowers, ribbons and trims were recycled from previous gifts...I love it when gifts come with pretty wrapping that I can re-use (in more creative ways! ;)
Monday
Milk boys
Check out these milk boys! My three nephews enjoying a before bed snack...;) Just a little fun with papers from Webster's Pages, a little blue Maya mist and Ranger distress inks...prima flowers and embellishments from Gauche Alchemy.
Sunday
I made a wish & you came true
This week's sketch at Card Patterns is up! Here's my card, I made a wish & you came true. The design team was sponsored by Gina K Designs and I got to play with a lovely set of stamps designed by fellow design team member Nina! I love how my stamped car works so well with the delightful patterned paper from My Little Shoebox! :)
Have a fabulous Sunday!
Saturday
U & me
As promised, here's my attempt at a digital layout....I basically played with a lot of digital overlays from House of 3 and Kenner Road. The layout U & me features a photo of my oldest nephew Sean and me, on the bed, taking photos in our jammies...:) If you missed the digital tutorial shared yesterday, see it here. And share your digital creations for a chance at a sponsored RAK! :)
I want to say a big "thank you" to all those who participated in the quilling challenge...I just read the post again and realized that I didn't set a deadline nor announced if there was a RAK and yet you played along! How sweet! Without further ado, the winner is
Anita at Crafting Forever with this labour-intensive piece!
Congratulations Anita! I'll be sending a RAK your way! :)
Friday
Tutorial on digi scrapping by Creative Casey...in 5 simple steps
Hello friends! I would love for you to get to know my friend Casey Wright from Creative Casey who has so generously used her precious weekend time to put together a tutorial on digi scrapping! Just for us! In 5 simple steps!
First let's look at her digi gallery...
********************************************************************
I'm so excited to be guest blogging for Yvonne today - I love the idea of 'doing more with less' and that's one of the reasons I joined the fun group of people who call themselves digi scrappers! Like many of you scrappers out there, I really started to become obsessed with ALL that is scrapbooking after the birth of my first child. I find that the creative process really offers more to me than just using pretty paper and embellishments - although it is fun to try all of the different and new products. For me, it's a therapeutic process that allows me to document my family's life creatively and that offers me an opportunity to tell those every day stories, that when unwritten may be forgotten. I like to use different forms of mediums on my projects and am inspired by everything around me. Of course, I love going to my local scrapbooking store and buying all of the latest and greatest items, but I also really like the idea of conservation and digital scrapbooking really offers a wide range of solutions for that. I know that some of you out there are probably intimidated by the idea of digital scrapbooking, but follow these quick easy steps below and you will be on your way to digi scrapbooking in no time!
For those of you out there that don't have access to Photoshop Elements, I would recommend visiting their website - Adobe Photoshop Elements Free Trial and trying out the system free for 30 days.
Step 1: My tutorial today is called "Photoshop in Five" and will have you well on your way to using elements to create those digital pages. After downloading the free trial, the first thing you want to do is to open all of the papers, elements, and pictures that you might be interested in using. If you don't have any digital elements, no problem - there are several websites out there that offer free digital kits (Two Peas in a Bucket and Little Dreamer Designs). Simply select 'file' then 'open' and find the elements that you've saved on your computer. Here is a snapshot below of what screenshot should look like and where the elements should show up after opening.
Step 2: The next step is to open up a blank layout to the size that you wish. Traditionally, I used 12x12, but you could make the dimensions whatever size you wish. Simply select 'file' then 'new' and type in your dimensions along with a title and you've got your blank document. Here is a snapshot of what that window looks like:
Step 3: After you've opened up your blank layout, now is a good time to save your document and for now, just save it as a PSE (photoshop elements) file. Now you can simply start dragging items onto your blank layout. You do this by clicking on the item you would like to use and then dragging it from the layers pane (on the left) onto your layout. The most important item to learn in Photoshop is the idea of layers. Just think of it as a stack of papers - one thing layered over the other. You can change the order of what you see by simply moving the layers around in the layers pane. Here is a screen shot of where you will see the layers:
Step 4:Once you've got the idea of layers down, then you can really start to play with the size of the images. You can either use your pointer tool to drag the marquee to a smaller size by clicking on the item and dragging it smaller or you can manually change the size. I actually prefer to do it manually because I typically have an idea of how big I would like my items to me. However, there's no right or wrong way to do it as long as the process works for you! I simply select 'image' then 'resize' and after that I indicate the size and resolution. I would always recommend using 300 dpi for all elements - it just really provides a clear resolution of the elements/pictures. Here is a screen shot of the window used for manual resizing of objects:
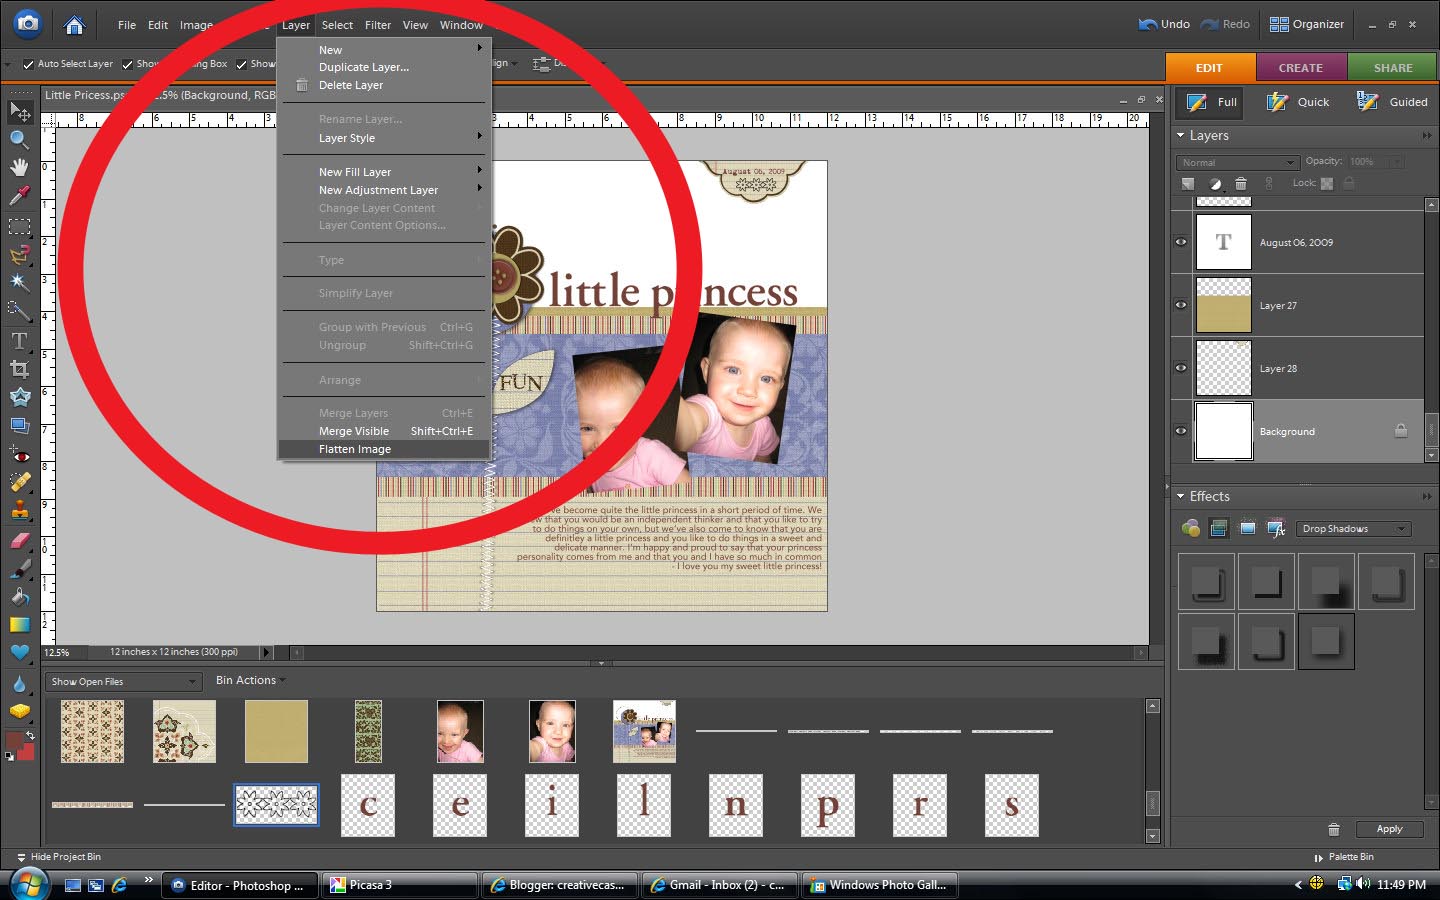
Step 5:Once you've got your items on the page and you like the way your layout looks, then you want to move forward with flattening the image. This allows the layers to merge together so that the file can be saved at a reasonable size as a jpeg document. Without flattening, you will find that your file size will be too big and that you won't be able to view without using Photoshop Elements. To flatten images, you simply select 'layer' then 'flatten image.' Now, save the item by selecting 'file' then 'save as.' You will see a window that asks you where you want to save and this is where you select jpeg as a file type. After that, you can select the file size according to how you want to use the file. I actually like to print my layouts for my scrapbook, so I save them at a high resolution. However, if you are only interested in sharing over the computer, I would recommend saving at a medium quality.
Here is the layout that I created for today's tutorial using the Marks Paper Company digital kit - August.
So there you have it! Five steps to Photoshop! Okay everyone - CHALLENGE TIME! Simply create a 12x12 layout using the steps used above and leave a comment here with a link to your layout - we would love to see what you've made!
***********************************************************************************
The deadline is two weeks from today. With a RAK sponsored by Casey! :)
I'll share my inspired piece in my next post. And announce the winner of the last challenge on quilling. Please leave a little love for my guest Casey, okay? :)
Thursday
Lil' wonder
The new challenge at Scrapping the Music is up! This week's song is Gotta Be Somebody by Nickelback. A totally catchy song! :) My layout, Lil' wonder, features my littlest nephew...[okay, it isn't a flattering picture of this cutie because it was a sweltering hot day]...but I love this smart little guy...he knows how a camera works...he would pause for me to take a picture of him...and then continue playing after. Every single time. Pretty cool feat for a 13 month old...:) [okay so it could be early camera exposure syndrome...;]
Patterned papers are from Webster's pages, a little misting, some handstitching, some tulle and doilies...SRM word stickers and cute duck stickers! :)
Labels:
design team work,
Layouts,
nephews,
scrapping the music
Tuesday
Will work for ice-cream
Oh yes...my nephews will work for ice-cream...here they are posing for me so that they can score some ice-cream! ;) I left some love notes for each of them (pull-out tags)...I think it would be cool for them to read in future! :)
Patterned papers are from Cosmo Cricket, some handmade yo yo flowers [don't laugh..it was my first try] (tutorial can be found here), crepe paper, doilies, mist, SRM and Cosmo Cricket stickers, Heidi Swapp chipboard letters, Prima flowers, Heidi Grace pin and some handstitching.
Inspired by the challenge at my LSS.
P/s: Thanks for all the love you left me on my last post...:)
Monday
Two boys a girl and a bed
So, my brother and his wife went away on another vacation without the kids (again!)..hence two boys a girl and a bed...;) It was eight nights of very disruptive sleep (kids fidget a lot when they sleep!) but I did enjoy having my nephews around! :)
A fun layout using Lily Bee papers, crepe paper, SRM stickers, blue embellishments (Gauche Alchemy), ribbon, doiley, handstitching and that cute girl charm! :)
Inspired by Sketchy Thursdays.
Sunday
Splash
Hello friends! Hope you are having a splashing good Sunday! :) Happy Mother's Day to all mothers! Here's my card for this week's sketch at Card Patterns. This week's sponsor is Stamping Boutique and I played with this mermaid stamp...which I coloured with copics and added stickles for some sparkle...I added some cute sea animal stickers for a really fun card. Patterned paper is from October Afternoon. Do play along for your chance to win 5 digital images or 3 rubber stamps!
Pin It
Saturday
Eat only the best
I shared this project over at the GA blog ... :) A friend of mine passed me a really beaten up but naked Maya Road lunch tin (thanks K!) The naked part got me excited of course because it means a host of possibilities for decorating...;) The lunch tin got me thinking about food of course (I'm a total foodie!) and so I played with the Kitsch Delish Paper Craft Mixed Media Kit with some bits from the Scarlett Fever Red Mixed Media Color Kit for that punch of color to create this Eat only the best project!
Love this Jenni Bowlin paper which I decoupaged to the front of the lunch tin....I love the faint "Best" so I just added some gold distress stickles (for some glass glitter sparkle!)...and embellished with bits of patterned paper, stickers and rubons.[I really think distress stickles are wayyyy cooler than regular stickles...or maybe I just like getting my fingers dirty...*LOL*]
I painted these wooden letters (Kaiser Craft) with acrylic paint and inked the edges with distress ink. The brown letter stickers are from Cosmo Cricket. "What's cookin'?" is a Basic Grey rub-on.
Some bits from the Scarlett Fever Red Mix Media Color Kit... I really love this fruit punch label! :)
I used the wrapping tissue to fill up the back part of the tin (in place of patterned paper), added the misted doiley, some lovely punchinella (love this stuff!), rubon and sticker!
For the top of the tin, I used patterned paper, a beer label [okay, this was a cover-up...I was too lazy to measure and cut too much of the patterned paper], doiley, bling, lacey fabric [gathered to look like a napkin], sticker and some charms [from a keychain]...
Do you like it?
Thursday
Amazing
Hello...hope you are having an amazing week so far..:) This week's song at Scrapping The Music is up! The song is Rainbow Connection from The Muppet Movie...;) My layout features a church in Melbourne...I've always been a fan of the Victorian era...architecture, fashion, literature, history...:)
A really quick layout! Patterned paper is from Webster's Pages..spritzed with Maya mist [grapefruit]...so it's all pretty and sparkly! Prima flowers, stickles, lace and embellishments from Gauche Alchemy's Pink Parts Mixed Media Color Kit. I added a cute Betty Boop charm at the top right. Can you see?
Labels:
design team work,
Layouts,
scrapping the music,
travel
Tuesday
At last
Love these photos of my parents on their wedding day...At last (I so love this song!)..check out the facial expressions (*LOL*) :)
[A bit of trivia..in case you were wondering why I keep scrapping my parents' wedding photos.. my parents have more pictures of their big day than all of my individual childhood photos put together..sad fact of being the second child...shared limelight...my brother was always next to me! Should have thought to push him away...]
October Afternoon papers (so pretty right?), SRM stickers, animal stickers, chipboard letters (MME), lace, tulle, flowers, doilies and brads.
Inspired by Let's get shabby.
Monday
{Happy} cheeks
Happy Monday to you! I have a fun layout to share with you today...{Happy} cheeks features my two nephews kissing their little brother (much to his disdain since he only likes girls to kiss him! * LOL*)...
I had so much fun working on this layout! Patterned papers are from My Little Shoebox (too cute!), some fun stickers (can you spot them?), a little handstitching, some doodling...
Inspired by Sketchy Thursdays.
Sunday
Thanks for lifting my spirits
This week's sketch at Card Patterns is up! The sponsor this week is Hero Arts so do play along for your chance to win US$30 worth of cling stamps! :) The clear base for my card, Thanks for lifting my spirits, is actually packaging material......it's the clear plastic base of the stack of rewritable dvds (to prevent scratches on the last dvd)...I inked it with Stazon. The tag is from 7 Gypsies (inked with Distress inks) and the stamps are from Hero Arts. I added some bling flowers along the edges and a layered bloom.
Pin It
Subscribe to:
Posts (Atom)
>