Wednesday

Add banners to your projects with Anupama Choudary!


My guest today the the talented Anupama Choudary of Scrapbooks from India. Her style is graphic and bold, indicative of her design background and chockfull of fabulous textures which she achieves with mediums and embellishments. There are always unexpected and beautiful details on her pages. Today she shares with us her fave technique of adding banners to pages. She's also hosting a challenge with a fabulous RAK for the winner! :)

But first, let's drool over her beautiful gallery, shall we?


Hi there! I am Anupama Choudary from Hyderabad, India. I am married to an actor and we have two beautiful kids, Saanvi (7) and Karishnu (5).
I am a trained Interior Designer and did my Masters in Business Administration. I love being a stay-at-home mom and working from my home studio, Once Upon A Time. I make artist-edition scrapbooks and frames on order for local clients. I am honored to be a Design Team member of Inkido (Papercraft Scandinavia), Scrap for Help andBerry71Bleu in 2013. I would describe my style as 'Artsy Grunge'. However, if my daughter wants a 'pretty' page, I make one :) You can see more of my work at Scrapbooks from India. 
Thank you, Yvonne, for having me and visiting your blog has always been a pleasure.


I'd like to share a fun tutorial about one of my favourite techniques - adding a banner to my scrapbook pages! I always love to find innovative ways to include it on my layout. Here are some -

1.  A banner layered with corrugated paper and G45 papers

    
2. A Doily banner

    
3. A Chipboard-stringed Banner


4. A banner made out of trinkets from the dollar store!
   

5. An alpha banner
    

6. A banner made from scraps - simply distress and layer!


Finally, the layout I made for 'Do More with Less' - A Clothesline Banner


STEP 1: I picked interesting scraps of patterned paper from my Inkido stash and shaped them into pennants.


STEP 2: I added to the string a Prima clothespin and some blooms. 


STEP 3: I cut vintage pictures from a 12x12 sheet and 'hung' them on my clothesline.

STEP 4: I embellished the banner with bling, buttons, stamps and paint. 

There you have it, folks! An easy peasy way to add interest and movement to your pages :)
Now for my challenge - Make a Scrapbook layout /altered art with a BANNER. You can use paper, cardstock, burlap, fabric...the sky is the limit!
Play along to win this RAK from me.


Ready to play along? Please link your newly created layout/altered art featuring a banner via Inklinz [located at the end of the post] by Friday April 5th, 11.59pm (GMT+8).

As always, please leave a little love for my guest Anupama.


Share/Bookmark

Pin It

Tuesday

The one where I went with a lame title for my layout...


Posing-on-the-stairs-layout

I don't usually have problems with titles on my layouts [okay some are pretty corny *LOL*] except for the yearly Chinese New Year photos. In case you didn't know, I'm Chinese....there is maybe a drop or two of exotic blood [My great great great grandmother was Portuguese]. Anyway, I digress...Chinese New Year is about meeting relatives and friends, eating sinful food and wearing new clothes [yep, including underwear *winks*].


Which means there are lots of photo opportunities but not so many exciting stories to scrap about. Hence, the creative block when it comes to titles for layouts. Can't get any more lame than "Posing on the stairs" right? *LOL*
How to create your own supply list tutorial.

I was inspired by the sketch at C'est Magnifique.

P/s: Can't wait for you to meet this month's guest blogger!!!:)


Share/Bookmark

Pin It

Monday

The weekend I went a little crazy with the tag-making..and some challenge winners!


Pretty-tag

This weekend I went crazy with the tag-making....playing with mediums and pretty stuff....:) I was inspired by the shades of pink challenge at City Crafter.


It's amazing how much you can pile on a little tag. I would experiment with mediums then cover parts I don't like with patterned paper. Previously I used a shipping tag as a base, now I'm using grungeboard as it holds up better to my abuse! *LOL* 

Handmade felt bloom tutorial
Pretty beaded pin tutorial
Supply list tutorial
________________________________________________________

A big thank you to those who played along with my guest Keren's challenge! 

The winner is ....

But wait...Keren also decided that there should be a runner-up....


Congrats Helen Tilbury and Lizzy Hill! Please email me with your mailing addresses! :)


Share/Bookmark

Pin It

Friday

How to decorate a box in 10 minutes


The-10-minute-box

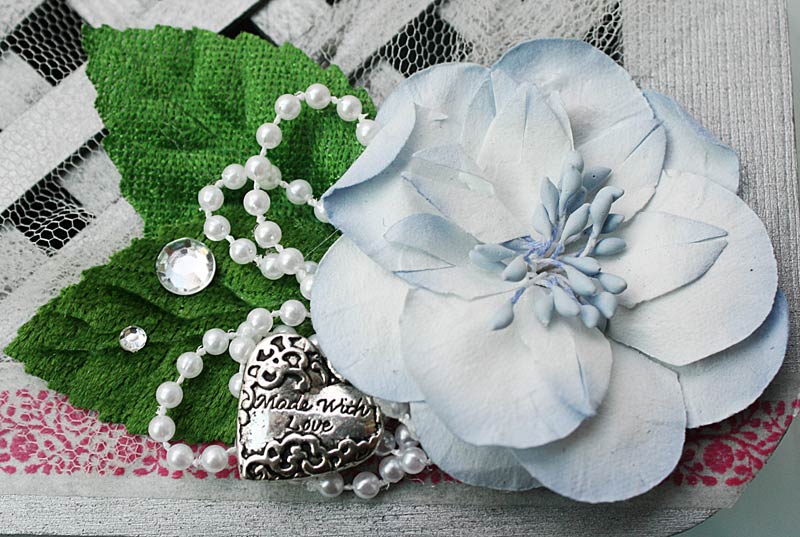
I don't know about you but I always find myself in need of a decorated box for a last-minute meeting with a friend....a 10 minute box is very useful in such an instance. :)

How to decorate a box in 10 minutes

1. Gather your supplies - box, washi tape, paper bloom, pearls, charm, some leaves, tulle and a hot glue gun. (2 minutes)
2. Turn on your glue gun and while it is heating up, adhere washi tape to box. (2 minutes)
3. Arrange embellishments in a pleasing manner...(3 minutes).
4. Adhere everything with hot glue gun (3 minutes).
How to decorate a box in 10 minutes
P/s: Happy weekend friends! :)


Share/Bookmark

Pin It

Thursday

The bid to stimulate hair growth...


Sophie-with-hair-journal-page1

So my niece S will be 2 at the end of the month and she still has very little hair. Apparently wearing a pair of shoes bought by an aunt on the father's side of the family is supposed to stimulate hair growth. I did that of course [gotta try right? *LOL*] but still no luscious hair growth in sight...*winks*


Guess I have to manufacture a  full head of fiber-paste hair for her....maybe this will stimulate hair growth? *LOL* Still into my windows in art journal phase...so happy that my tag punch can come into play. :)


The background was created with my latest obsession - Derwent Inktense Blocks [Hey Miae, I played with mine!]. I coloured one side of the journal page, spritzed water, blended with a paintbrush, then closed the book to get a mirror page on the adjacent page. The dots were applied using an Art Deco stencil and Faber Castell Artist Big Brush Pen. I fussy-cut some blooms from patterned paper [Zeus and Zoe kit]. Then a wash of Tattered Angels Glitter Glam for a sparkly finish.


So glad I started on my art journal journey. It's been really fun. If you've started on something new this year, why not play with Zeus and Zoe's New Beginnings challenge? The prize is an Art Deco stencil and some fabulous paints. Yum. :)

How to create your own supply list tutorial.

Share/Bookmark

Pin It

Wednesday

How to create a wall hanging with CDs and texture paste


How-to-make-a-wall-hanging-with-CDs-and-texture-paste

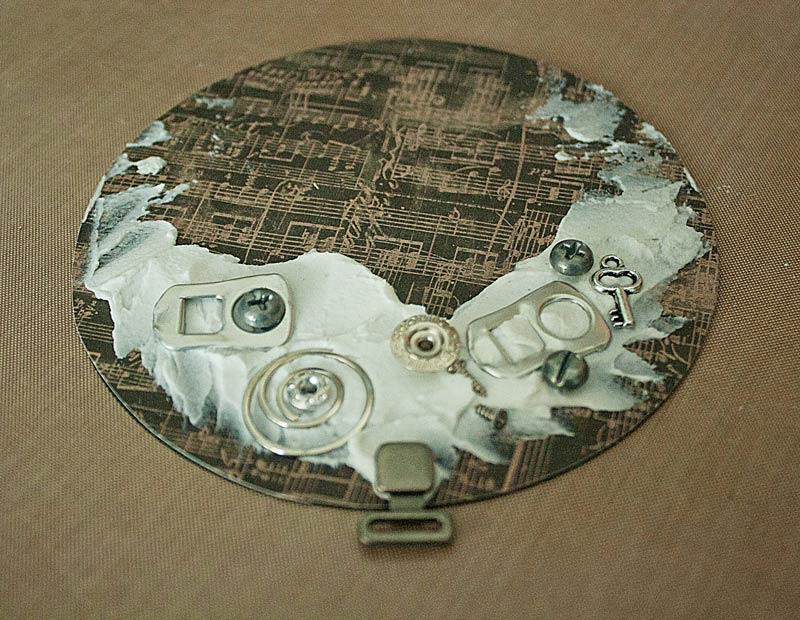
Back in January, I asked readers what tutorials they would like to see on this blog...Lizzy Hill wanted to see a project using texture paste and Evelin wanted to see altered art. So I've combined their requests into a tutorial on how to create a wall hanging with CDs and texture paste. :)


1. Start with a stack of used CDs to form your base. About 3-4 would be enough. Too many and it becomes quite heavy. Adhere them together. I used a hot glue gun.


2. Adhere patterned paper [thanks Lizzy!]to a single CD. This would be adhered to the base once it's been embellished. Gather all the embellishments you want to use...choose items that are lightweight if possible. I went with some tab pulls, small screws, paper clip, charms, screw eyelets.


3. Spread some texture paste and start adding your embellishments in a configuration of your choice. The texture paste serves as a "glue" to hold everything together.


4. Add some beads to fill up the small spaces in between. Allow it to dry naturally.


5. Add a little glass bead gel for more texture. Then starting to add metallic paint colours and PearlEx for some shimmer.


6. Then I added my main elements...charms, nuts, old clock hands... And painted them to blend in with the background. I finished with a little distress stain in vintage photo for an aged look. A painted lock and a distress stained bow...then adhere decorated top to base. Stick some 3M velcro to the back and you've your very own wall hanging.

What do you think?

I had so much fun raiding my toolbox for this project. Come join in the fun for LESSology Challenge #23: What's in your toolbox?


Share/Bookmark

Pin It

Tuesday

Are you apprehensive about a face-to-face meeting with someone you met online?


Y&H

Like most people, I am always a little apprehensive about a face-to-face meeting up with someone I got to know online. What if they don't like me? On the web, I can maintain a certain aura of mystery. And I can be self-deprecating and funny. After numerous edits. *winks* In person, I might just underwhelm. *LOL*


But I am always glad I take the chance. Because the experience of meeting a fellow paper lover always trumps all the insecurities. :) Like when I met up with my bloggy pal Helen Tilbury from South Africa when she stopped over for a visit to Singapore.


Since Helen's the queen of modern shabby chic, I thought it would be appropriate to go all pretty and sweet on my layout....
How to create your own supply list tutorial.


Inspired by the sketch at ScrapFriends.

*Edited* This layout was a winner at City Crafter!

P/s: Don't forget to play along with my guest Keren's challenge, it ends on Friday!


Share/Bookmark

Pin It

Monday

My fave month of the year! :)


Paper-weave-birthday-card

March is my fave month of the year because it's my birthday month...yay! :) [Why celebrate just that one day when you can celebrate the whole month, right? *winks*] 


I had so much fun putting this card together...I made a paper weave with old book paper, Faber Castell gelatos and Golden glass bead medium. For a step-by-step tutorial, please visit Faber Castell Memory Design Craft for this paper weave card. :)

How to create your own supply list tutorial.

Share/Bookmark

Pin It

Friday

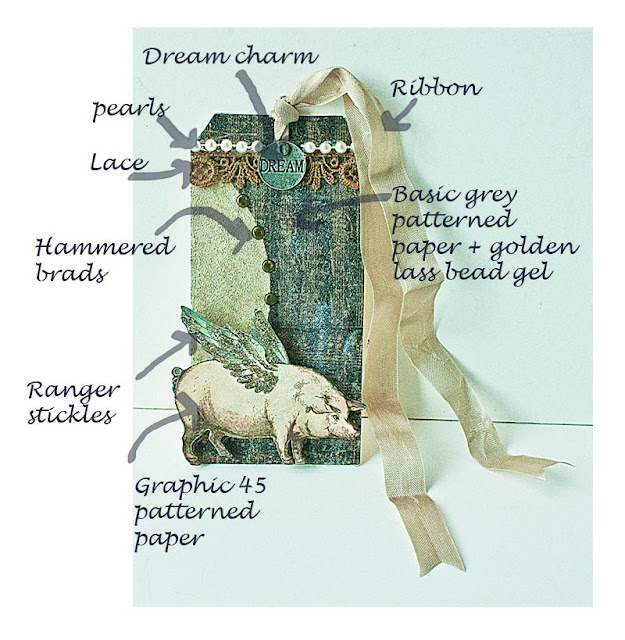
I find myself creating tags....


Dream-mixed-media-tag

I find myself creating tags of late. I love that I'm not restricted by dimension and layers...because the tag doesn't need to fit into an envelope..*LOL* 


My obsession with Golden glass bead gel continues. I love how it turns a flat background sparkly and interesting...[it does take a while to dry thoroughly though...see some white spots on my tag? It's dry to touch but not completely cured...]
How to create your own supply list tutorial.
Playing along with City Crafter.

P/s: Happy weekend friends. If you have time, play along with LESSology Challenge #22: How Charming!


Share/Bookmark

Pin It

Thursday

My quest to use up my patterned papers...


Happy-day

My obsession with mixed media has me using very little patterned paper lately. So not helping with my quest to use up my patterned papers...*winks*  

I thought to myself, "Why not scrapbook just using patterned papers and not use any mediums at all?" .... [it was soooooo hard...I really wanted to mist or use gesso to break up the patterns... *LOL*]


The conclusion? I love using just patterned papers, stickers and rub-ons. This page came together in under 30 minutes because I didn't need to wait for mediums to dry. And I used up quite a bit of patterned papers! Yay! *High fives all around*
How to create your own supply list tutorial.

Share/Bookmark

Pin It

Wednesday

So, what's on my craft desk?


My-craft-desk

So on Monday I posted this picture of my craft desk on my Facebook Fan Page and it went viral for some strange reason...*LOL*. Want to know what's inside each drawer and on each shelf? *winks*


1. Faber Castell watercolour pencils and Papercrafter crayons.

2. My drawer of Faber Castell Artist Big Brush Pens. [Awesome for colouring stamps and chipboard.]

3. This bag consists of mostly tools - fabric scissors, pen knife, Tim Holtz scissors, EK Success precision scissors, staplers, paper piercer as well as my Derwent watercolour crayons [I buy them individually so I have only a handful].

4. Here I have all my fave markers and pens and glue. Zigg pens, Sakura gelly roll and micron pens, loads of Sharpies and Tombow glue.

5. This shelf consists of my glaze medium, stamp cleaners and mist bottles of Faber Castell Gelatos.

6. These two shelves are a mix of the various mists I have - Maya mists, Tattered Angels mists, Studio Calico's Mr Huey's [I hate the bottles they come in because they always leak at the opening so about halfway through a bottle, I pour them into clear mist bottles and label them. Love that they are uniform and take up less space.] and my own concoctions.

7. & 8. Rubber stamps. Since they are in clear view, I use them more often. [Clear stamps need to be stored away from light so my clear stamps are in a box under my desk.]

9. My Copics. I don't have many. If you notice, I tend to buy things only in colours I like. :)

10. Faber Castell Gelatos [yummy!] and PITT pens [Love how they write on glossy photos though I mostly use the black].

11. Ranger distress stains and other Ranger mediums.

12. Inks - I don't have many because I tend to use only black and brown.

13. My clear box of rub-ons. [I only have this box of rub-ons but it's taking a really long time to finish them!]

14. These are clear boxes with round containers for all my little knick knacks like charms and brads, sorted by colour.

15. Paint brushes and palette knives.

16. Acrylic paint - Mostly Daler-Rowney with some Goldens.

17. My wooden drawers are a mix of StazOn inks, Ranger stickles, PearlEx, twine and paper clips - things I use frequently.

18. The top shelf consists of paper ephemera - journal cards, tags, cut-out overlays [perfect for adding little bits of interest on a project] plus new Sharpies. The bottom shelf contains more frequently used mediums - Ranger Crackle Paint in rock candy, Golden crackle paste, fiber paste, glass bead gel, gel medium.

There you have it. My craft desk. What do you think?


Share/Bookmark

Pin It
>
Related Posts Plugin for WordPress, Blogger...

LinkWithin

Pin It