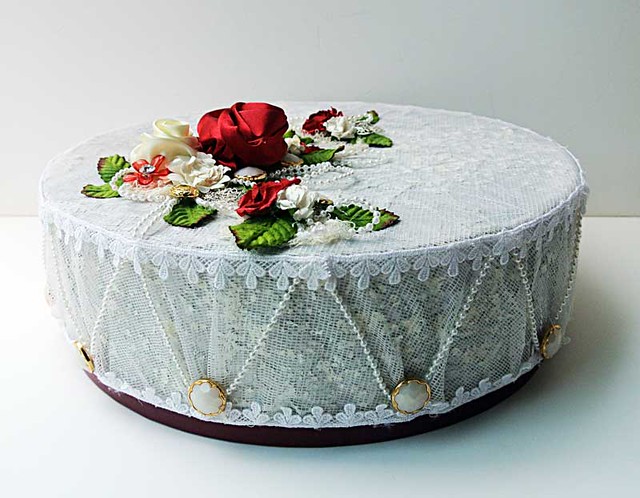
Altering a box is a labour-intensive job. Even if it's just decoupaging with patterned paper. And it is even more time-consuming if you want to get "fancy"...you know, upcycle existing materials and incorporate your "found" objects to make it a one-of-a-kind project....the kind of stuff I like.:)
Since it is going to be a labour of love, I would suggest going for a sturdy box. So that it can withstand the altering process and have a decent lifespan as a pretty box.
My fave boxes are mooncake boxes [from the Mid-Autumn Festivals]. Now apparently a LOT of people like to pass their mooncakes boxes to me [sans the mooncake!] but I'm fussy about what I alter. I like to be challenged creatively but if I have to reinforce the box before I start work on it, it fails the sturdy test and goes straight into the recycle bin.
Yep, a box collector with standards. *LOL*
I started by covering the box with wrapping tissue [from packaging] and matte gel medium.
Then I applied gesso all over. Gesso is hard on paintbrushes so I like to use a sponge.
And then covered it with silver paint.
The next step was to apply some stencil design on the box. I wanted to use my white opaque flakes because it was one of those neglected mediums.
I loved the stenciled design when it dried and also "rediscovered" why I hardly used the white opaque flakes. It was looked very pretty but the rough texture wasn't pleasant to the touch. It was "pokey". Now who wants to "cut" themselves every time they open a box right? *winks*
The "pokey" box lay in plain sight amongst my stash, mocking at me every day...
"Have you found a solution? Are you going to make me pretty? Why are you ignoring me?"
For two whole weeks, it tormented me. [dramatic music plays in background].
Until last Saturday. When I rummaged through my stash and found a piece of remnant vintage curtain which reduced the roughness of the texture and still allowed the stencilled design to be seen. Progress!
There was also the challenge of adhering the fabric around a circular box. I decided to add "gathers" and added pearls and buttons to distract. [Okay, I was watching Amazing Wedding Cakes while doing this....*LOL*]
I kept the embellishment clusters on the cover simple so that it showed off more of the texture I spent so much time on. And gives me the option to add a personalized sentiment or name for when I actually give the box away.
So now you know friends, altering a box is no easy task. There will be an extremely "ugly" stage when you question yourself on why you even started the project in the first place. But there's a great sense of satisfaction when it's done. :)
Pin It


13 comments:
This is beautiful, Yvonne!!
This turned out gorgeous Yvonne !! I am stuck at altering a hexagonal box after few layers of texture and black gesso, I really get it when you say yours was talking to you, mine is also mocking me...lets see how it turns out :)...........I think I need to watch few shows !!
WOW. I'm blown away by this. Wrapping a round box in lace is not easy and this looks perfect. The trim and the pearls really elevates it. That's going to have to hold something REALLY special.
Oooh what a stunner!!!
Cheers
Dr Sonia
Oh wow, this is stunning!! I love how you decorated it!! The lace looks amazing!! Awesome tutorial, too!! You've made me want to give it a try :) Have a great day :)
Lisa
A Mermaid's Crafts
You are simply AMAZING!!!!!! I love love love love this!!! GORGEOUS!!!!!!!!!!!!!!!!
wow that came out amazing.. so clever
Ahha what a classy looking makeover ! Fabric has made lot of beautiful difference !
I agree the stuff to be altered must be sturdy ,I learned it hard way..good in a way, now I can throw away some ,rather than hoarding all the packaging !
WOW, Yvonne! This is such a great tutorial - - I am going to bookmark it I loved it that much! Your altered box turned out absolutely gorgeous, too. And I also want to thank you so much for your heartfelt words of condolences, too. HUGS!
It turned out sooo well.....I think I would have tossed it....good on you! And it is really pretty. FABULOUS use of the curtain netting, too:):)
This came out so beautiful! Just gorgeous!
Oh, wow! What a process! So glad you persevered because this is stunning! It almost looks like a wedding cake, it's that beautiful! WOW!
This is stunning!!! Fabulous upcycling - as always :-)
Post a Comment
Thanks for visiting my blog and taking time to leave a comment. I really appreciate it. Have an awesome day!:)
Cheers, Yvonne.