Monday

It was a tiara-wearing kind of a day...*winks*


It-was-a-tiara-wearing-kind-of-a-day

Okay, the secrets's out. Some days at the Yam household are tiara-wearing kind of days. *LOL*


It's blingy and sparkly and everyone just looks pretty in a tiara right? *winks*


And yes, I may have a growing tiara collection...even my teddy bear wears a tiara. ;)


I had to "bling" up my chipboard letters with glitter paint....


And added some sequins to up the "bling" factor.


Playing along with Stuck?! Sketches.

Share/Bookmark

Pin It

Thursday

Why I love mixing media...


Why-I-love-mixing-media

As a person who didn't doodle or draw as a child, learning how to draw has been a tad challenging. [Can you believe it's been a year already?] It's hard to be carefree and loose when you have preconceived notions of how things should look, instead of what they really are.


For instance, I was drawing my eye lashes as straight lines instead of curves. Until I flipped a beauty magazine and really studied an ad on mascara. *lightbulb moment*


And my drawings/paintings always start out ugly. Real ugly. *LOL*


Then there is the question of proportions and getting the angles right. Here I know the girl looked a little odd but I wasn't sure how I could "save" this painting.


That's when the coloured pencils and paint markers came into play! As you know, watercolours lose their luminosity if you "overplay" with them. Mixing other media can help correct mistakes/flaws and "rescue" your drawings/paintings. :)


I used my coloured pencils to create shadows for depth and added tendrils to make her eyes and face look more proportional. I used a white paint marker for the pop of reflection in her eyes. She still isn't perfect but a tad more presentable, right? *winks*


Share/Bookmark

Pin It

Monday

The third mixed media canvas of the trio...:)


Neon-colours-mixed-media-canvas

So, the other day, I mentioned that I made 3 mixed media canvases over a weekend. I tried to challenge my myself to use similar embellishments but make each one a little different. (Click on links to see previous canvases if you missed them: Canvas #1 & Canvas #2)


For this one, I went with bright and bold colours for LESSology Challenge #59: Neon-inspired. 


I used The Crafter's Workshop stencil with Liquitex Super Heavy Gesso here. It can't hold peaks but works well to create a slightly elevated texture and dimension. (Modeling paste will get you more dimension.)


I finished with my fave embellishments from Maya Road of course. :)

Share/Bookmark

Pin It

Thursday

2 sheets of patterned paper = 4 projects


One of the ways I try to maximize my art therapy time is to work on several projects in one seating. Like if I have my hot glue gun and pretty embellishments out, I will make a few tags and mixed media canvases. I incorporate different elements to make them distinct but if you are really observant, you can tell which projects were actually done in one seating. [Clue: When I'm obsessed with an embellishment, I will use it over several projects till I get it out of my system or till I run out of it...*LOL*]

I think it speeds up efficiency because you are "in the zone". *winks* Here are the four projects I did in one seating using two sheets of patterned paper of the same design. 

Life-is-an-advemture

I love the graphic print of this We R Memory Keepers patterned paper which I got from my Xyron design team stint. It was the perfect backdrop for my fun photos. One patterned paper used up! :)


Spring-coffee-tag

Next I made a tag. I needed to use spring colours so I added some pink and yellow.

A-quick-decorated-box

Then I thought the patterned paper would look nice covering a sturdy box.

The-decorated-paper-bag

Of course, the pretty gift box needed a matching gift bag so I recycled an old paper bag.

There you have it, 2 sheets of patterned paper = 4 different projects in one seating! 


Share/Bookmark

Pin It

Tuesday

A decorated paper bag for Maya Road..


Decorated-paperbag-for-Maya-Road-by-Yvonne-Yam

So the quest to use up my patterned paper stash has moved up a notch as I just discovered recycled paper bags in my "save-it-for-a-rainy-day" stash [actually they are a couple of boxes that I conveniently call a "stash" *winks*]. 


I cut the patterned paper to size, run it through the Xyron Creative Station for an even layer of adhesive and then embellish to my heart's content with Maya Road embellishments.


If you have been wondering why the pretty tulle blooms have been making an appearance on nearly every one of my recent projects, it's because I'm obsessed with them. The design team at Maya Road gets to choose the products and my last DT box was mostly these tulle blooms in every colour of the rainbow plus those wooden spools in every size. You know how I get when I get obsessed, right? *LOL*

This project first appeared on the Maya Road blog.

Share/Bookmark

Pin It

Monday

Messy background art journal pages


Messy-art-journal-pages

I don't always start an art journal page with something specific in mind never plan my art journal pages. I just throw colorants on and see what sticks. Let my imagination run wild. After all, there's always the option of painting gesso on the "terrible" parts and starting over. *winks*


Like on these art journal pages. I did acrylic paints, sprays with stencils, gesso with stencils, ink drips, paint splatters...and of course, decided that it needed a girl's face from my imagination on it. That's why the girl has some skin imperfections. *LOL*

Playing along with More Than Words challenge.


Share/Bookmark

Pin It

Friday

Sweet colours on a mixed media canvas...


Sweet-colours-on-a-mixed-media-canvas

So the other day, I was "schooled" by my niece S who told me that I can only buy her dresses in pink or baby blue. Apparently, 5 year olds these days are very picky about their wardrobe choices. 

I remember just wearing anything my mum picked out without throwing a tantrum...but I really hated it when my sister and I had to wear identical outfits. Worse for her though...because once she outgrew her outfits, she had to wear my hand-me-downs! *LOL*


Anyway, I've taken to soft and sweet colours of late...like the ones here on this mixed media canvas.


I started with wrapping tissue from packaging and lace from an old bra which I adhered to the canvas with matte gel medium. Then I applied light modeling paste with The Crafter's Workshop stencil to unify the textures. After a coat of white gesso, I went in with some ColourArte Radiant Rain mists. 


The pink spray mist nozzle was stuck so I had to unscrew the nozzle and just flicked some of the mist on. But I kind of like the random droplets I got. Besides, I had already picked out my embellishments for the canvas so I had to make it work somehow...*winks*


This is canvas #2 of a three-series set of canvases. I shared the canvas #1 last week.

P/s: Happy weekend friends! :)

Share/Bookmark

Pin It

Wednesday

Cheeky kids...


Cheeky-kids

So I spent some time with these 2 cheeky kids [aka nephew + niece] the other day. Yes, they are past the age when you can get them to do stuff for you without asking why...and getting them to do your "bidding" requires serious negotiation. *Okay, it's called bribery! LOL!* But we still had a lot of fun!


I kept the layout really simple because I really wanted to use the Sassafras patterned paper with all the animals that I have been hoarding for a few years. Yes, I've been ruthless in the patterned paper usage of late...[Okay, it's either use it or get rid of it because of spatial issues]. 


I also took out my Art Anthology stone effects paint out for a spin on the chipboard title. 
Playing along with My Creative Sketches.

Share/Bookmark

Pin It

Monday

The one where I couldn't wait to play with my supplies...


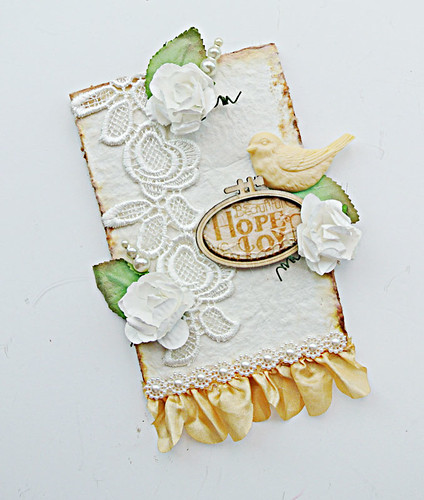
Maya-Road-tag

When I got my Maya Road goodies a couple of weeks ago, I couldn't wait to play with the yummy embellishments and made this tag. I just adore that resin bird and the gorgeous lace trim! :)


I found this textured white paper in my scrap pile and used it to cover a cardboard base. After distressing the edges, I used some Ranger distress inks to "age" the edges a little. [Oh yes, I have a whole collection of distress inks but never quite "fell in love" with them.... glad they are getting some action now. *winks*]


Next was the fun part...where the hot glue gun came out to play! [Last week, I had a minor "meltdown" when I discovered that I only had one glue stick left in my stash! *LOL*]


I tend to get dimensional on tags because they don't have to fit into an envelope and I usually include them in a gift box.


Happy week ahead friends!

P/s: I was travelling last week so I will be playing catchup on your blogs this week!

Share/Bookmark

Pin It

Thursday

An obsession with the eye...


An-obsession-with-the-eye

If you follow me on Instagram, you would know that lately, I've been obsessed with drawing and painting the eye. It is a fascinating subject for me strangely. So, if you catch me staring intently at you, I'm really checking out your eyeballs! *LOL* 


This one was done with Prismacolor Pencils on bristol paper. It took forever [like an hour! ] Burnishing and blending with coloured pencils require lots of patience but you get a lot more control. The ones in the previous photo were done with watercolours....and I kind of screwed up with the eye lashes. They are so hard! *LOL*

Share/Bookmark

Pin It
>
Related Posts Plugin for WordPress, Blogger...

LinkWithin

Pin It