Showing posts with label mixed media tag. Show all posts

Wednesday

When I listened to a gold shiny object...*winks*


Fine-day

So the other day I was clearing out my old makeup and dropped a Guerlain travel-sized pressed powder on the ground. The gold shiny metal cover stared at me and pleaded, "Use me on a project...don't discard me!"

Now you know, when your art supplies start talking to you, you pay attention and do exactly when they tell you, right? *winks*


Plus, it's gold and shiny. You know I have a thing for gold. And shiny things. *LOL*


Of course, I have a stack of already precut cardboard tags all ready to go (yes, I'm guilty of online shopping *hangs head in shame*).


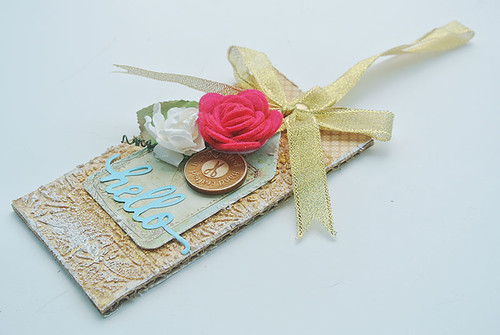
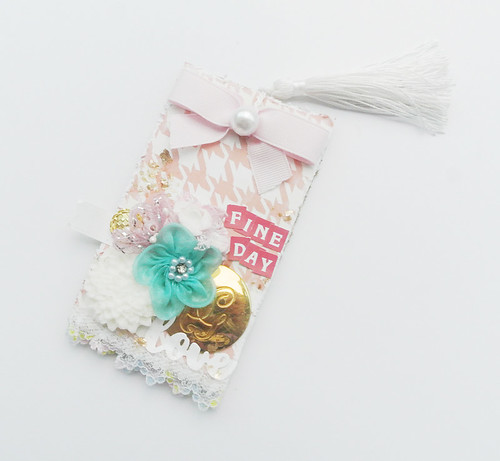
I adhered the houndstooth patterned paper to the cardboard base and distressed the edges for texture. I also used watered down gesso to tone down the colour.


I added a gold button and some Golden gold mica flakes to tie in with the focal point. I also worked in some of my Echo Park Paper letter stickers. The ribbon with the pearl was reused from retail packaging.

P/s: Do your art supplies speak to you??? 


Share/Bookmark

Pin It

Monday

The tag that caused a lot of pain...


The-tag-that-caused-a-lot-of-pain

Meet the tag that caused me a lot of pain. And possibly a scar on my left calf. 


Yep, I went into battle with my hot glue gun and it won. [cue super sad music] See that pretty blue flower? Well its evil twin (loaded with hot glue) decided to slip from my fingers, burn my left thumb and make a spectacular landing on my left calf. Ouch! 


But at least the tag turned out pretty right? *winks*


Share/Bookmark

Pin It

A fall-inspired tag


A-fall-inspired-tag

Hello friends! I'm currently working on using up my chipboard stash (yay, go me!). My chipboard collection gets quite a bit of usage first as "stencils"  for my mixed media projects before they end up as dimensional pieces on my projects. Do you do that too?


As always, my tag base is cardboard from packaging. I glued 2 pieces together for a sturdy base before covering the front and back with paper scraps and painting with a layer of gesso. 


When the gesso layer was dry, I went in with some mists in fall-inspired colours.


And since I was playing along with the Fall Coffee Lovers Blog Hop, I had to add in my Maya Road wood token with a coffee cup, nestled between fall leaves.  *winks*


I finished off with a Maya Road diecut hello and some pretty trim.


These are some of my fave colours to use on projects and I love how it turned out - perfect for adorning a gift bag of coffee beans, tea bags or hot chocolate.


Happy week ahead friends!


Share/Bookmark

Pin It

Wednesday

A textured and layered tag


A-textured-and-layered-tag

I love making textured and layered tags which are great for adorning a gift bag in lieu of a card. 


My tag base is always cardboard from packaging because it holds up better to my "abuse". :) 

I had a little "accident" and stained the patterned paper that I had adhered to my tag so I went in with a stencil and textured paste. Which I then decided to paint gold. And when that looked a little too gaudy, I went in to tone it down with some white gesso.


I distressed the edges of a smaller Prima tag to form the base of my focal point. Then I went in with some Maya Road embellishments. And finished my tag with gold glitter ribbon from packaging.


Hope you are having a great week friends! :)


Share/Bookmark

Pin It

Monday

The one where I couldn't wait to play with my supplies...


Maya-Road-tag

When I got my Maya Road goodies a couple of weeks ago, I couldn't wait to play with the yummy embellishments and made this tag. I just adore that resin bird and the gorgeous lace trim! :)


I found this textured white paper in my scrap pile and used it to cover a cardboard base. After distressing the edges, I used some Ranger distress inks to "age" the edges a little. [Oh yes, I have a whole collection of distress inks but never quite "fell in love" with them.... glad they are getting some action now. *winks*]


Next was the fun part...where the hot glue gun came out to play! [Last week, I had a minor "meltdown" when I discovered that I only had one glue stick left in my stash! *LOL*]


I tend to get dimensional on tags because they don't have to fit into an envelope and I usually include them in a gift box.


Happy week ahead friends!

P/s: I was travelling last week so I will be playing catchup on your blogs this week!

Share/Bookmark

Pin It

Wednesday

A purple mixed media tag


A-purple-mixed-media-tag

This was another one of those mish mash tags....where I use little bits from my "save-it-for-a-rainy-day" box and try to make something decent. *LOL*


I started with a cardboard base which I covered with paper. Then I added light modeling paste with a stencil and spritzed with a lilac mist.


Next I added little bits of lace from old bras [yes, apparently I like purple lingerie...*winks*].


I finished off with paper blooms, bling and a feather. :)

Share/Bookmark

Pin It
>
Related Posts Plugin for WordPress, Blogger...

LinkWithin

Pin It