Tuesday

9 ways to give a new lease of life to household items


Sometimes I like to go "shopping" at home for items to alter. You would be surprised at the fun stuff you can find if you really "explore" your home. Here are 9 ways to give a new lease of life to household items.

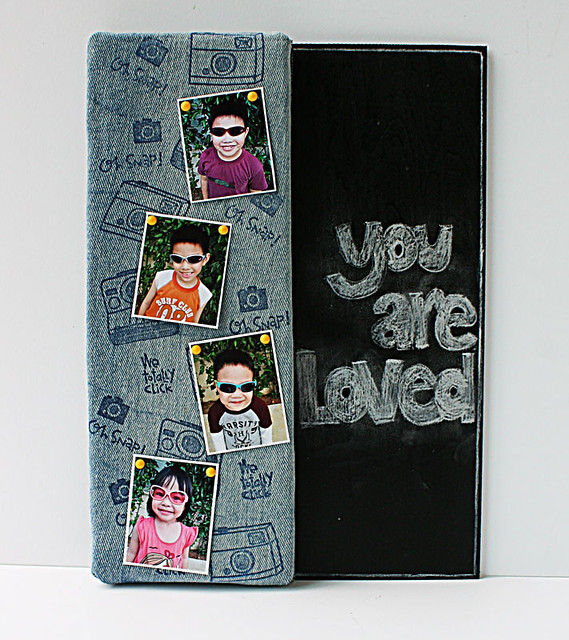
Two-way-board
Two way board for Xyron and Paper Smooches

1. Make a two-way board with packaging sponge, old denim fabric and a piece of wood. You can pin your fave photos and use a chalkboard marker to write notes.

Yum-pan
Meet my yum pan
2. An old frying pan makes a fun decor piece for the kitchen. :)


Animal-kingdom-project-by-Yvonne-Yam-for-LESSology2
Using the glass pieces from old lighting

3. Glass pieces from old lighting can be reworked into a pretty glass container for pens.


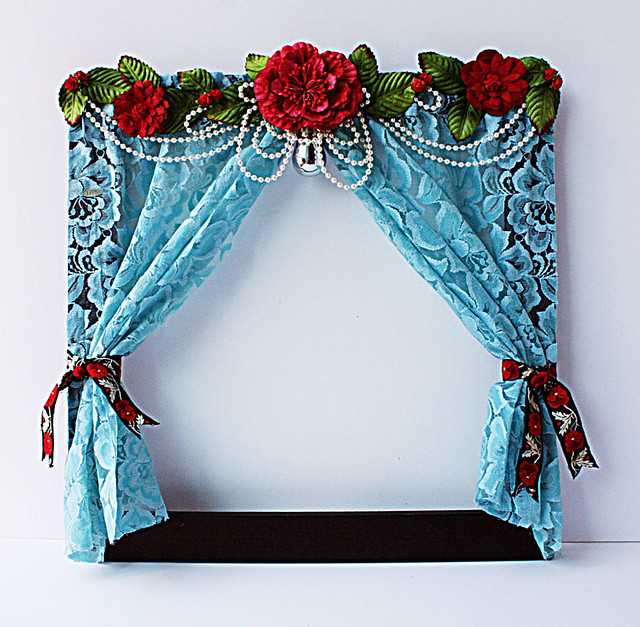
Window
My "window" for LESSology
4. An old frame can be "beautified" to a display piece for photos and little notes.


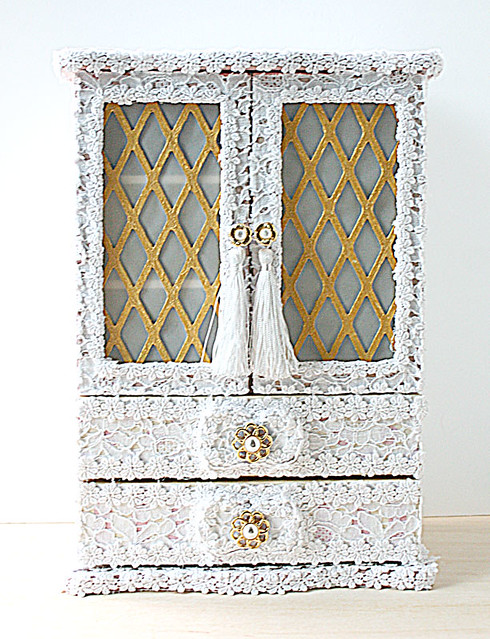
Upcycled-storage-unit
The need to "lace-cify" everything
5. An old storage unit gets a makeover with leftover lace, buttons, vellum, chipboard, paint and tassels.

Mixed-media-canvas-with-old-lighting-parts
Getting to know my creative process
6. The hardware from old lighting can make a statement on your mixed media canvas.

Upcycled-bottle-with-beads
Why you should order a gin and tonic
7. Decorated mini alcohol bottles look great on display.

Letsgettrendynow3stitching3byYvonneYam
Altered project for Let's Get Trendy Now!3
8. An old loofah brush can an awesome base for an altered project.

Mixed-media-on-a-mooncake-box-cover
Mixed media on a mooncake box cover

9. Wrapping tissue, chipboard and colorants can transform an ordinary mooncake box into something a little more magical.

There you have it. 9 ways to give a new lease of life to household items. Which one will you try?

P/s: Check out 9 (more) ways to give a new lease of life to household items.


Share/Bookmark

Pin It

Monday

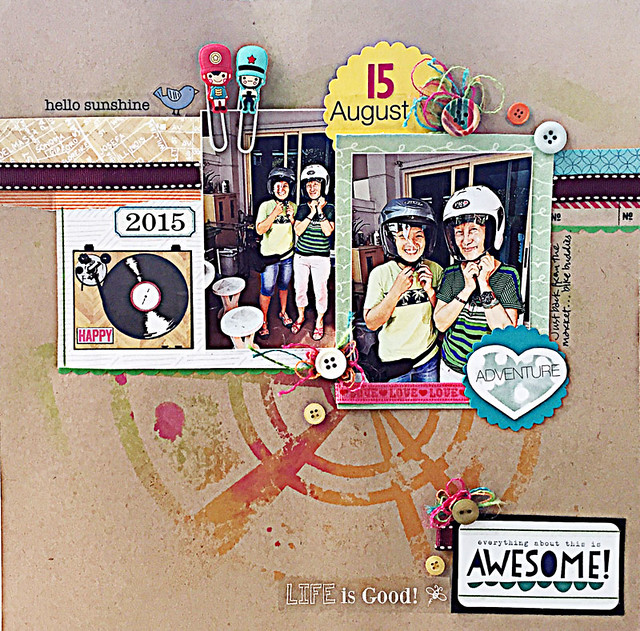
Scooter buddies


Scooter-buddies

The other day I spotted these two [aka mum & sister] in their helmets after a short trip to the market nearby on my sister's scooter.


As usual, they obliged me with a photo or two. *winks*


Don't they look cute? *LOL*


So I just had to use these cute paperclips on my layout, right?


I haven't done a scrapbook layout in weeks and it was nice to work in some paper scraps and buttons [I don't buy any but apparently they breed because I still have loads of them!].


Playing along with Stuck?! Sketches.


Share/Bookmark

Pin It

Wednesday

A mixed media canvas using leftover lace and fabric


Mixed-media-canvas-with-leftover-lace-and-fabric

So the little bits and pieces of lace and fabric that I have been "saving for a rainy day" have been driving me a little crazy of late. Too pretty to throw away and too small to work into any project....or so I thought....*lightbulb moment*


I decided to adhere them on an 8x8 canvas (with matte medium). Then I painted over it with a coat of white gesso and I got a great textured surface to work with.


I went over the surface with gold paint, leaving some parts unpainted, then added some Golden glass bead gel with The Crafter's Workshop stencil. I defined the stenciled image by adding a layer of Inka Gold in old silver over the raised areas.


I used a remnant pearlescent fabric as the base for my embellishment clusters. Love the sheen and texture it adds to the piece.


Can you tell from the finished product that background was a mish mash of lace pieces in different colours? *winks*

Playing along with ARTastic challenge to make the background a feature. Here's the inspiration picture:


Share/Bookmark

Pin It

Monday

I scored some textured fabric!


Perfect-mixed-media-card

I love it when my mum's friends think of me....and hand me cool stuff to play with. Like remnant textured fabric. *winks*


Just perfect to add punch to a corrugated cardboard base. 


Yeah...I went a little crazy with the gold.:)

Playing along with Cardabilities.

Share/Bookmark

Pin It

Wednesday

Upcycled: a gift container for ColourArte


Upcycled-gift-container-by-Yvonne-Yam-for-ColourArte

Oh well, you all know that I'm a box and container girl. So I couldn't possibly pass up on altering a big sturdy tin container, right? *winks*


Today I share how I transformed an ordinary tin container into a pretty gift container in a step-by-step tutorial over at the ColourArte blog. I would love for you to go take a look.:)


Share/Bookmark

Pin It

Monday

Playing in the art journal...:)


Mixed-media-art-journal-page

I am really enjoying my altered book art journal. :)


It's big so I can really practise my facial details. 


Playing along with The Mirror Crack'd and The Mixed Media Monthly Challenge.

*Edited* These journal pages made Top 5 at The Mirror Crack'd.


Share/Bookmark

Pin It

Thursday

An altered bottle...a tutorial. And a giveaway winner!


Altered-zipper-bottle-for-LESSology.

I recently fell hard for watercolours. And with that came the inevitable collection of paint brushes just for my watercolours. Of course that meant that they needed a "home".


I started with this juice bottle. I love that it's slim and compact and perfect for my brushes. :) I applied Liquitex matte medium to adhere the lace to the bottle. Then I used one half of a zipper to "cover up" the joint and decorate the circumference of the bottle.


I also added some pearls along the edges to make it a little prettier.:)


I ran a needle and thread through the other half of the zipper to create a gathered effect.


Then I used a hot glue gun to create a spiral bloom.


The zipper bloom was then adhered to the bottle.


I finished by adding a fun charm to the bloom. :)

________________________________

A big thank you to those who took time to comment on my altered shoe for ColourArte. The winner of the $25 gift certificate to the ColourArte store is Reusing Cards and Quilling! Please send me an email so that we can get you set up for some shopping at the ColourArte store!

P/s: I'm signing off early this week because it's my country's 50th birthday and we have a 4 day weekend! Woohoo! Happy birthday Singapore! :)

Share/Bookmark

Pin It

Tuesday

Every picture tells a story....or does it? *winks*


Every-picture-tells-a-story

Does every picture tell a story? Maybe...


Picture #1: 
Dad - photo-ready, wondering when this photo-taking of food would be over....
Mum - arranging the cups and plates so that they are photo-ready [yep, she is "well- trained"!].

Picture #2:
Mum and dad - posing with the breakfast spread.


What you didn't see was that dad actually took a bite from one of the sandwiches but had to put it back on the plate for proper photo-taking! *LOL*


Yep...I was chuckling as I was working on this layout. 


Playing along with the Stuck?!Sketches.

Share/Bookmark

Pin It

Monday

The embellished monogram....a tutorial


Altered-monogram-by-Yvonne-Yam-for-Maya-Road

Presenting my latest embellished monogram....:)


I started with a bright yellow wood monogram from Smiggle that I got on sale for $1. I covered the top surface with remnant canvas fabric, applied Liquitex resin sand medium with The Crafter's Workshop stencil and painted the other surface with gesso.


Next I misted with ColourArte Radiant Rain shimmering mists for a subtle sheen. After that I started embellishing. I added the Maya Road pom pom trim along the edges, then glued some pearls around to "glam" it up. I used a rub-on on the frame, then covered it with crackle glossy accents.


I decided to make the bird stand out a little more so I went in with some Silks Acrylic Glazes and "blinged" out the bird by adding mica flakes, a glitter embellishment and a wing charm.


I love how my embellished monogram turned out. Who wants me to make them one? 


This embellished monogram was a design team project for Maya Road.


Share/Bookmark

Pin It
>
Related Posts Plugin for WordPress, Blogger...

LinkWithin

Pin It