

My guest today is the super talented Erum Tasneem of VIBGYOR Krafts. Erum makes the most breathtaking creations. Her projects are always full of textures and layers.She has a great sense of colour which she combines with her beautifully handmade flowers to stunning effect! Today she shares an awesome tutorial on how to create an amazing ribbon flower. She's also hosting a ribbon challenge with a fabulous prize for the winner! :)
Prepare to be awed! Check out some of E's creations!


*******************************************************************

Hi! I am E.T. of VIBGYOR Krafts. I live in Karachi, Pakistan and we have very few craft supplies here, tons of art supplies but almost zero craft supplies. Because of limited craft supplies, I gravitated towards making stuff on my own. For instance, dyeing my own paper and drawing and cutting my own flowers. I have always been inspired by the Prima flowers I see used by so many crafters. Fairly recently this inspiration has led me to making fabric flowers. I still make paper flowers and sometimes combine both fabric and paper flowers together in one card.
I mostly make cards with no images and just flowers framing a sentiment (which is usually computer generated due to lack of stamps). I am happy with what I have and I think sometimes my cards come out good enough. I do make a lot of flowers from scratch and today I have a pictorial for you. I have come up with this flower on my own and the resulting flower is gorgeous.
Thanks to Yvonne for considering my creations worthy enough to showcase here.
Things you need:
Ribbon or fabric (preferably 1 inch or above)
Glue
Glitter (not necessary)
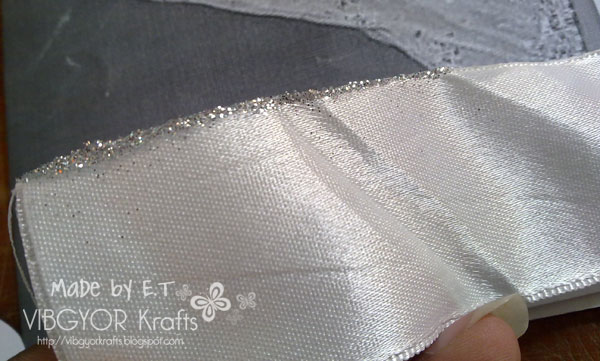
Step 1.Apply glitter or stickles to one edge of the ribbon. Let it dry.

Step 2. Cut out a rough circle, this will be your flower base. This doesn’t have to be perfect, it won’t show.

Step 3.Apply glue on the circle and start gathering your ribbon as shown in the picture.

Step 4.You can also overlap and make a second ruffled layer.

Step 5. Stop at any point you want to or continue to add a third layer. Now start twisting the ribbon instead of adding more ruffles (like you make a twisted rose).

Step 6. Keep twisting and gluing down the twisted ribbon until you are pleased with the outcome. Now cut your ribbon, apply a bit of glue at the end of the ribbon and insert it in the flower’s center.

Step 7.You can finish it off here by adding a gem or button OR

Step 8. You can take a thinner ribbon than the one you are using right now. Cut it 3-4 inches, roll it and glue it in the center like I did.

Step 9. Play around with your flower until you get the desired result. Tuck in and glue a few sharp folds and this is what you will get.
You can see that I didn’t continue with applying glitter along the entire edge. Midway through the making of this flower, I thought I would add glitter once the flower is complete. Here is what it looks like after I placed it on my project.

Here is my project.

******************************************************************
Isn't that a stunning card? Ready to play along? Link up your newly created projects featuring a handmade ribbon flower via Inlinkz (located at the end of the post) by Friday September 9 for your chance to win this awesome ribbon collection...

As always, please leave a little love for my guest Erum!


37 comments:
Wowwwwwwwwwww! Her work is GORGEOUS! I loveeeeeeeeeeee her flowers! :):):):):):):):):):)
Erum.. Love the ribbon collection.. :D... and thanks for the tutorial.. I think I shall try my hand at it.. :-)
wow!! Thanks Erum...hope i get to try this out :) btw what glue did u use... i have real trouble getting any fabric to stick well on paper :|
that is such a gorgeous way of using ribbons. Love it Erum!
This is simply simply fantastic...just way beyond gorgeous!! love the ribbon flower and I have the perfect ribbon for it!! yay!! I hope I can make it though!!
gorgeous card Erum and thanks for this wonderful tutorial i sure would like to try my hand at it's very very pretty.
So good to see you here, Erum! And I can't wait to jump start and start making some ribbon flowers :)
lovely creation erum! and thanks for the tutorial! jus loved it
Stunning card Erum. Love your flowers...hope to get time to create this week.Thanks for the tutorial.
fab project erum. love your flower and evverything abt this project cus everything is very nicely done :)
i will give it a try.
hugs
Alyna
Wonderful creations!!!
Wow I love that flower have to try it, thanks!
Wow! Thank you ladies!
@Karuna I use UHU (all purpose adhesive)- made in Germany
you know those glue that, when dries off, sticks on your fingers like a second skin or dried skin? It's that kind of glue. Plus it dries super quick.
What beautiful creations! Love the flower!!!
Wow that is such a super cool flower - love it! Looks super easy too & I actually have some glubers - those glue circles from Cosmo Cricket - which would make it even easier. Erum's work is very beautiful!
awesome tutorial! i will try these pretty flowers!
Supa cute flower Erum! Thanks for the tutorial :) Its nice to read about you and good to know how nicely you put the supplies available with you to good use. I also love the way u use the glitter bals from Pie Lane in ur cards. Would try to participate in the contest as I love making flowers :)
erum rocks !!
Wow! Love what she created! So easy, yet so beautiful! Tks. for sharing her work with us! :)
Love the tutorial... thanks!
Beautiful flower and such a stunning finished card!
Erum's work is beautiful and really love how she utilize her supplies. thanks for the wonderful ribbon flower tutorial, too!
Erum you are so very talented, this is an awesome flower tutorial.
Hi Erum,..your work is really very beautiful.Thanks for the flower tutorial.I also use UHU glue for the fabric...true its really dries up fast.Surely try this flower and would love to take part in this!
Super beautiful flower. Love the card too. :)
Gorgeous! Love your tutorial as well. You've made excellent use of your supplies!!
Had fun playing along and Though I know that I am nowhere close to the gorgeous ness she brings on paper...I kinda liked it
Wonderful tutorial. Lemme try and make a ribbon flower card for this Yvonne. So nice of you to showcase Erum here.
i have to make card using the ribbon or i can simply put the pic of ribbon flower too...pls reply...
What a beautiful bloom! How did I miss this??? Well, it was last week while I was out of power. I am still catching up on everything!!!
I hope to play!!! I still need to finish my LO from the last challenge. Hmmmm, not so sure I can combine the 2, gotta think about it some more!
hey !!i think my first link is leading nowhere :(so i linked it up again !!kindly delete my first link.
http://mitralee.blogspot.com/2011/09/adding-color-to-white-ribbon-and-tail.html
Linked up two projects, please use the red, white and blue layout. ;-)
Thanks for the cool idea!
Hi ET.
Wow hun what a fabulous ribbon tutorial. I will definitely be trying this out.
hope you are well.
hugs
Dawn xx
Thank you for the terrific tutorial. Love your beautiful flowers! I will have to try it!
WHAT A FABULOUS PICTORIAL...
WANNA TRY MAKING THESE FLOWERS SOON... GREAT JOB ERUM!!!
HUGS,
RITI
Erum, you make things look gorgeous! Love the flower and the card you used it on :D
Post a Comment
Thanks for visiting my blog and taking time to leave a comment. I really appreciate it. Have an awesome day!:)
Cheers, Yvonne.