Showing posts with label tutorial. Show all posts

Monday

Mixed Media Monday - how I draw a mixed media eye in my sketchbook


Hello friends! For today's Mixed Media Monday, I will be sharing how I draw a mixed media eye in my sketchbook. :)


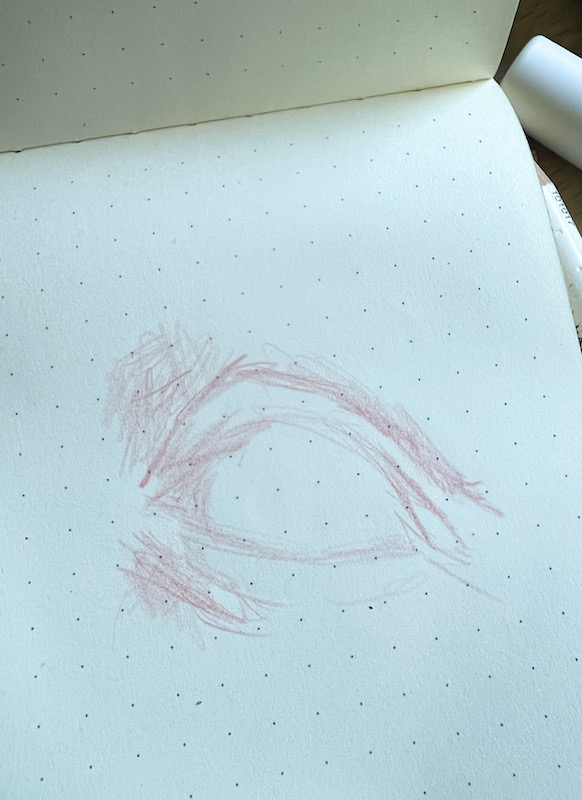
I usually start with a quick sketch with my non-dominant hand (left). It keeps the drawing loose and is part of my ambidextrous goal for 2022..*winks*


Then I go in with another colour....clearly still with my non-dominant hand...it looks messy at this point but the goal is to put some broad strokes and colour down very lightly.


Then I add in the iris of the eye. The key is to go in with light strokes and to layer the colours without blending. This gives you the flexibility to "correct" if you don't like the strokes/colours/shapes.


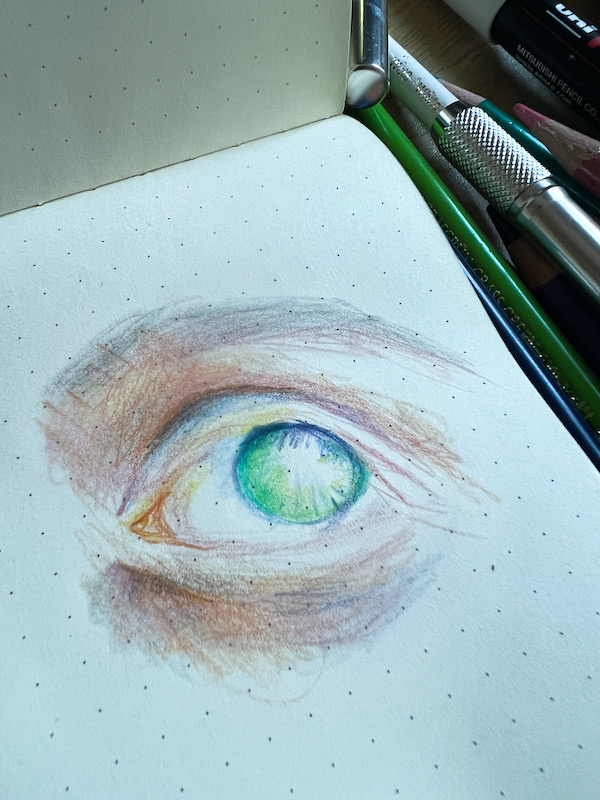
Once I'm happy with the overall shape of the eye,  I like to go in with the darks to create some depth (and drama). Still keeping the marks really light and loose.


Next I go in with warm colours to "brighten" it up - orange, yellow and red...and start blending the colours together.


Next step is to go in with the pupil and darken certain areas to create depth to the eye.


The final step is to draw the eyelashes and add in the white highlights.

Now, if you like the really smooth look, you can burnish in the colours. The unblended look is more my style...*LOL*

And there you have it, how I draw a mixed media eye in my sketchbook. :)


P/s: I used Faber Castell Polychromos and a white Posca paint marker for highlights.


Pin It

Friday

Your weekend project - a cute decorated paper bag (a tutorial)


Hello friends! Here's your weekend project - a cute decorated paper bag! :)


Start with a sturdy paper bag of your choice.


Measure and cut patterned papers to fit the front, back, bottom and sides of the paper bag. I usually cover just the front and back of the paper bag but I am on an ongoing mission to use up my patterned papers so I went with my paper stack from 7Gypsies that I've had for years.


Adhere cut papers to the paper bag with an adhesive of your choice. I went with my Xyron Creative Station for an even layer of adhesive.


Start playing around with your elements until you are happy with the layout design. Then adhere the pieces.


Add handles to the bag. 


I like to finish off the decorated paper bag by adding some texture.


There you have it - a cute decorated paper bag to add to your stash. Perfect to pull out for that last minute gift!

Happy weekend friends!:)


Share/Bookmark

Pin It

Thursday

Tutorial Thursday- Santa on a milk carton


A recent re-organization and declutter of my craft supplies uncovered some hidden "new" gems in my stash...


Like a bunch of these craft milk cartons. Which are perfect since I don't have that many gift boxes to upcycle for Christmas this year.:)


I cut some patterned paper and adhered to the carton.


For a slight contrast, I used the b-side of the patterned paper for the main design panel.

You can see that I did a lousy job cutting the circle out after adhering the patterned paper. What I should have done was trace out the circle, cut the circle out of the patterned paper before adhering the piece to the milk carton. Also, because I did such a lousy job, I decided that ONE circle window was good enough *gal was clearly lazy*. *LOL*


Even though I was going to put a clear window over the circle window, I decided that adding a little bit of washi tape would "cover up" the cut marks in case the carton got scrutinized very closely by the recipient (Yep...any excuse to use my Christmas washi tape...hehehe).


After that, of course, I decided that the clear window needed a glittered frame. :)


And since I only cut out one window, I had an extra clear window panel so I added some gold glitter and made it a shaker Santa milk carton. :)


I finished by adding some fussy-cut elements and stickers.


I think it would be great for holding some candies or cookies. And look nice as a display piece.


What do you think?


Share/Bookmark

Pin It

Tutorial Thursday - a quick Santa paper bag


Well, if you know me, you would know that I would most definitely try to do a project incorporating multiple Santas in my bid to use them up right? *winks* Here it is...this week's obligatory Santa project!


I started off with this small sturdy paper bag from YSL. 


I measured and cut two pieces of patterned paper for the front and back of the bag.


I ran the pieces through my trusty Xyron creative station for an even layer of adhesive and then adhered the pieces to the bag.


Next I adhered the Santas to the paper bag. It was a great opportunity to use up the partial Santa faces that I had.


Of course, in my overzealous haste to glue the Santas down, I left a gaping "hole" between the Santas that was too small for a full Santa head but definitely threw the design off-balance. So, I tried to fix it with some trees and a mini Santa....you know like I intended to design it in the first place. Did it work ? *LOL*


I really like how it turned out...great Christmas gift bag for some sweet treats. What do you think?


P/s: Yes, this girl is really trying to use up those Santas. Can't wait to finally get them all glued down on projects and out of my stash. Will it happen in 2020? *Fingers crossed*


Share/Bookmark

Pin It

Wednesday

Earth Day 2020 - a decorated upcycled box tutorial


Happy Earth Day 2020 friends! Today I'm sharing an upcycled mooncake box! :)


I started with this sturdy mooncake from last year's Mid-Autumn Festival. At first I was a little reluctant to do anything with it because of the cool holographic cover. But I'm currently on a mission to upcycle whatever's available at home right now...*triumphant music plays in the background*


I started with patterned paper (Basic Grey and Graphic 45) that I cut to size and adhered to the box.


Then I thought it needed more punch...so I went in with a ribbon border. And of course, I did a horrible job adhering the ribbon at the four corners so buttons were strategically added as a design element. *winks*


I wasn't quite sure how to decorate the box initially. Then the Singapore Prime Minister extended our #stayathomeduringtheCOVID19pandemic order by another 4 weeks till 1st June. Well, goodbye spring then, let's just go ahead and look forward to summer (*high fives friends in the northern hemisphere*) shall we? *optimistic music plays in the background*


Lots of fussy-cut elements and stickers. :)


I had so much fun working on the cover because of all the happy colours!


Not sure what to put in the box yet? Maybe a coordinated folder filled with goodies?


What do you think?


Share/Bookmark

Pin It

Monday

Make Stuff Monday - Another quick decorated paper bag


Well friends, I'm slowly making my way through my stash of paper bags. Here is another quick decorated paper bag.:)


I started with this sturdy white paper bag with silvery grey bag handles.


I measured, cut and adhered the paisley patterned paper to the bag, then added white lace trim along the edges.


Next, I tied a bow with lace, then dressed it up further with a crochet doiley and a heart bling. I love the white on white on white. *winks*


I think it turned out quite pretty...what do you think?


Share/Bookmark

Pin It
>
Related Posts Plugin for WordPress, Blogger...

LinkWithin

Pin It