Wednesday

Another Yam family birthday layout...:)


So I interrupt the Christmassy projects to share another Yam family birthday layout. Just a few more to go...;)


It was my brother's birthday on March 1st but we celebrated on February 28th because the baker (aka me) wasn't free on March 1st. Clearly if you want cake, you have to accommodate the baker's schedule right? *LOL*


This was the niece's "I hate taking photos" phase. *shakes head*


I really wanted to use this background paper so  I went in with many pops of colour to create visual interest.


I had some leftover bits of yellow cardstock from a previous project and I really liked the fun shapes so I incorporated them as they were...


Just 3 more birthday layouts to work on. I have another done for a guest designer gig next month. Will I be able to complete them before the end of 2019? Only time will tell. *wish me luck*

Playing along with The Studio Challenges.


Share/Bookmark

Pin It

Tuesday

Tuesday Tutorial - a Christmas scene in a glass dome


So this project was totally inspired by a Christmas scene in a glass dome that I saw last week when I went festive shopping...


The price tag was a whopping S$49.90! Of course, the crafter in me thought that I could totally do this for a whole lot less. *winks*


Even though I was tempted to buy the glass dome base at Ikea, I decided that I probably could find stuff in my house that I could use. Like this glass dome with a cute birdie...and this metal candle holder that I've had for years.


I gathered some Christmas cake decor pieces and a brush tree...


And just hot glued them on the candle holder.


I added some LED lights and I was done! 

What do you think?


Share/Bookmark

Pin It

Monday

Make Stuff Monday - a decorated Christmas tree


Hello friends! Meet this year's decorated Christmas tree! It's a gift for my cousin.


It was hard to find an undecorated small Christmas tree this year...they were way more expensive than the decorated ones. In the end, I went with this slightly adorned flocked Christmas tree. It had a couple of pinecones, berries and ball ornaments.


I added some fun felted reindeers...and some red leaves (from an old faux poinsettia plant) for a little more colour.


Then I incorporated this fun little "scene" as the center of attraction. Yep...those are Christmas cake decorations. *winks*


It looks really pretty lighted up....so tempted to keep this for myself....hehehe.

P/s: Sorry I couldn't get any photos in daylight. It's been rainy and gloomy here the last few days.


Share/Bookmark

Pin It

Thursday

Mother's Day 2019 celebration


I'm pretty proud that I've baked for every single Yam family celebration we've had this year (*high fives all around*) except for my own birthday (because I'm still waiting for someone to bake me something *hint*), including Mother's Day and Father's Day.


Here are the photos from the Mother's Day 2019  celebration - I baked cranberry scones and a mango frangipane tart.


Dad thought it would be funny to hold up two packs of coffee instead of my signages....;)


Can you tell that this was a really mish mash kind of layout? I was trying to use up random bits of scrap + happy mail wrapping bits (those punched bits because you know I'm too lazy to get my punches out for a layout...hahaha).


I did try to create some cohesiveness in the layout by outlining the leaves and text with a white gel pen. Did it work? *winks*


Of course, I had to add in the pig because we were all pigging out. *hehehe*


Playing along with The Paper Girls Challenge Blog #188: Family.


Share/Bookmark

Pin It

Tuesday

November 2019 eye sketches


Just a few lunchtime art-on-the-go eye sketches I did this month in my sketchbook. I went straight in with Prismacolor Premier Colored Pencils (yeah...my graphite pencils feel a little neglected.*winks*) and highlighted with a Signo Uniball white gel pen.:)


Share/Bookmark

Pin It

Monday

Make Stuff Monday: Quick Christmas gift-wrapping using stuff you have at home


Hello friends! How are your Christmas preparations coming along? I did some gift-wrapping this weekend....the quick and easy way, using stuff I have at home.:)


I got a couple of books that needed wrapping and I did contemplate actually buying some Christmas wrapping paper but decided to challenge myself to use stuff I already had at home. So I went for my brown packaging paper as the base and cut some Christmas scrapbooking paper (*high fives those who have lots of Christmas-themed scrapbooking paper in their stash*) as the mat for some simple embellishing.


Since these were all going into a large decorated Christmas box (*you know how extra I am...winks*), I kept the design flat and minimal. I adhered the patterned paper to the base using washi tape so that the recipient can reuse the packaging. I finished with a strip of vintage Christmas sticker.


I used the same supplies for all 3 books for an overall cohesive look and feel but just varied the way I used the supplies to differentiate them slightly.


I am pretty happy that some of the older Christmas-themed patterned papers finally got to see the light of the day. *hahaha*


Here they are all together. :)


Happy week ahead friends!

P/s: I was travelling last week so I will play catch-up on your blogs this week. :)


Share/Bookmark

Pin It

Thursday

A mixed media self-portrait on canvas


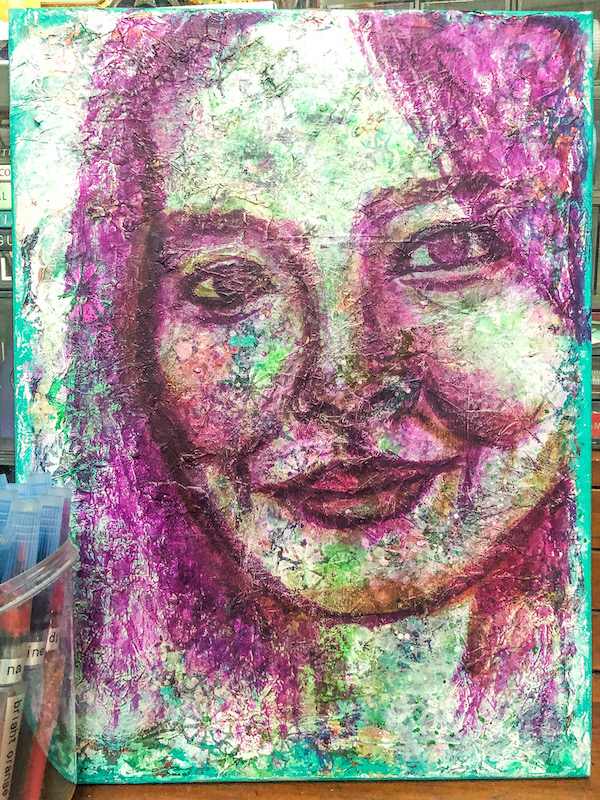
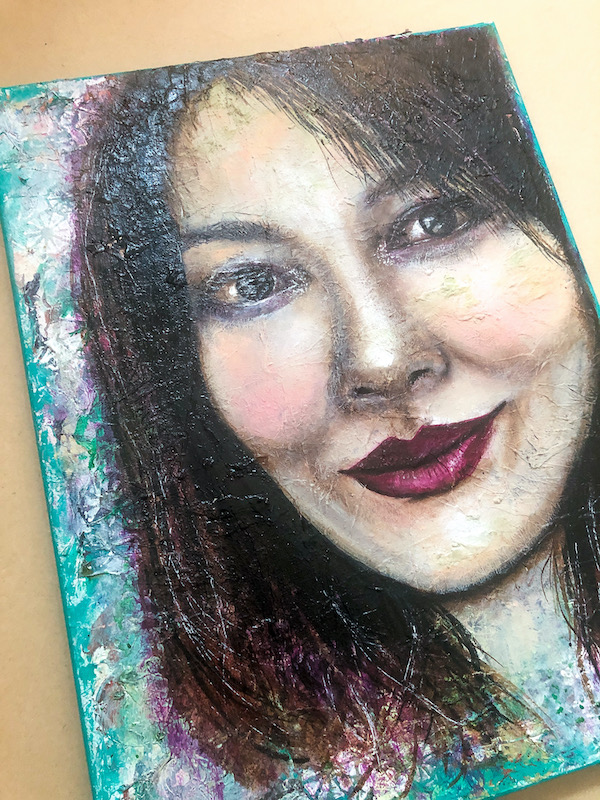
As you know, I've been practising drawing self-portraits in my sketchbook this year. I decided to use one of the sketches as my reference and work on my second mixed media self-portrait on canvas (see my first mixed media self-portrait on canvas). Of course, I chose to use the self-portrait sketch that drove me nuts because I like to "torture" myself unnecessarily. *LOL*


The background is a mish mash of scrunched up wrapping tissue, gesso, acrylic paints and inks. Then I did my initial sketch with a waterbrush pen filled with purple Liquitex acrylic ink. I like working with this ink because of its transparency (lets me build layers) and open time (even when it dries to touch, I can still lighten the colour with a wet towel and vigorous rubbing).


This was how it looked mid-point....bearing little resemblance to me. *hahaha*


Here was how it looked when I was working on the details...


Moving forward, I might have to reconsider how I do the backgrounds for my portrait paintings. While the tissue and gesso added some nice texture, it also created weird bumps and uneven surfaces which made it difficult to paint over.

Plus, I might have been too heavy-handed with my inks when working on the background. See the green bits on the forehead and cheek? The green keeps emerging even after several layers of heavy-body artist grade acrylic paint. If people ask, I shall say it's artistic style but you and I know both the truth *shh...don't tell ok?*


I hung my painting up on the wall and tweaked the details over the course of a few days. Apparently, walking past a painting every day helps you see it with fresh eyes. I think I'm going to seal this painting and move on to the next. What do you think?


Share/Bookmark

Pin It

Tuesday

Fun with lanterns


So I mentioned that children carry lit lanterns around the neighbourhood as part of the Mid-Autumn Festival celebrations. Of course, the Gangster Gang (aka nephews + niece) and their aunts (aka me and my sister) had to join in on the fun. :)


I didn't get great photos because the street lights and the candle lights really threw off the white balance on my iPhone. And I was clearly too lazy to make manual adjustments. *winks* Let's focus on the good, shall we? Photos of people were taken. You can recognize the faces. Family time was documented on a scrapbook page.  *victorious music plays in the background*


A super-quick layout because I ran out of my tape glue and the liquid glue was sticking everything on my fingers instead of the page. *LOL* How I eventually got that tissue ruffle banner embellishment to stick on the page is a marvel. *hehehe*


Not quite sure why Dorothy from the Wizard of Oz was involved in our lantern festivities but she really helped to break up the monotony of text on the background paper. :)


Playing along with Stick It Down.


Share/Bookmark

Pin It
>
Related Posts Plugin for WordPress, Blogger...

LinkWithin

Pin It