Tuesday

Learn how to make punched paper blooms with Hussena Calcuttawala!


My lovely guest today is Hussena Calcuttawala of Quill and Punch Works. Hussena makes really pretty dimensional creations. I love that she makes her own embellishments from scratch and that she has mad quilling skills. Her projects show great detailed work and I love that she maximizes the use of her tools to create eye-catching one-of-a-kind creations. Today she shares a fabulous tutorial on making your own bloom with a flower punch. She's also hosting a challenge with a prize for one lucky player.

Let's admire her beautiful gallery!


Hi Everyone,
I am Hussena and I am from Kolkata ,India...I have been Blogging for a Year and a Half and My Journey has been a Wonderful One !! Not Only Have I made a Lot of Friends, But have learnt so Many New Craft Forms from each of the Blogs out There !! I truly believe that Blogging has been a great Tutor and My work reflects it !! I am so Grateful to Yvonne for Featuring Me in Her Blog ...Her blog was one of the Earliest Blog I had been Following and as all you Know She Loves to Share all Her tips and techniques for Scrap Booking and It has been so Helpful to Me and Many Others :).
Today,I am sharing with You all one of My all time Favourite techniques which I use  in almost all My Projects :) And that is "Making Flowers" using a Punch....And I have a Short Tutorial of the Same !! Hope you all Like it :)


My Challenge for You is to Make a Card /LO or Any Other Project  Using a "FLOWER" Made from "PUNCHES" ......It Can be any Type Of Flower as Long as a PUNCH is Involved in Making It ..Hope you all Will Participate in this Challenge :) ..Looking forward to Seeing your beautiful Creations 

And This is My Card based on the Flower I Made :-


The   Winner of the Challenge will Receive a Surprise Goodie bag from Me consisting of  Pattern Papers{ 6 * 6 } ,Cardstocks, Embellishements, Stickers ,And  Ribbons :)
___________________________________________________________
Ahhhh...definitely a fabulous technique to learn, especially if you love blooms! Ready to play along? Please share your newly created projects using a "flower" made from "punches" via Inlinkz [located at the end of the post]  by Friday 31 August.
As always, please leave a little love for my guest Hussena!

Share/Bookmark

Pin It

Monday

I am using up my stash of blooms....and a giveaway winner!


Welcome-to-the-family

Hello friends! I've been reorganizing my craft supplies and have set myself some lofty goals...including using up my stash of blooms. Wish me luck! *LOL* [yes...still working my way through my cousin's wedding photos...]


I don't use flowers very often because I feel they look awkward on my layouts....like I'm trying too hard? *winks* This time I thought I would add leaves [yes...some floral arrangement in the house is missing some leaves. *LOL*] and it looks pretty decent eh? *winks* 

Supplies: Carta Bella patterned papers, Crafter's Workshop stencil, Maya mist, Prima canvas letters, buttons, trim, brads, paper blooms, fabric blooms and leaves, pearls, stickers.

____________________________________________________________

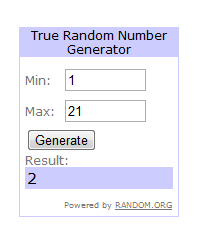
Thanks to all who participated in my class giveaway! I went to count my punch stash....I have 34!!!! 

The random winner is Romina Nahata!


Congratulations Romina! Please send me an email so that I can arrange for your class pass! :)

P/s: Don't forget to play along with my guest Isha's challenge! I have a fabulous new guest tomorrow! :)


Share/Bookmark

Pin It

Thursday

Do I have a fave?


Milestone

So my bestie claims that every new nephew or niece is my fave kid. Hmmm...there might be some truth to that. I most definitely like them better when they lose the soft spot on their heads [death trap!], when they can walk and talk a little and when praise is all you need to get them to do something for you! *winks*


But nephew #1 will always have a special place in my heart. We shared some fine, unforgettable moments...including a super "horrifying" one in the ladies' room. He was just off diapers and apparently did not have the finesse to handle his "equipment properly" [think Daddy Day Care]...so that was the first and last time I had to clean up a public toilet...*LOL* 

Playing along with the sketch challenge at Frosted Designs.

*Edited* This layout made Top 3 at Frosted Designs! :)

Supplies: Echo Park patterned papers, SRM stickers, Maya mist, American Crafts thickers, ribbon, buttons.

P/s: Come play along with my guest Isha's challenge and LESSology Challenge #16: Bubble boy or girl.  Don't forget about my fabulous class giveaway too! 


Share/Bookmark

Pin It

Wednesday

10 ways to journal on your layout.


I think that journaling is one of the most important aspects of scrapbooking. Even when the perfect photo seems to tell the entire story, somehow, the addition of words makes it even better.
I am not the sort to plan my pages...just like to go with the flow and see where my creativity takes me. This does pose problems for journaling...especially when I get overzealous with embellishing and *gasp* leave no space for journaling! Here are 10 ways to journal on your layout.


1. Handwrite on the background of your photo.


This is my fave way to journal. And works very well on distracting backgrounds that you are too lazy to edit before you print out your photos. When the background is dark, I use a white pen and vice versa.

2. Use a journal tag.

A coordinated journal tag blends in with the overall design and is an unobtrusive way to add your journaling. [Actually the journaling tag was added to hide a boo boo on the photo *LOL*]


Sean and Sophie
S and his little sister layout.

3. Write on your photo mat.

The texture paste on the background meant an uneven surface for writing so I created larger photo mats which I could journal on.


4. Utilize the space along the perimeter.

I love to journal along the perimeter because it usually blends in with the overall design of the page. Just pick a colour that already appears on your layout.

Whatzup
Whatzup layout.

5. Print the journaling on the photo.

This one's a total time saver. :)


Grandpa's birthday cake
Grandpa's birthday cake layout.

6. Keep the journaling close to the title of the page.

Because it's a pretty busy layout and I wanted to journal directly on the patterned paper, I kept it in close proximity to the title of the page for a cohesive look.


7. Use journaling strips.


The upside to this method is that you can "test" how it looks before fully committing it to the page.


Everybody loves leftovers
Everybody loves leftovers.

8. Blend it in with your embellishments.

I wanted the photo and the titlework to be the focal point of this piece so I blended my journaling with my embellishment cluster....[can you spot it?]

Hooray for goodie bags
Hooray for goodie bags layout.

9. Create a journal mat that blends in with the design of the page.

Here I was working a grid format so I just created a journal mat that blended in with the overall design of the page.

Fresh clean day
Fresh clean day layout.

10. Print journaling on transparency.

This allows you to seamlessly incorporate the journaling as part of your design. [Actually I don't own a light blue journaling pen ...*LOL*]


There you have it. 10 ways to journal on your layout. Which is your fave way to journal? 

P/s: Not big on journaling? Check out 4 sneaky ways to tell your story without actually journaling.


Share/Bookmark


Pin It

Tuesday

I love bright colours!


Hanging-out-with-you

Ahhhh...I love the Paper Cottage collection from Basic Grey! You know I love it when the patterned paper is like 80% done....it saves a lot of time! A little bright orange paint and a little fussy-cutting plus cute photos of my nephew J and my niece S....and I'm all done!


It did take a while for the paint to dry though ....that's why I like mists so much...they dry almost instantaneously...*LOL* But paint colours are way more intense...you know how I love bright colours!  *winks*

Playing along with the only patterned paper challenge at Frosted Designs and the sketch from sketchbook 365.

Supplies: Basic Grey patterned papers, Cosmo Cricket letter stickers, Heidi Swapp chipboard letters, twine, paint, buttons, ribbons, black pen, white pen.

P/s: Come play along with my guest Isha's challenge and LESSology Challenge #16: Bubble boy or girl.  Don't forget about my fabulous giveaway too! 


Share/Bookmark

Pin It

Monday

A giveaway! :)


Hello there friends! How about a little giveaway to start the week? :)


If you want to get a little more mileage from your growing stash of punches and die-cuts, why not join my friend Mo Kao  in a 3-week online workshop over at The Art Studio via Scrapbook News and Review? She's letting me give away ONE spot on her fabulous class [worth $39.99] to one of you! :)

I’ll show you how to speed up your scrapping time by using basic shaped punches on your layouts as well as practical uses for basic shapes such as circles, squares and hearts. For example, I’ll show you how to create a gorgeous flower using only heart shapes. 
I’ll also help you with design by providing you with:
9 sketches to use for your class projects (and to add to your sketch collection)
9 interesting ideas on how to use simple die-cut shapes (three ideas for each shape)
9 sketches presented in full-color palettes (sketches also available in black-and-white)
9 finished layouts 
Assorted shape templates
You’ll even get a big surprise in the end! 
In this class, you’ll learn how to apply scrapbook page design skills and color palette ideas to create fabulous scrapbook layouts that use all the creative ideas presented in the lessons. 
All information will be presented in a mostly video format with the ability to retrieve the sketches and templates as documents to save to your computer. You’ll need a circle, square and heart punch/shape/die-cut, although you’ll also be able to use the shape templates for some of the lessons. 

____________________________________________

Doesn't it sound like a fantastic class? I know I should be doing so much more with my punches! To be in the running for this awesome giveaway, leave a comment on this post telling me how many punches you have in your stash [it will make me feel better about how many I have....*LOL*]. I will announce the winner on Monday, 30th July.


Share/Bookmark

Pin It

Friday

How to decorate a jar with scraps.


Hello friends! How about decorating a jar with paper scraps and remnant trims this weekend?


A really easy and pretty project to do for the weekend! Have a great one friends! :)


Supplies: Graphic 45 patterned papers, plastic jar, ribbon, trim, paper bloom, pearls, glue.


P/s: Come play along with my guest Isha's challenge and LESSology Challenge #16: Bubble boy or girl. :)


Share/Bookmark

Pin It

Thursday

A mini album in a tin box!


J's tin album


So I was invited to guest design for lulupu.com this month and the theme is mini albums! :) I upcycled an old tin box which was used to house an accordian-styled album [4.25 X4.5] with photos of my nephew J. 


Now you all know that littlest nephew J spends an insane amount of time with me. Most weekends. Saturday and Sunday. The first kid I know to burst into tears when his daddy comes to pick him up...yes, there have been many tearful goodbyes with him in the car seat wailing while holding my hand, "I don't want to go home. I want to stay here...."


The upside to spending this much time with his aunt is the ridiculous amount of photos and videos he has. *LOL*


Here he was dressed up in his sister's outfit... [he insisted...I was thoroughly entertained! *LOL*]


Here he was singing...


At the playground...


To create unity among the pages, I use repeated elements like the owl with the googly eyes [I added Glossy accents for dimension] and the tag and twine. I also printed all my photos in black and white for a more cohesive look.


Supplies: Nikki Sivils patterned papers and stickers, EAD designs owl stickers, Inkessentials Glossy Accents, googly eyes, twine, tag, ribbon.


Share/Bookmark

Pin It
>
Related Posts Plugin for WordPress, Blogger...

LinkWithin

Pin It