Showing posts with label Your weekend project. Show all posts

Friday

Your weekend project - a cute decorated paper bag (a tutorial)


Hello friends! Here's your weekend project - a cute decorated paper bag! :)


Start with a sturdy paper bag of your choice.


Measure and cut patterned papers to fit the front, back, bottom and sides of the paper bag. I usually cover just the front and back of the paper bag but I am on an ongoing mission to use up my patterned papers so I went with my paper stack from 7Gypsies that I've had for years.


Adhere cut papers to the paper bag with an adhesive of your choice. I went with my Xyron Creative Station for an even layer of adhesive.


Start playing around with your elements until you are happy with the layout design. Then adhere the pieces.


Add handles to the bag. 


I like to finish off the decorated paper bag by adding some texture.


There you have it - a cute decorated paper bag to add to your stash. Perfect to pull out for that last minute gift!

Happy weekend friends!:)


Share/Bookmark

Pin It

Your weekend project: Upcycled vitamin container


Hello friends! Happy Friday! Just a quick project to share today....an upcycled vitamin container...perfect for gifting some candies/small objects. :)


I had this project on my mind for quite a while but as you can see from the size of the container, it took me a rather long time to get through this bottle of Vitamin C (I prefer to get my vitamins through real food but will take a supplement when necessary..or when I remember...like 2x a week...*winks*).


I cut some patterned paper to size and ran it through my trusty Xyron Creative Station for an even layer of adhesive.


Then I just adhered it to the vitamin container.


Next I added a blue ribbon.


I finished off with a button and a scallop-shaped journaling card. I like the idea of repurposing this plastic container that the recipient can reuse as a display container or regift to someone else.

Happy weekend friends!


Share/Bookmark

Pin It

Your weekend project: mixed media wall art


Your-weekend-project--wall-art

It's March and into month #3 without Netflix. *dramatic music plays in the background* 

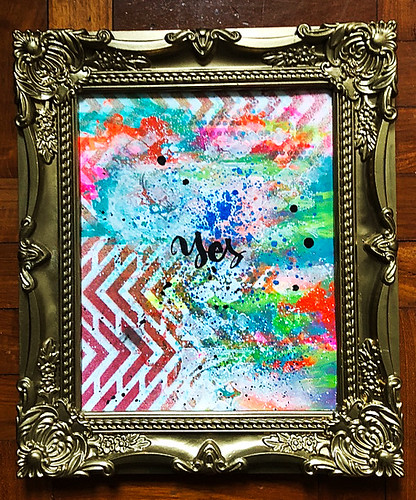
Instead I've been watching YouTube videos on Minimalism. I know. That's so NOT me. *LOL* Of course, with these sort of videos, there are so few things in sight that your eye tends to wander to where there are things *winks* like the walls. Which have one or two framed quotes in gold foil text on a clean white background. 

"Well, I can do that", I said to myself. And then of course, my background is mixed media madness and my text is in black. Hahaha!


I started with a white plastic frame that I bought cheaply in Manila back in 2016. Yes, it was left languishing in my cupboard for a while. Since my motto this year is to "Use it or lose it", this baby got a few lovely coats of spray paint to make it look a little more "expensive". 


Next, I found a piece of hot-pressed watercolour paper that was THE perfect size for the frame (read: no cutting required!). Then I thought to myself, "Why waste a good sheet of paper on some text?" And then promptly went to town with spray mists and stencils, acrylic paints and liquid acrylics. Yep, we are talking about Maximalism here. ;)

Of course, that whole process took a bit of time and I asked myself, "Do I really want to cover all that up with a quote?". Actually, I was tired at this point and really didn't feel like fiddling with text plus I've been practising brush lettering my daily affirmation so that's what I went with....YES.

So I wrote the word numerous times on wrapping tissue....chose the one that I liked best and just adhered it to the base with gel medium. Of course, you get just write directly on the watercolour paper but when you do it this way, you can play with the placement of the text on different parts of your artwork but committing to it. :)

Happy weekend friends!


Share/Bookmark

Pin It

Your weekend project: decorated box and gift bag (tutorial)


Decorated-box-and-gift-bag

How about decorating a sturdy box and gift bag this weekend? *winks*

[Apologies for the crappy photo...it's gloomy rainy season here in my part of the world, the Nikon is still at the doctor's (okay, I only brought it in last Friday) ...so the colours are a little off. ]

I started off with a sturdy cardboard box (Yep, I have 3 of these Google router boxes.. See the upcycled router box for my previous decorated box) and a floral printed paper bag from Crabtree & Evelyn. I really like the colours on the paper bag so I used those as the main colours for my decorated box and gift bag combo.

1. I selected a pink and gold-foiled patterned paper from a DCWV patterned paper stack and cut out 6 pieces for the box. After that, I cut out some to cover up the brand on the bag. I broke up the pattern on pattern overload with a mat of green cardstock. 

2. I ran the papers through my Xyron Creative Station for an even layer of adhesive. 

3. After that, I went in with my trusty hot glue gun and Maya Road pearl trim. This step is not difficult but just a little time-consuming....but so totally worth the effort!

4. Then comes my fave part - embellishing! I did take some time to choose my embellishments because I needed at least 2 of each to create a cohesive decorated box and gift bag combo.

5. I used the same elements on both the box and the bag but tweaked the arrangement a little.

6. I really liked how the set turned out - very pretty and girly.  I'm thinking the recipient will be pretty happy with them...even if there was nothing else in the box...*lol* Just kidding...of course, I would put some nice stuff in the box. 

P/s: Happy weekend friends! It's my sister's birthday on Sunday so you know I'll be cooking and baking because the Yams love a good celebration! I will share pictures next week (hopefully).


Share/Bookmark

Pin It
>
Related Posts Plugin for WordPress, Blogger...

LinkWithin

Pin It