Showing posts with label bird is the word. Show all posts

Monday

The story about the red bean cake


The-red-bean-cake

Back in March, we took a family vacation to Taiwan. And it was an eating vacation. Really. If that street stall had some write-up about it, we just had to try it. *LOL*


So when we were exploring the city of Kaohsiung, my dad "disappeared" for a while...he crossed the street to queue up for the red bean cake [it's like an enclosed pancake with red bean filling].


We had to take photos while we were waiting for our red bean cake of course! *winks*


Currently enjoying colouring my Blue Fern Studios chipboard with a black Sharpie and outlining with a white pen. :)

Playing along with the challenge at Once Upon a Sketch and Bird is the Word.

*Edited* This layout was featured at Once Upon a Sketch.


Share/Bookmark

Pin It

Thursday

The 20 minute layout


She

Sometimes, limiting your craft supplies makes it much easier and faster to complete your layout because there are fewer elements to fiddle around with. 


For this layout, I challenged myself to use only black or white embellishments [to match the photos taken with my bloggy pal Lynnda when we met in Melbourne]. Once I adhered the photo and the largest element - the swirl, the rest of the elements fell into place quickly and I had this layout done in 20 minutes. :)


Playing along with the challenges at Skissedilla and Bird is the word.

*Edited* This layout was a winner at Bird is the word!


Share/Bookmark

Pin It

Wednesday

Did someone say seafood?

Just-say-seafood

Ahhhh...nothing beats the taste of fresh seafood. Especially after a long scenic drive along the coast, smelling the sea all day. :) Definitely an indulgence. Let's just say one should not be taking a cholesterol test after a meal like this. *LOL*


I was inspired by the challenge at Sketchbook 365 and Bird is the Word (the word "winter" is in my journaling).

Supplies: Sassafras patterned paper, Graphic 45 patterned paper, Jenni Bowlin patterned paper and stickers, Crafter's Workshop template, Maya mists, SRM stickers, American Crafts thickers, EAD Designs sticker, 7Gypsies sticker, white pen, black pen, washi tape, brads, ribbon, metal embellishment.


Share/Bookmark

Pin It

Monday

The story of the flustered aunt...

Play-on-in-style

So last Saturday was an aunt's worst nightmare [okay...I have been known to exaggerate a wee bit...*LOL*]. 
3 nephews + 1 niece + super crowded playground with 15 other kids = 1 flustered aunt! 
It was so hard to keep track of my gangster gang! *winks*


But smiling faces like this one makes it all worthwhile. [This layout features nephew #2 back in July. ] 

Playing along with Bird is the word and OUAS + CSI. My evidence: bird, leaves, star, rub-ons. My testimony: Journal on photo.

Supplies: American Crafts patterned papers and thickers, Crafter's Workshop template, Maya mists, SRM sticker, Unity stamp, washi tape, buttons, ribbon, rub-ons, felt embellishments, black pen, white pen.


Share/Bookmark

Pin It

Thursday

Cheating with photos...and a challenge winner!


Spending time with grandma

Hello friends!  It does seem like I take a lot of photos of my 3 nephews and 1 niece, eh? Actually I don't. I take more pics of my creative projects! *LOL* But I do try to take some monthly photos and try to stretch them across a few layouts to kind of cover the month...[I tend to write the month and year instead of the actual date...yeah, that is sort of cheating...]


Anyway, I love my scrapbook pages to be of funny moments that would be hilarious to reminisce about years later. Or sweet moments that I want to remember forever. Like this sweet tender moment between a grandma and her grandkids.


To make the layout more "interesting", I added individual pics of my niece S who has just started walking [and evidently refused to look at the camera]...


And of littlest nephew J with that killer smile...:) [Okay, it was hard to keep the kids still for photos with grandma]

Supplies: Artful Delight May 2012 kit, Creative Imaginations stencil, Maya mists, 7 Gypsies stamp, buttons, white pen, blinged butterfly, ribbon.

Inspired by the "smile" challenge at Bird is the word.
_____________________________________

A big thank you to those who played along with my guest Virginia's shopping challenge! The random winner is Victoria L


Congratulations Victoria! Please email me so that I can arrange for your RAK to be sent to you. :)


Share/Bookmark

Pin It

Wednesday

Sibling rivalry


Sibling rivalry

It's interesting to watch the sibling rivalry between nephew #2 and nephew #3. One moment they are happily playing together, the next moment one is either telling on the other or wailing very loudly. *LOL* Check out nephew #2's cheek....courtesy of nephew #3's teeth! Yep, boys play rough!


So I got some disgusting glue marks on the photos and decided to cover them up with crackle paint. The effect is quite cool and goes pretty well with the whole bath/water theme [it doesn't photograph well though].


Clustering of elements from my "save-it-for-a-rainy-day" stash. :)


Playing along with the challenges at Bird is the word and City Crafter.

Supplies: Crafter's Workshop template, Mister Huey mists, SRM stickers, Ranger Crackle Paint in rock candy, American Crafts thickers, Fancy Pants felt, Sassafras patterned paper, black pen, brads, button, twine and clothespins.

P/s: Have you signed up for the Three Cool Chicks workshop yet? *winks* And don't forget about my guest Virginia's shopping challenge! :)

*Edited* This layout was spotlighted at City Crafter! :)

Share/Bookmark

Pin It

Monday

I love journaling on photos! :)


The bride

So I've finally started scrapping my cousin's actual day wedding photos [the ones you saw earlier were taken before the wedding]. I love this particular photo of her getting dolled up for her big day. :)


I love journaling on photos using white and black pens. :)


I used the sketch at Artful Delight and incorporated the word "future" from Bird is the Word in my journaling.

Supplies: Graphic 45 patterned papers, Prima canvas letters, SRM stickers, corrugated board, doiley, buttons, twine, burlap, trim, metal embellishment, black pen, white pen.

P/s: Don't forget to play along with my guest Chunyuan's rock-and-roll challenge...it ends on Friday!


*Edited* I'm the winner of the April sketch challenge at Artful Delight. Yay! :)


Share/Bookmark

Pin It

A sparkling personality.


Sparkling

Littlest nephew J has a sparkling personality. :) He's polite [says "thank you" for everything you offer him], is super affectionate ["Can I hold your hand?" Or "Can the kissing monster kiss me?"], is a stickler for neatness [puts back his toys after playing with them] and has the sweetest singing voice. :)


I misted the white background with a Crafter's Workshop template, then used distress inks for the masked stars.


Playing along with the challenges at Bird is the Word and The Studio. I used the sketch at Lily Bee.

Supplies: Lily Bee patterned papers and stickers, SRM stickers, Maya mist, Crafter's Workshop template, Heidi Swapp chipboard and stars (as mask), Ranger Distress Ink, Stickles, buttons, handmade felt blooms, washi tape, buttons, twine, black pen, white pen, ribbon, embellishments.


Share/Bookmark

Pin It

10 {non-bulky} ways to add interest to your layout. :)


Discovered


I love to incorporate fun elements on my pages. But I also like my layouts to be relatively flat [way easier to store!]. Today I'm sharing 10 {non-bulky} ways to add interest to your layout. :)


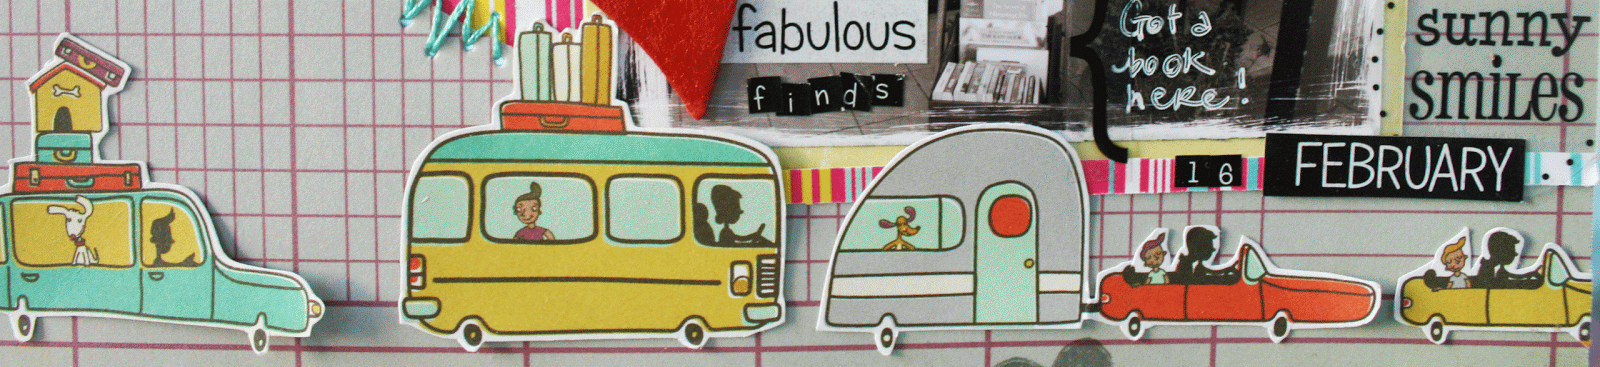
1. Incorporate fussy-cutting.

I like to stick the middle parts down so the sides stick out a bit...creates the illusion of dimension [while staying flat in your page protector].


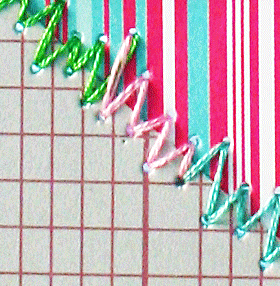
2. Add a little handstitching.

I love to randomly poke holes and then use different coloured threads to add a little fun! [I find this especially useful for hiding the fact that I forgot to ink the edges and when the patterned papers don't blend well together.]


3. Create an embellishment cluster.

Grouping elements of different textures add a playful feel to your piece. Try adding buttons, brads and found ephemera.


4. "Embellish" your photo.

I love to journal and paste stickers on my photos [especially of places and things]. Use arrows to pinpoint to something significant on your photo. [I found a cool book in the bargain bin! ] It's a great way to add random journaling bits to your layout.


5. Create a fun background by using a mask amd mists.

 I love that I can incorporate the colours from the rest of my layout to create an artsy custom background. [For how-to, please refer to tutorial: How to create a masked and misted custom background.]


6. Play with fonts.

This could be your title work or your journaling. I love to incorporate my own handwriting too. It helps to tell the story in a more interesting way than a block of journaling.


7. Stamp.

Use fun picture stamps to tell your story. :)


8. Go crazy with stickers.

I love to mix it up with lots of letter and word stickers. Paste them on a chipboard and you get a dimensional chipboard element...the possibilities are endless! ;)


9. Include "white" space.

"White" space prevents eye fatigue and gives your eyes a place to "rest" so as to better appreciate all the elements on your layout. It doesn't necessary have to be white in colour though....I consider my masked and misted background my "white" space. The next point reinforces the importance of "white" space.


10. Ensure a continuous flow of elements.

When you have a continuous flow of elements, you help guide a reader's eye through your layout. Try to keep some parts light and your focal point a little "heavier" with elements.


There you have it, my 10 {non-bulky} ways to add interest to your layout. :) Do you have any to share?


Supplies: Cosmo Cricket patterned papers, Maya mists, American Crafts thickers and stamp, Fancy Pants chipboard, Adorn It, SRM and Sam & Lucy letter stickers, thread, doiley, grid mask, brad, charm, buttons, white pen, black pen.


P/s: This layout was done specifically for my guest designer gig at Bird is the word. It features a quaint little bookstore in Wentworth Falls. :)


Share/Bookmark

Pin It

Wonderland...a glittered up castle! :)


Wonderland

Happy 2012 my friends! :) May your new year be a wonderland of happiness with your dreams fulfilled!

I've been busy making wedding decorations for my cousin's wedding which is this Sunday...thank goodness....there's a light at the end of the tunnel! *LOL*


Today I'm sharing a 12 x 12 canvas layout that features a castle! So fun eh? *LOL*


It was previously a little girl's toy...which I spray painted. The colour turned out to be a light metallic green instead of a light aqua [Boohoo...I was cheated by Krylon!!!]....so glitter and bling to the rescue! Turns out that glitter can cover up a multitude of "sins"! *LOL*


I added some grey felt so that the castle wasn't so dazzling...*LOL*


I actually painted over an old canvas [because the idea struck me one insomniac night and I had no blank canvas], adhered some scrunched up wrapping tissue and misted it. Once that was dry, I covered the canvas with white tulle for a dreamy effect! :)


A little banner action...pearls, stickers, clear crystals, charm, mirror...


Trim, pearls, charm, handmade felt flowers....

Supplies: 12 x 12 canvas, toy castle, glitter, wrapping tissue, Maya mist, handmade felt flowers, embellishments from Gauche Alchemy.


The title of this piece was inspired by the "wonder" challenge at Bird is the Word.


*Edited*  This was the challenge winner at Bird is the word! :)

Share/Bookmark

Pin It
>
Related Posts Plugin for WordPress, Blogger...

LinkWithin

Pin It