Wednesday

Workspace Wednesday - January eye drawings


This year, I'm prioritising my art. By squeezing in some time in the day to zone out and draw. And simulating the atmosphere of a "cafe" at home....soft background music, a cup of tea and lots of natural light. Here are the January eye drawings so far. 

What about you? Are you changing things up in your life to have a little more creative time?


Share/Bookmark

Pin It

Tuesday

What are we having for dinner ? Leftover lunch pizza! *winks*


Like most mums, my mum fears that there will not be enough food when her grandchildren come over for a visit on Sundays so she cooks a lot. Which often results in leftover food from lunch. That I have to somehow incorporate into dinner which I am in charge of. *challenge accepted*


So the other day, we had leftover lunch pizza! A bit of fusion with cheese, tomato slices and soy sauce pork belly. It was pretty tasty! *LOL*


Playing along with The Studio Challenges.  The poinsettias and the banners were fussy-cut from some recent wrapping papers and the rest all old stuff from my stash.


Share/Bookmark

Pin It

Monday

Make Stuff Monday - recent cake adventures


Hello my friends! Happy new year! Today I'm sharing some of my recent cake adventures!

First up...Christmas cupcakes! I saw some cute decorated Christmas cupcakes at Preppy Kitchen where he used inverted ice-cream cones as trees and just piped frosting on them to decorate them.

Of course, my icing was too runny to pipe successfully because I refused to use so much icing sugar (this was when I made American buttercream). So I just brushed the icing on the ice-cream cones and added sprinkles. The cones were not empty either, they were filled with M & Ms too. 

However, they were pretty labour-intensive so the neighbours got just ONE Christmas tree cupcake and 6 regularly frosted cupcakes while I kept the Christmas trees for the Gangster Gang (aka 3 nephews + 1 niece). It was a hit! :)


Well, I've always wanted to try my hand at making aYule log.  So I did. I went with the recipe from Delish.com with slight modifications (I reduced the sugar for everything).

It was of course, my first go at making a roll cake because you know me, let's not try a simple sugar roll cake, let's go with the more technically difficult one. *LOL* Anyway, my roll wasn't perfect but there wasn't any cracks on the cake so that's a win! (yay, go me!) And I think I did a decent job with the chocolate frosting - it looked like a log, right?

It was really really good. Since nobody in the Yam household liked Yule logs, I thought I would be able to eat this all by myself over the course of a week perhaps. No such luck. They ate it all! 


Next we celebrated my sister E's birthday. Now I made FOUR 8 inch cake layers - 2 chocolate and 2 vanilla but had to improvise and just went with 2 layers instead because I underestimated the amount of frosting that was needed to frost a cake of that size. It happens when you try to Frankenstein a cake - I went with a chocolate cake recipe from one site, a vanilla cake from another, chocolate frosting from my Yule log recipe and chocolate ganache drip from another site. 

Anyway, I present to you my first attempt at a chocolate drip cake! The vanilla portion of the cake helped to temper the chocolatey parts and I added some crunch by adding a layer of crushed Kit Kats between the cakes. Yep, empty plates all around *pats self on back*. 


Of course, since I had two cake layers that were unused, I decided that my sister would get a second cake to celebrate her Chinese birthday. So I tried my hand at an island cake. (Clearly your gal here watches way too many YouTube videos..*winks*)

There were many technical challenges with this cake:
1. I decided to cut down my cakes to 6 inches so that they would fit my 6 inch spring form pan and I could make a taller island. 
2. Of course, there was a "landslide" and the island lost some of its mountainous regions in the freezer. And I had to patch up as much as possible.
3. As I patched up the cake, it got bigger at the bottom and it wouldn't fit into the 6 inch spring form pan. And of course, I only had a 9 inch spring form pan. So I had to use that.
4. But I had already made the jelly (for the ocean) for the 6 inch pan so  I didn't have enough to fill a 9 inch pan.
5. Then of course, the pan sprung a leak so we lost even more water. 

Hence I present to you - my first island cake at low tide. (Also with no sea foam because I didn't have white gel colouring).

And did I mention that the nephews asked, "Why is there broccoli on the cake?" *LOL*

In case you were wondering...the whole cake is covered with chocolate ganache so that the jelly would not seep into the cake. I used lychee flavoured pastry cream with lychee pieces in the cake and the jelly was also lychee-flavoured to tie everything together. I also used agar agar instead of gelatine because agar agar sets at room temperature while gelatine needs refrigeration to set. 

It was surprisingly good. I am contemplating making another one. With a lot more "ocean". *hehehe*

What do you think?


Share/Bookmark

Pin It

Thursday

My first attempt at sugar cookies *winks*


Would you believe that your gal here has never made sugar cookies and made them pretty? *dramatic music plays in the background*

So I made my first batch on Sunday and got some "assistants" to try out the consistency of my royal icing....


Nephew #3: working hard on spreading his icing....


The niece was very pleased with her creations. And of course my assistants were paid handsomely - they ate all the cookies they decorated! *LOL*


So I thought I might attempt a Christmas cookie box as a gift for my cousin. But of course, nephew #1 ate most of the remaining undecorated cookies so I had to make and bake some more. 


I also got a food container box from Daiso for my Christmas cookie gift box. Well, I found out that the decorating part was way way way harder than I thought and I had to simplify to get a somewhat decent box of cookies. Alright, brace yourself. Don't forget that this gal is new to sugar cookies and decorating them....


Tada! My first decorated box of Christmas cookies! Hahahaha!:) They don't look that great but they are quite yummy! :)


Here they are all wrapped up and as I am typing this, digesting in the stomachs of my cousin, her husband and their son.:)

Happy holidays my friends! I know this is a tough year with many of us unable to spend the festive season with friends and family. But this difficult time will pass. Let's just stay safe and protect those around us. 

Meanwhile I'll be taking a bloggy break...see you in 2021! 


Share/Bookmark

Pin It

Tuesday

The other day's girl in my sketchbook


Hello friends! It's almost Christmas! How are your preparations? I've been busy baking cookies all day. Tomorrow will be the fun part of actually decorating them! Yes, it's your gal's first time making decorated sugar cookies. And she intends to give them away as gifts. *winks*

 But here's the other day's girl in my sketchbook. I went in with a white gel pen to define her features and I like how she turned out. :)

Happy week ahead friends! :)


Share/Bookmark

Pin It

Friday

Living Room #2 finally got some love


So, with all the staying-at-home I've been doing in 2020, it was inevitable that some furniture was going to get moved around. The family living room is a decent size so I decided to create 2 living room areas in the space. Living Room #1 would be the cosy area to foster conversation while Living Room #2 would be for watching tv. Unfortunately, everyone in the household has their own mobile devices to stream their own interests so Living Room #2 has been quite neglected.

Until the Gangster Gang (3 nephews + 1 niece) got an early Christmas pressie from their parents in the form of a Nintendo Switch set. Now, Living Room #2 is the most popular living room because of its sheer proximity to the tv. *LOL*


Now all the 4 kids love hanging out in Living Room #2, hoping that their siblings will fare badly in the game so that it will be their turn to play! Hahaha!


I used the bits and bobs I got from my recent happy mail and just added more washi tape and of course, an owl, because no layout would be complete without a bird (right, Julie???)


And yes, I even got my border punch out for a quick play! Go me! *winks*


Can you believe that this is the first layout of the kids together in 2020? Yep, I haven't seen the nephews #2 & 3 and the niece since March. So, even though the photos aren't great, I'm glad they made it to the Yam family album for 2020.

Playing along with More Than Words.


Share/Bookmark

Pin It

Wednesday

Let's chat - life update in Singapore


It's been a while since my last update on life in Singapore during the COVID-19 pandemic. Our Prime Minister just announced several days ago that we will be going into Phase 3 of re-opening on December 28. We have been in Phase 2 since June. 

With Phase 3, local attractions can accommodate visitors at 65% capacity up from a previous 50%. Social gatherings can be in a group of 8 people, up from 5 previously. There would be a pilot scheme of some nightspots re-opening in January 2021. These have been closed since March 2020. Mask-wearing remains mandatory in all public places.

And of course, by end December, Singapore will have its first batch of the Pfizer-BioNtech vaccines in the country. While priority will be given to essential and front-line workers and the more vulnerable citizens, the plan is to vaccinate all citizens and long-term residents above the age of 16 by third quarter of 2021. 

While vaccination is free, it is voluntary. Our senior ministers will be first in line to get vaccinated to allay public fears and attest to the safety of the vaccine. My folks are adamant about NOT taking the vaccine because of the fears of the long-term side effects which are unknown at this point in time. My sister and I are on the same page - we will get vaccinated if it means that we get to travel again. However, we'll probably be low in the priority queue based on risk factor. 

What about you? Will you be taking the vaccine once it becomes available to you?


Moving on to some happy things...check out the happy mail from my Aussie pal Lizzy. Of course, it arrived the day after I informed her that her X'mas package will be late (because in a time of pandemic, parcels have to be sent out mid-November to have any hope of reaching the recipient before Christmas)...*LOL* 


And yesterday, I went to Spotlight (Aussie-owned craft and interior superstore) to pick up a 1M open star tip and some sprinkles...and came home with these! My excuse is that there were on 30 -40% off and I get an additional $40 off $100 purchase. So, you are looking at S$61.80 worth of cake-decorating supplies! Guess, cake-decorating is going to be my new hobby for 2021.

Tell me, how are things going in your neck of the woods?

Share/Bookmark

Pin It

Monday

Handmade gift #2 - home-baked chocolate chip cookies


Hello friends! 2020 has been such a challenging year so I am spreading a little festive cheer with some home-baked sweet treats...nicely packaged in one of my Christmas packaging of course. Pictured is the reworked decorated paper bag featuring Santa.


I even took out my Christmas oven gloves to help me out with the festive baking. Aren't these cute? I found them in mum's stash months ago and now I can finally use them! *happy dance*

Today I'm sharing my current fave chocolate chip cookie recipe. Please note that lots of patience is required to make this.

1 cup unsalted butter (227g)
3/4 cup organic raw sugar
3/4 cup brown sugar
2 cold eggs 
300g all-purpose organic flour
26g bread flour
1/2 teaspoon baking soda
2 tsp organic sea salt
2 tsp cinammon 
chocolate chips & walnuts (or nuts of your choice)
organic sea salt for sprinkling

1. The first thing you need to do is get your butter out and into a pan. Because you need to melt the butter till you get burnt butter. Which takes a long time. And a lot of stirring. And a lot of.."Why did I even start this?" Until you start smelling the toastiness of the burnt butter. Then you will be like, "Omg. This is going to be the best cookie ever!"

Even so, you're going to have to wait. Because you need to transfer the burnt butter into a container and put it into the refrigerator until it solidifies again. Which takes like maybe 90 minutes.

2. During the wait, you could prepare your other ingredients and put them in the refrigerator as well. Because this recipe requires everything to be cold.


3. Once your butter is ready, cream the butter and sugars in the bowl of a stand mixer. You could totally do it with a wooden spoon and get a good arm workout. But I would recommend using a stand mixer/handheld mixer because you already lost some precious time with the burnt butter. *winks* Once the mixture is light and fluffy, add in the cold eggs, one at a time.

4. Next, add in half the dry ingredients until well-incorporated, then finish off with the remaining dry mixture. Do not overmix. I usually stop when I still see little bits of flour because I find that it is easier to mix in the chocolate chips and nuts when there's still some flour unincorporated.

5. Add in the chocolate chips (I went with dark chocolate and white chocolate) and nuts. I didn't specify an amount because I usually just eyeball the amount. *LOL*


6. Then you need to put the dough in a container, cover it and put it in the refrigerator. Where it will stay for 3 days. Because it got tired after all the mixing...and needs to rest. Okay, you can bake them after 1 hour but it gets more yummy after 3 days. My suggestion is to bake some to get you through the 3 day wait and then bake the rest after 3 days.

7. Three long days later, get your cookie dough out of the fridge and preheat your oven to 350F/180C.  Place your cookies out on a baking tray and bake for 12-14 minutes depending on your doneness preference and how big your cookies are. I like mine crispy on the outside and soft on the inside. And I like the size of cookies I get when I use my ice-cream scoop. They are easy to handle and pack.


They do spread a little so leave some space for them when you bake.


For a little more depth of flavour, sprinkle some organic sea salt on top.

There you have it...my current fave chocolate chip cookie recipe. :)


Share/Bookmark

Pin It

Friday

A quick decorated Christmas gift bag for the minimalist


Now that all the fussy-cut Santa faces have been used up, it's time to move on. Today's project is a decorated Christmas gift bag for the minimalist. 


I cut two sheets of the same patterned paper to fit the front and back of the paper bag (eh...I might have done a little shopping lately...okay, it was just yesterday! *LOL*) Then I ran the sheets through my Xyron Creative Station for an even layer of adhesive before adhering them to the bag. After that, I inked the edges of the patterned paper  so that the edges blended in with the black paper bag. I finished by inking a chipboard sticker for a cohesive overall feel.


I love it when I get one of those wide paper bags because you can put loads of stuff in them. You just have to reinforce the bottom with some cardboard. And fluff up the top with some wrapping tissue (recycled of course). This bag folds flat for easy storage too. Perfect for someone in your life who may not appreciate a lot of cutesy, colourful stuff. Yep...no Santa face for this minimalist! *hahaha*

Happy weekend friends! 


Share/Bookmark

Pin It

Thursday

Surprise ! Extra Santa projects!


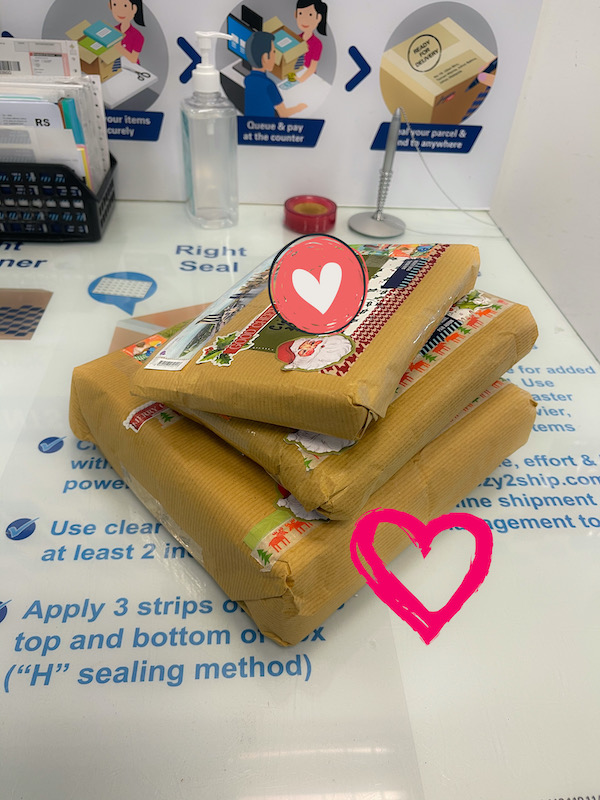
Last week, I shared what I thought was the last Santa project as I wasn't sure if I could share the last few projects since there were going to be on actual mail packages. I did manage to take some pictures before I addressed the packages. So you get to see them. I mean, in case you had some Santa withdrawal (is it only me? *winks*)


This one was the largest package so I had a little more space to play with.  I made sure to leave space for actual stamps. I always ask for stamps at the post office. :)


I wanted to make it look nice and festive without covering the whole package and confusing the mailman. *LOL*

While leaving me enough space to write the recipient's name and address. 


The sweet lady at the post office took great care to paste the stamps around my design so I hope the recipients enjoy their parcels. Or at least the stamps of Singapore's cityscape. Parcels which they might receive possibly in 2021 since apparently I was supposed to send out mail by mid-November to even score a pre-Christmas delivery. I have a totally valid excuse:  It's 2020's fault. *LOL*


Share/Bookmark

Pin It
>
Related Posts Plugin for WordPress, Blogger...

LinkWithin

Pin It