Showing posts with label Made With Love. Show all posts

Friday

An old mixed media canvas...


Jeremy-and-Sophie-mixed-media-canvas

So I recently got back some of my mixed media canvases that were on display at my LSS Made With Love. Including this busy mixed media canvas featuring my fave muses - nephew J and niece S - that I never shared here.


That was back in October 2013....just over a year and a half ago. Now I look at it and wonder how much time I took then to fussy cut all the blooms in the background and stamp all the foliage.


 I really went all out with all the details for my whimsical garden scene....stamping and rub-ons, pearls and wood tiles!


That was the start of my fave pop-up silhouette photo craze I think....*winks*

Thanks for taking a trip down memory lane with me. Aren't you glad my style is way more streamlined now? *LOL*

Happy weekend friends! :)


Share/Bookmark

Pin It

Monday

For the love of pizza...


Pizza-layout-by-Yvonne-Yam-for-Made-With-Love

I love pizza. Especially thin-crusted ones. Yum!


So the other day I brought my mum out for a salad and pizza. Oh yes, the mother has been trained in the "photo for keepsake or social media before eating" protocol. She is a natural right? *winks*


Love the lovely Basic Grey Tea Garden patterned papers and the pretty Prima tag and blooms from my LSS Made With Love Singapore


The fussy-cut patterned paper blooms were coloured with Wink of Stella pen in clear for a lovely overall shimmer. I also added Ranger stickles to the centers of the paper blooms. The Maya Road chipboard letters were painted with Art Anthology stone effects paint.

If you reside in Singapore, the supplies on this layout can be found at Made With Love Singapore. This is my last project for the store.


Share/Bookmark

Pin It

Tips for drawing and painting a girl...


Mixed-media-girl-on-canvas

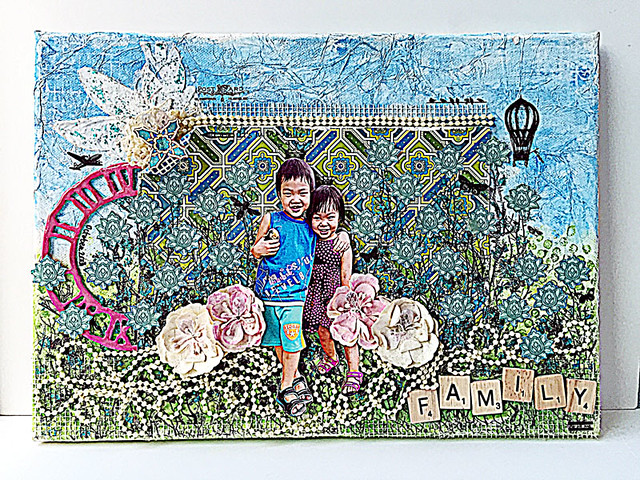
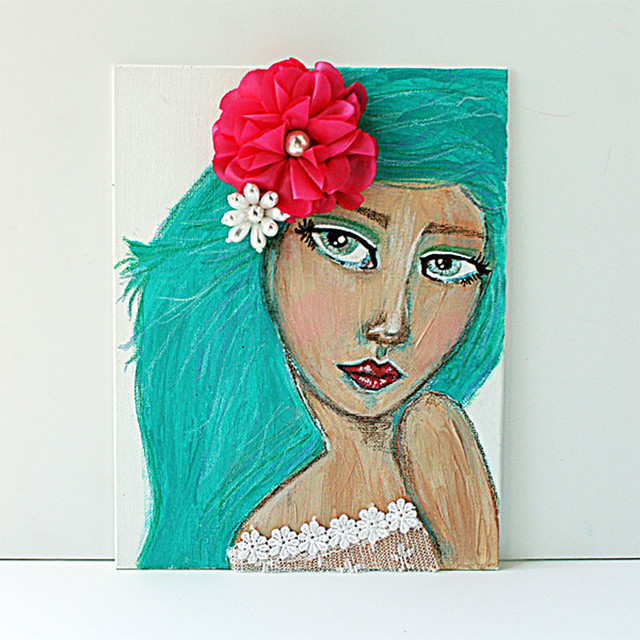
As you know, recently I've been obsessed with drawing and painting girls. I have only been at it for about a month but it's enough to debunk the myth that "I can't draw!". But let's not get ahead of ourselves here, I still think it's terribly difficult to draw and paint a realistic face but whimsical,  I think we all can do. :)

At first, I thought the eyes would be the most challenging part...but it turns out that the nose is the hardest. If you don't highlight the bridge of the nose, the face is just flat. If you try to create depth by introducing shadows, sometimes, it just looks like your girl has a bruised nose or maybe took the whole contour makeup thing a little too far...*LOL*


1. Use matte acrylic paint for the face and neck of the girl. If you are doing it in an art journal, craft paint would suffice. If you are doing it on a mixed media canvas for display, use artist quality paint for its lightfastness. Glossy paint would NOT work because you can't draw on top of it. You can add matte medium to your glossy paint to make it matte though.

2. Draw in the shape of the face and the features with a Prismacolor pencil. Don't worry about getting it perfect because when you draw on matte acrylic paint, it can easily be erased!


3. If it's still a little challenging for you, you can "cheat" by using a stencil or a stamp to help guide your process. These will help you in the placement of the key features of your face. 

4. Because of the wax in the Prismacolor pencils, you are able to blend the colours quite nicely. I'm partial to Prismacolors but feel free to use any colour pencils you have.


5. To paint the eyes, I use a combo of Posca white paint pen and Liquitex black ink in a Pentel Aquash brush. The Posca paint pen is filled with thin acrylic paint and you can buy them in various nib sizes for quick application. The Liquitex black ink is thin enough to be filled in a Pentel Aquash brush without clogging. You can also use Copics or Sharpies of course. Or just paint with a thin brush but this is easier. :)

6. For the hair, I painted it with Dylusions paint in Turquoise. I used my colour pencils to add some "movement" to the hair. Then I finished off with some Maya Road embellishments.

All the supplies used here, except for the Posca paint pen, Prismacolor pencils and Liquitex ink, can be found at Made With Love Singapore


Share/Bookmark

Pin It

Using leftover letter stickers on my mixed media canvas....


Sweetheart-mixed-media-canvas

So my letter sticker collection is driving me crazy because the ones I have left are random numbers and alphas...which take up a LOT of space but they don't help with the title works on my projects. *grunts*


*Lightbulb moment* Since they have a bit dimension, I thought I could treat them like chipboard and add some textured interest on my mixed media canvas background.


I adhered them to the canvas with matte gel medium, added a layer of gesso, then played with Ranger Patinas. Even though they are paints for metals, I love the thick consistency and they dry with a semi-glossy slightly raised finish. *yum*


I also added some light modeling paste with The Crafter's Workshop stencil for more texture and interest.


The photos [my mum & niece] were matted on white cardstock with a MT tape border. I finished with some Maya Road chipboard and vintage trim, buttons and outlining with a white gel pen. 

If you are located in Singapore, you can get all the supplies from Made With Love. :)


Share/Bookmark

Pin It

The journey to pocket page scrapbooking....


Pocket-pages-altered-spine-album

So the key to getting started on pocket page scrapbooking is really in the album. Love this Simple Stories SN@P! 6x8 burlap binder that I got as part of my design team assignment for my LSS Made With Love . I couldn't bear to cover up the chevron design so I decided to "alter" the spine instead [modeling paste with The Crafter's Workshop, black gesso, burlap, bloom, leather strap from an old shoe].


You can tell that I haven't quite gotten the sizing of the photos quite right...*LOL* 


I didn't have any Project Life Cards so I had to dig into my scrap stash. Yeah, and the corner rounder was tooooooooo far away! *winks*


I love the Basic Pages that came with the album though. Because I could add more dimensional items. I didn't have any reinforcement rings so I added a strip of washi tape on both sides. 


I have to say that pocket page scrapbooking wasn't that easy for me because I had to pare down my embellishments and think "smaller". But it's been a fun journey. :)

If you reside in Singapore, you can get this awesome binder and the supplies for this project at Made With Love Singapore. You can also view this album later this week at the store. 


Share/Bookmark

Pin It

Tuesday

Happy siblings mixed media canvas for Made With Love


Happy-siblings

So I finally found the stack of photos of The Gangster Gang [aka nephews + niece] that I printed back in August when I decided that I would use my fave photos on my mixed media canvases ...errr...better late than never right? *winks*


As I mentioned previously, I love the popup look so I always fussy-cut the silhouette and pop them up on 3D foam. 


I prefer to use black 3D foam to really maximise the shadow effect.


I did some stamping and stencilling on the background to add a little more interest to the Blue Fern Studios patterned paper.


I really wanted to use my red Petaloo blooms so I coloured the blooms on the patterned paper with Wink of Stella glitter pens to match.


I addd some subtle sparkly bits by using The Crafter's Workshop stencil with Golden Glass Bead Gel.

The supplies used on this 12x12 mixed media canvas can be found at Made With Love Singapore.

P/s: Have you entered my mixed media canvas giveaway?


Share/Bookmark

Pin It

Monday

A purple mixed media box for Made With Love...a short tutorial


Mixed-media-box

So I had a purple kind of weekend...and made 3 projects this weekend featuring purple.  Like this mixed media box for Made With Love. ;)


I started with a Graphic 45 mixed media box. As usual, I had a project in mind and got the cream coloured box but changed my mind and painted it black...*LOL* 


I applied some light modelling paste with The Crafter's Workshop stencil.


Then I applied Tattered Angels mist in a soft lilac shade....adding more mist for a more intense colour in certain spots.


I used the same mist to colour some gauze and then embellished with Petaloo blooms, leaves, pearls and bling.


I added some DCWV patterned papers to the Prima frames and embellished around them. A piece of vellum was added to the box window.


The rest of the box of the box was also covered with DCWV patterned paper. The "sexy" sentiment was taken from an old wrist band. [And yes, this was the found object that inspired this project..*winks*]

Share/Bookmark

Pin It

New dress = photoshoot....a layout for Made With Love


New-dress-layout

Apparently my niece is well-trained in the SOP [standard operating procedure] for new dresses. *winks*


She would get all her "accessories" out and get me to take photos of her. :)


Yep...new dress = photoshoot. *LOL*

If you reside in Singapore, supplies for this layout can be found at Made With Love. :)

Share/Bookmark

Pin It
>
Related Posts Plugin for WordPress, Blogger...

LinkWithin

Pin It