Monday

Someone was happily posing in the garden...*winks*


Posing-in-the-garden

Someone was happily posing in the garden the other day....


Flashing that perfect smile for the camera....my niece S.


She takes instructions well...and varies her poses for the camera. *winks*


I must say I'm a wee bit jealous that it's hard to take a bad photo of her....*LOL*

Playing along with Stuck?! Sketches.


Share/Bookmark

Pin It

Thursday

Guess who got to "ride" on the scooter?


Guess-who-got-to-ride-on-the-scooter

So the nephews were pretty excited when Aunt E said they could "ride" on her scooter for some photos...:)


The photos were not great because of the lighting so I printed two photos - one in colour and another in black and white - and "combined" them. 


I ran out of 3D dots so I propped the photos up with cardboard for a dimensional look.


Random bits of patterned paper were added for pops of colour. I did a little machine-stitching for a more "finished" look.


I added some twine and cork paper for texture.


Playing along with My Creative Sketches.

Share/Bookmark

Pin It

Tuesday

Using little bits and pieces in my planner


Planner-pages-for-LESSology

I love it when the little bits and pieces in my stash get used up...even though it takes a long long long time to even make a dent in that stash...I'm sure you know what I mean. *winks*


I'm currently enjoying my monthly planner spreads [daily and weekly are just too much work for me!] even though I've essentially completed only one month. *haha...fingers crossed that I can keep up with it!* 


It's been fun fitting in the little bits of scrap paper, adding personal touches like a painted face and using found objects in my "save-it-for-a-rainy-day" stash in my planner. :)


Like an ice-cream stick. It is lightweight and has a cool texture. :)


My partial girl's face was from a scrap piece of watercolour practice.paper that I tested my new watercolour pencils on.

Like most of you, my real schedule is stored electronically. This physical planner is just a way to jot down some memories that I may not scrapbook about and to use up my scraps.:)

This project was created for LESSology Challenge #56: Hand-lettered Love. Come join us if you have time this month! 

Share/Bookmark

Pin It

Monday

Mixed media girl on a wood panel


Mixed-media-girl-on-a-wood-panel

I really enjoy using wood as a substrate. For this piece, I applied a layer of clear gesso so that the natural wood colour still shows through [On hindsight, I should have drawn a smaller face...*LOL*].


After that, I sketched my girl with a coloured pencil. Yes, I like to draw with coloured pencils because graphite gets very smudgy and drives me crazy! And I'll let you in on a secret: coloured pencils can be erased when you draw on a gessoed surface! :)


Here's my mixed media girl on a wood panel after using a variety of colorants - Prismacolor pencils, Faber Castell Polychromos coloured pencils, Daler Rowney Acrylics, Posca Paint Markers, Caran d'ache Neocolor II watersoluble crayons, Liquitex black and brown inks and lots of wet tissue.


Playing along with ARTastic Challenge to use wood veneer.

Share/Bookmark

Pin It

Saturday

A vintage-inspired mixed media canvas for the Maya Road Design Team Blog Hop...*winks*


Well hello there friends! Welcome to the last stop of the  Maya Road Design Team Blog Hop! :)

To be in the running for the yummy Maya Road Sweet Nothings Card Kit, you must leave a comment on all the blogs in the hop by Tuesday March 8th. The random winner will be announced on the Maya Road Design Team Blog on Thursday March 10th. 

Mixed-media-canvas-for-Maya-Road

Here is my project! A vintage-inspired mixed media canvas using a neutral palette. :)


The patterned paper background was distressed on the edges and painted with a coat of light wash gesso.


Then I went to town with Maya Road charms, wood embellishments and trim.


If you somehow got lost in the hop, please visit the Maya Road Design Team Blog for the full list of blogs to visit.

Thanks for stopping by today and good luck! :)


Share/Bookmark

Pin It

Wednesday

Personalizing my planner with a mixed media girl...*winks*


Decorated-planner-pages-by-Yvonne-Yam-for-Maya-Road

So I haven't really got into the whole planner decorating craze even though I got my first Kikki K planner last year. I got a personal-sized one so that I could carry it around in my bag but I always forgot to take it out to use. Weeks would pass and those blank spots in my calendar made me feel "unaccomplished". *winks*


This year, I decided to give it another go after discovering that people were covering up blank spots with cute stickers! And you know me...I have to have texture so I added some bling and lace tape too.:)


Of course, since I'm into drawing and painting girls, I had to personalize my planner with a mixed media girl too. *winks*


What about you? Have you joined in on the planner decorating craze?

P/s: This project was created for Maya Road.

Share/Bookmark

Pin It

Tuesday

The gold decorated box...a tutorial


The-gold-decorated-box

So last month, I went on a "must-complete-half-done-projects" mission. This was one of them.:)

I started with this sturdy mooncake box. 


I covered it with wrapping tissue from packaging for texture.


Next I adhered chipboard.


After a coat of gesso, I applied gold acrylic paint. To create a little more depth, I applied Silks acrylic glaze in bronze. I also used Ranger crackle effect accents to define to chipboard design.


The last step was to embellish! Oh yes, I might have gone a little overboard with the buttons! *lol*

P/s: Another box for my mum to store her sewing supplies!:)


Share/Bookmark

Pin It

Thursday

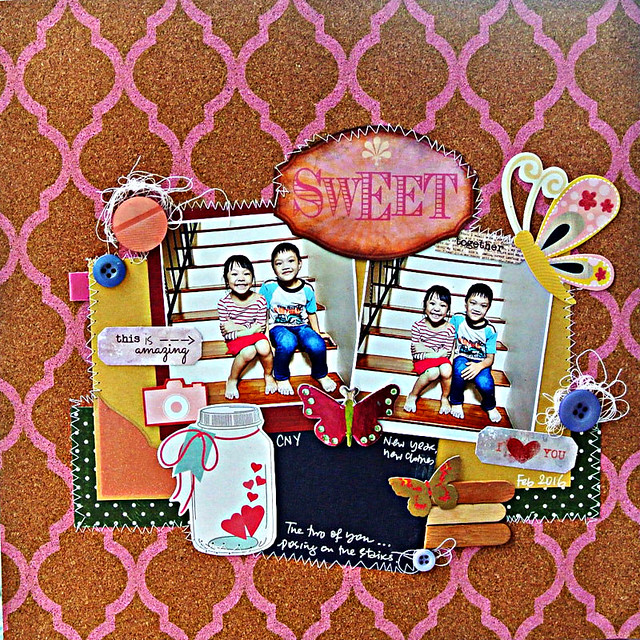
These two are so sweet together...:)


Sweet-together

So the other day, I discovered the best spot for photo-taking at home. The staircase! There's a window on the opposite wall that lets in light. :)

Of course,  the discovery only came after 8 years living here...*slaps forehead for stupidity*


Determined not to waste any more glorious photo possibilities, I had to take photos of littlest nephew and niece...these two are so sweet together. :)


I decided not to hoard this DCWV cork paper...and added random bits of fussy-cut patterned papers.


Playing along with Stuck?! Sketches.


Share/Bookmark

Pin It

Wednesday

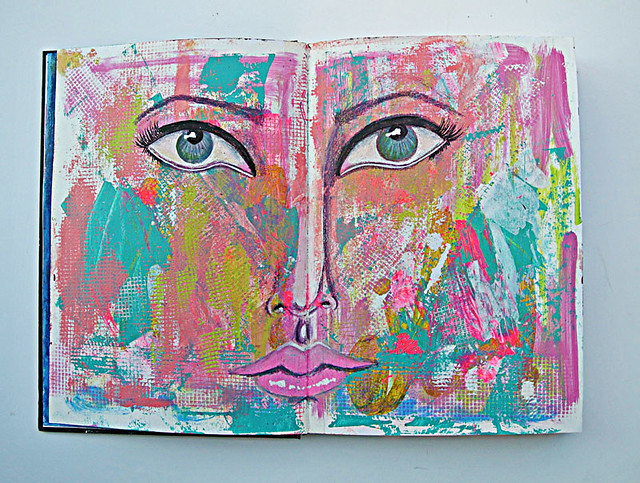
The abstract that went awry....*winks*


Face-on-a-messy-background

Well friends, you know I've been a little obsessed with faces in the last few months. The other night, I really meant to work on an abstract spread in my art journal *pinky swear*...


But you know, abstracts are hard....they need a focal point. So I drew an eye. Since I like symmetry, the only logical thing to do was to draw the other eye, right? *winks*


After that, the nose and lips just had to be drawn of course. *LOL*


So here it is, the abstract that went awry. *cheeky grin* 

Do you think she needs like a clearly defined chin and face?


Share/Bookmark

Pin It
>
Related Posts Plugin for WordPress, Blogger...

LinkWithin

Pin It