Showing posts with label Maya Road. Show all posts

Thursday

Baby girl gift box (a tutorial)


So one of my cousins (who married a French dude) is having a baby girl....so I got her a few baby pressies (you know me, always to striving to be every kid's fave aunt...*winks*) that of course, had to be housed in a cute gift box too. :)


I started with a pink gift box from Kikki K that I covered with pink baby girl patterned paper (I knew I was hoarding this for a reason! Haha!). I measured the papers, cut them to size then ran them through my Xyron Creative Station for an even layer of adhesive. Next I went in with some Maya Road pearl trim along the edges of the box.


I really wanted to use this ornate Maya Road frame so I decided to make my own little embellishment using a birdie sticker (poor birdie had to be cut down to size to fit the frame) and Ranger Glossy Accents.


Next I added coloured threads to the mini spools.


Once I was happy with the embellishment cluster arrangement, I stuck them down with a hot glue gun.


It turned out quite sweet, eh? :)


Share/Bookmark

Pin It

Wednesday

Decorated hanger for my paint tubes


Deocrated-hanger-for-my-paint-tubes

So the other day my sister returned me this painted hanger that I gave her years ago to "hold" her actual gift. It was one of those small Daiso wooden hangers that I painted red because it is my sister's fave colour. 

Yep...my sister has the tendency to return me stuff I give her years later...which is why these days I prefer to give her consumables (food and toiletries). *LOL*


Anyway, the paintwork has held up well so I just went in with my trusty hot glue gun and some Maya Road embellishments to make the hanger a little prettier. And now this decorated hanger holds my paint tubes and hangs nicely on my Raskog cart. :)

P/s: In case you were wondering, my sister is a minimalist while I'm a maximalist trying to be a minimalist. You know the struggle is real, right? *winks*


Share/Bookmark

Pin It

Monday

The basket makeover (a tutorial)


The-basket-makeover-by-Yvonne-Yam-for-Maya-Road4

So the other day I found this old basket in my stash that was beckoning to me, "Make me pretty!" And of course, since I always listen when inanimate objects speak to me, I just had to. *winks*


I kept my fingers crossed when I went rummaging through my fabric stash for this remnant lace fabric (that I used for One piece of fabric: 10 projects), hoping that it would be big enough to cover the basket. And it was! Yayness! :)

Next I added some Maya Road pearl trim to the edges of the basket.


I covered the handle of the basket with cream satin ribbon. And embellished with some pearl trim.


The ribbon I had wasn't quite long enough for the entire basket handle so I improvised by adding some Maya Road felt blooms at both ends of the handle. 


Then of course, I had to finish off with an embellishment cluster of all things pretty. :)


Here it is...photographed with 3 large pencil boxes and 2 planners so you can gauge its size. 

What do you think? Did I make it pretty? 


Share/Bookmark

Pin It

An embellished tag for Maya Road


An-embellished-tag-by-Yvonne-Yam-for-Maya-Road

So I got hit by one of those 72 hour bugs and spent my weekend in bed partially sleeping and binge-watching designer fashion shows on YouTube. Any little attempt at exertion like making my bed, resulted in an avalanche of drippy nose and teary eyes so *insert dramatic music* of course, I didn't make my bed! *winks*


I did however, attempt to make something pretty, like this embellished tag for Maya Road. :)


I started off with two pieces of cardboard (from packaging) which I glued together to create a sturdy base for my tag.  


And then I just went in with my hot glue gun and embellishments.


P/s: Happy week ahead friends!


Share/Bookmark

Pin It

Remnant lace on a mixed media card


Mixed-media-card-for-Maya-Road-by-Yvonne-Yam

Do you have remnant little bits of lace lurking in your stash that are just too pretty to throw away? Why not adhere them all on a card to create a lovely textured background? :)


I started by adhering the remnant lace pieces on a watercolour card base with gel medium. You can get creative by mixing the pieces to create a lovely pattern. Then, paint a layer of gesso to prep the textured surface for colorants. 


I went in with some spray mists and applied some gesso on the raised surfaces to showcase the lace texture.


I finished the card with a few embellishments from Maya Road. 


Happy week ahead friends! 

Share/Bookmark

Pin It

Thursday

Have you noticed that I like to add subtle bits of humour to my layouts?


Layout-for-Maya-Road-by-Yvonne-Yam

People who flip through my scrapbook albums always end up laughing out loud because I like to add subtle bits of humour to my layouts. It could be the photos I used to tell the story or the embellishments I used to highlight certain aspects of the photo. Can you spot the fun bits here???


Doesn't it look like my nephew E has foxy ears? *winks* Well, since I couldn't get the two people in the background out of the shot (they were paying customers in a cafe), I might as well just "use" them for a fun shot. ;)


Check out the fussy-cut heart and arrows on my parents' chests in the photo. Hehe...my parents still hold hands when they go out. :)


This layout was created for Maya Road and first appeared on the Maya Road blog.


Share/Bookmark

Pin It

Monday

Tag on a gift box


Tag-on-a-gift-box-by-Yvonne-Yam-for-Maya-Road

Sometimes when you are pressed for time, all you need is a decorated tag to "dress up" your gift box. [Says the person who is still frantically wrapping Christmas pressies at the moment. *LOL*]


Never mind that I bought the gifts months ago and started decorated my gift boxes months ago...I am not ahead in the game my friends. Anyone in the same sorry state? *panic mode*


Just a super quick tag on a gift box project for Maya Road. It's a great way for the recipient to re-use the gift box and the tag. :)


Share/Bookmark

Pin It

Friday

Projects for the Maya Road/Chameleon Pens Swap....tutorials included


Hello friends! Today I'm sharing two projects I created for the Maya Road and Chameleon Pens swap. Now, I've been eyeing these pens for a really long time (they are really pricey here) so I was really happy to receive two sets courtesy of the lovely folks at Chameleon Pens. :)


Mixed-media-wood-pallet-by-Yvonne-Yam-for-Maya-Road-Chameleon-pens-swap

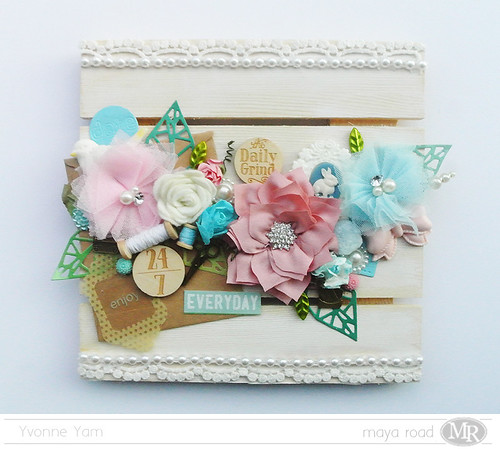
My first project is this mixed media wood pallet. So soft and pretty, eh? *winks*

1. I started with the Maya Road 8x8 DIY wood pallet that I covered with some gesso and white to give the pallet a slightly white wash look.

2. I went with a Maya Road kraft envelope as the base to start my embellishment cluster because I really wanted the embellishments to stand out and patterned paper might detract from that. You must have seen those diecut leaves a million times but I really LOVE the Maya Road Geometric Leaf Die. *LOL*

3. Since I was going with sweet pastel colours for the embellishments, I coloured some white flowers with the light blue Chameleon Pen. The first one was covered entirely in blue. For the second one, I played with the toning medium to get a much lighter tone. I also coloured a small threaded wood spool blue. LOVE how fast I got these done with no mess to clean up!

4. I used the yellow Chameleon Pen to colour in the beak and tail of a Maya Road white resin bird. 

5. And then it was time for my fave part - putting everything together. I usually like to start from the center and work my way out but this time, I started from the left and worked all the way across because I tend to go crazy when clustering. *winks*


For me, clustering is all about mixing up the textures and shapes. And tucking little knick knacks here and there. I went with different types of blooms - tulle, ribbon, felt, paper and resin. I added metal charms, wood tokens and trinket pins.


And I went really slow and steady with the hot glue gun...after my last painful incident....and I emerged unscathed this time! Yay me! ;)


Mixed-media-cad-by-Yvonne-Yam-for-Maya-Road-Chameleon-pens-swap4

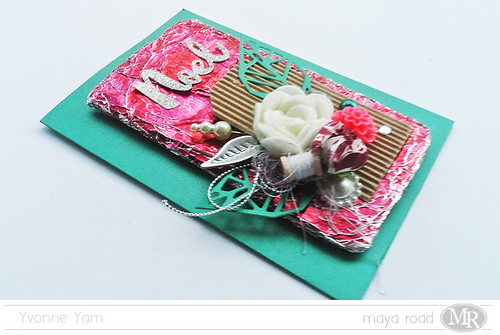
My next project is this dimensional mixed media Christmas card. Now you know that I like flattish cards in general but I made this so that I can adhere it to the top of a box and call it decorated...hehe. *lazy bones*


I started with packaging cardboard that I cut to size and wrapped with aluminium foil.


Then I coloured the whole thing with a red Chameleon pen (hard to photograph the shiny foil). I love that it was quick to colour and I kept my hands totally clean!


I also coloured some thread and white paper bloom with the same pen, varying the intensity of the colour with the toning medium.


I love that I got 3 different tones from just one pen! The foil turned out like a ruby red, the bloom was a rich burgundy and the thread is a light plum colour. 

Full disclosure: I wanted to make a tag actually...but the red was just whoa...too strong! 


So I glued the whole thing on a card base ...and called it a card done! Hahaha....that's how I roll!

There you have it, two projects using Maya Road goodies and Chameleon Pens. Happy weekend friends! :)


Share/Bookmark

Pin It
>
Related Posts Plugin for WordPress, Blogger...

LinkWithin

Pin It