Showing posts with label let's get shabby. Show all posts

Thursday

My little wooden house


Wooden-house-decor

I love to look at little wooden houses in retail stores where they display cute little knick knacks [that I won't buy for myself but will squeal with delight when I get them as gifts...*winks*] so I was excited to find an "unadorned" one at Daiso. :)


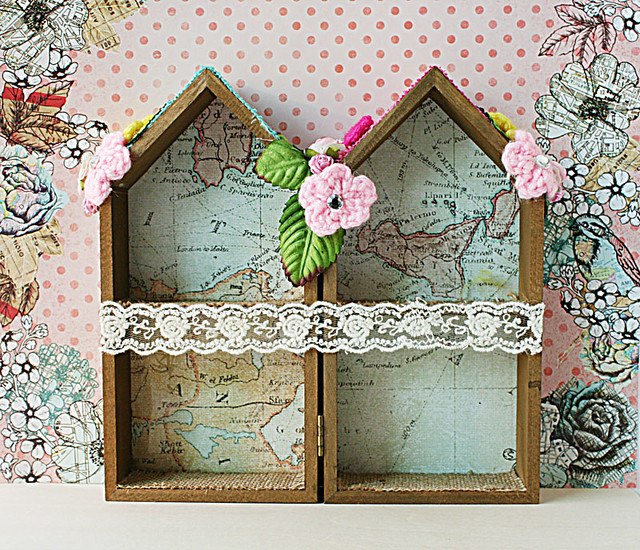
The good folks at Xyron sent me a whole bunch of pretty coloured burlap from DCWV that was perfect for this project. I ran the 4 x 6 burlap pieces through the Xyron 5" Creative Station and cut them down to size to fit my wooden house. I also adhered the map patterned paper from DCWV to the back of the wood unit. :)


Them I added some crochet and paper blooms, a remnant piece of lace and some bling.


I kept the embellishments simple because I really wanted to maximize the storage space for each slot. Plus I was going to use 3M velcros to adhere the unit to the wall so it needed to be light too.


Here's how it looks with an Angry Pig thumbdrive. Cute, eh?

Playing along with the challenge at Let's Get Shabby.:)

*Edited* I was the challenge winner at Let's Get Shabby!


Share/Bookmark

Pin It

Tuesday

My parents...on their wedding day


Wedding day studio photo

A quick layout to share today... a photo of my parents on their wedding day as inspired by the challenge at Let's Get Shabby.

Wedding day studio photo closeup

Echo Park patterned papers. Ribbons. Trim. Buttons. Pearls. Crochet flowers. Yo-yo flower.

***************************************

Thanks to those who participated in my blogoversary giveaway! It was really lovely to read about how you found my blog. :) The winner who was chosen randomly is...

#7 Ujjwal!

Congratulations! :)

Share/Bookmark
Pin It

Monday

All mine now

All mine now

Ahh..."All mine now..." ..possibly what my father was thinking...;)...as he fetched his bride...

I am playing along with Let's get shabby's latest challenge to incorporate paint, chipboard and lace. Patterned paper is from Graphic 45...edges distressed and inked with the background glimmer misted for a little sparkle! I also added some crackle paint in rock candy for subtle cracks on some parts of the paper [you may have to use your imagination for this...it doesn't show up in the photos!].


The chipboard key (from Delish) was painted with crackle paint and blended with distressed inks. A little tulle! :)


The "frame" for the photo was assembled with 3 pieces of doiley. Some distressed stickles in rock candy for the glass glitter finish...pearls, some gathered lace and 7gypsies velvet flowers. Stickers are from Cosmo Cricket and chipboard from Pink Paislee.

Subscribe
Pin It

Tuesday

At last

At last

Love these photos of my parents on their wedding day...At last  (I so love this song!)..check out the facial expressions (*LOL*) :) 

[A bit of trivia..in case you were wondering why I keep scrapping my parents' wedding photos.. my parents have more pictures of their big day than all of my individual childhood photos put together..sad fact of being the second child...shared limelight...my brother was always next to me! Should have thought to push him away...]

October Afternoon papers (so pretty right?), SRM stickers, animal stickers, chipboard letters (MME), lace, tulle, flowers, doilies and brads.

Inspired by Let's get shabby.

Subscribe
Pin It

Thursday

Innocent baby

Innocent baby

Innocent baby? My nephew J, enjoying his first bath in the tub with his brothers...He came to stay over recently and showed his naughty side :(...which I documented in a letter to him (tucked in the little envelope)...I did some stamping (yay!) with Fancy Pants stamps. Felties from Sassafras, tags from My Mind's Eye, base patterned paper from Creative Imaginations, letters from Basic Grey and brads from Imaginisce.

Inspired by Let's get shabby. Pin It

Sunday

Sun fun

Sun fun

Here I was in a two-piece pink swimsuit at a beach in Malaysia. Enjoying a little fun in the sun. :)

Lily bee patterned paper and tulle flowers, some lace, American Crafts vinyl letters, kraft paper, paint (applied with a sponge) and handstitching.

Inspired by Let's get shabby.

* Edited to add: This layout was featured in Friday Faves at the Lily Bee blog! :) Pin It

Saturday

Dreaming of a white X'mas

Dreaming of a white X'mas


I'm dreaming of a white X'mas...tough in my part of the world :(.....but the cooler weather at this time of the year means some pretty blooms to admire...:) Are you having a white X'mas?

Papers are from Basic Grey...except for the shaped base mat, KI memories I think...lace, ribbon, pearls, flowers (thanks Juhi!), distress inks, rub-ons, white pen and distress stickles in rock candy (the glass glitter looks like snow!)

Have a great weekend!

Inspired by Let's Get Shabby.
Pin It

Thursday

Two

Two

Two features my parents at their wedding dinner. I love this photo of them....they looked a little shy...about to start their life journey together.

This was done on a piece of 12x12 clear acrylic...if you look carefully, you can see a clear border between the white lace and the red paper. I inked the edges of the acrylic piece with two shades of Stazon (you can't see from the photo) because the distressed edges of the outermost border was not completely glued down (to create a little extra dimension). The Graphic 45 papers were inked with various distress inks. The buttons were originally white - I inked it with Stazon for the aged look. I made a floral bow (tied a bow twice) and added 2 twirled paper flowers. I snipped the petals, inked them, then folded some of them down to show the backside of the patterned paper.

Two closeup

Inspired by Let's get shabby.
Pin It

Monday

M & J


M & J...My mum and dad on their wedding day...Just a quick layout using Graphic 45, a little rock candy crackle paint on the flowers (love this stuff), doiley, some lace, ribbon. distressing and inking around the edges...check out that cute crown and that lovely lace (gifts from my blogland friend Mandy)...:)

Inspired by the challenge at Let's Get Shabby.

*Edited* This layout got an honourable mention at Let's get shabby...:)

Pin It

Sunday

Blushing bride


Supplies: Cardstock, ribbon, lace, pearls, paint, border punch, tassels, crochet flowers, wrapping tissue cardboard.

This blushing bride is my mum on her wedding day...:)

I'm so in love with ribbon and lace...check out the gorgeous lace my friend Mandy sent me from Australia (framing the left and right)! Thanks Mandy! :) They are perfect for the new challenge at Let's get Shabby... which is to use white and/or cream with a hint of another colour. Mine's a hint of pink...the cardstock which I painted over. I have to give credit to my oldest nephew S, who suggested that I include a butterfly on my layout...it does look pretty...:). What do you think?

Pin It

Wednesday

Life. Captured.

Supplies: Patterned paper: Webster's Pages & Creative Imagination, Others: Bling, lace, ribbon, paper flowers,pearls, stickles, thread.

It's been a couple of weeks and I'm still trying to capture that elusive perfect life shot of my mum with her 3 grandsons...my nephews just refuse to cooperate...lol..:) Oh well. This is. Life. Captured. Somehow.


Inspired by Let's Get Shabby. Pin It

Sunday

Dreamer

Please click on photo for larger image.
Supplies: Patterned paper: Collage Press, Cardstock: Bazzill, Swirl felt: Queen & Co, Chipboard: Fancy Pants, Stamps: Autumn leaves, Others: Ribbon, transparency (photo), pearl strand, ric rac, thread, lace, crackle paint, ink, brads, cuttlebug embossing folder, blind material (textured background).

This is the layout I created for the challenge over at Let's get Shabby. I used a ton of scraps on this...yay! :) The textured background (vertical lines) was repurposed from old blind material and mounted on white cardstock. The cluster of ribbon flowers were from an old tissue holder which has seen better days :(. All the ribbon, lace and ric racs were small remnant pieces from previous projects. Some stitching was done on the patterned paper and to secure the pearls to the layout. A small piece of cardstock was embossed with swirls to match the felt swirls used in the layout. The brown inks used were distressed inks in vintage photo, brushed corduroy and tea dye. I stamped some round stamps on vellum paper with brilliance ink, cut them out then attached them to the patterned paper like "round" flowers. Not my usual style so the whole process took a long time. What do you think? Can I pull off th shabby chic look? Pin It
>
Related Posts Plugin for WordPress, Blogger...

LinkWithin

Pin It