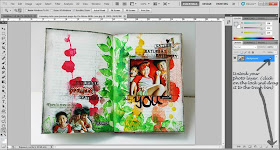
A lot of you have been asking me about how I create the supply list for my creative projects. Here's a tutorial of how I do it using my latest journal page and Photoshop.
1. Start by opening a new file. Ensure that the new file is large enough to fit your photo plus text. You can crop it down later. If you like, you can also name your file.
2. Open your project photo. Unlock your photo layer. Click on the lock and drag it to the trash bin.
3. Use your MOVE tool to move your photo to your new file.
4. Select TEXT tool. You can also choose a colour for your text.
5. You can also choose your text font and size.
6. Type out your text. I start a new TEXT layer for each line [see right column]. You can use the MOVE tool to adjust your text to desired position.
7. Select BRUSH tool. You can adjust the brush size and hardness. When you start using the BRUSH tool, the layer must be rasterized so you can no longer edit the text.
8. Use your mouse [or tablet and pen] to start drawing your arrows. You can undo each step with Undo Brush Tool.
9. Once you are happy with your image, you can crop it to size with your CROP tool.
10. Resize your image and save. I usually save one version in .PSD [so that I can edit later] and another for web.
There you have it, how to create a supply list for your creative project. :)


Love your journal page and the page you've had published in Scrap365.
ReplyDeleteAwesome tut...such a shame I don't have Photoshop!!!!!!!!!!!
ReplyDeleteVery cool!!!!
ReplyDeleteThanks a lot for this tutorial.I am new to photoshop and learning editing slowly.I love dthe idea of listing your supplies like this and I am so gonna use it .thanks to you.
ReplyDeleteThanks for the awesome tutorial!!! I love how you do your supply lists, so unique. This journal page is absolutely fabulous, too!!
ReplyDeleteWonderful tutorial! <3 these pages to bits!
ReplyDeleteWow, this is so beautiful! Love those colors and the fabulous design.
ReplyDeleteIf you're coming to Sydney & you've a spare moment...let me know...would love to meet up if at all possible!!! We're not in Sydney, but about an hour north...not that far away to go in....:):))
ReplyDeleteSuper tut!!! Thanks for sharing! ;-)
ReplyDeleteFabulous!! On my to do list!!! Thank you!!!!!
ReplyDeleteWhat an amazing tutorial ...Thank you so much for sharing ...I have been wondering how you have been listing your supplies using photoshop ..this tute explains it so well :)
ReplyDeletewow this is so cool! I love the bright colors and the placement of the photos, fabulous tutorial too!!! Thanks so much!
ReplyDeleteI am always like WOW...hehe this really is WOW i love it.. popping color and always sweet photos..
ReplyDeleteThank you so much for sharing how to do this. The tutorial is FAB!!! I don't have photo shop so this is now on my must have list lol ;)
ReplyDeleteThanks again and Happy Scrap :)
I don't have Photoshop either. I can do some of these things in Picasa, but there's definitely truth to the saying that you get what you pay for. ;)
ReplyDeleteI love this idea. I will be trying this out for sure!
ReplyDeletePinning your Fabulous Tutorial Right NOW!!
ReplyDeleteThank You so much Yvonne ;-))
How amazing is that.. I am loving this page. Lots of wonderful color.
ReplyDeleteHugs~
Love it!
ReplyDeleteWOW Yvonne! Thank you so much for sharing this with us!!!!!
ReplyDeleteThats a well explained tute Yam..I too use photoshop to edit my images..thanks for sharing it !!
ReplyDeleteawesome!! i am still trying to figure out how to resize photos in PS! lol
ReplyDeletethanks for sharing the tutorial good one..
ReplyDeleteWow! This is awesome! Thank you! :)
ReplyDeleteThanks Yvonne for the tut! I have PSE, not photoshop, but I think I can make it work, will have to give it a try!
ReplyDelete