Pages

Thursday

Do you have stacks of cards ready for all occasions?


Awesome-card

Do you have stacks of cards ready for all occasions? I don't. *LOL* I like to whip things up when I need them. :) So I'm always thinking of ways to simplify my card-making process.


I recently started using watercolour paper instead of white cardstock for my scrapbook layouts [They hold up better to my mixed media abuse...*LOL*]. But the watercolour papers come in 16x12 sheets so after cutting them down to size, I am left with 4x12 strips. These are really handy for pressing on the residual mists left on masks. I love that I have a stack of these to use whenever I need to make a quick card.


I run it through the Cameo for the sentiment, add a few embellishments and I'm all done in 15 minutes. 


Create your own supply list for your creative project with this tutorial!

Playing along with Moxie Fab World.


Share/Bookmark

Wednesday

Giggles, kisses and laughter...:)


Giggles-kisses-and-laughter

I love hanging out with these two - littlest nephew J (3+) and niece S (1+). Always filled with giggles, kisses and laughter. They are soooooo entertaining. :) And they work really hard [posing for pictures..*LOL*] for food. *winks*

Create your own supply list for your creative project with this tutorial!

Playing along with the challenge at Challenge Me Happy.


Share/Bookmark

Tuesday

I love my Gelatos! :)


Brothers-united

I remember the first time I had gelato. It was winter. In Rome. It took me a whole hour to finish my gelato. A total luxury for someone who lives in a tropical climate. [Lady Gaga's meat dress would sizzle in the heat and she could totally eat her dress! *LOL*]


I still love eating my gelato on a cold rainy day. :) And apparently I love playing with gelatos too - Faber Castell Gelatos® Colors.  *winks* Do you know that they can be both a dry and wet medium? Check out how I used Gelatos® Colors to create my background in a step-by-step tutorial over at Design Memory Craft

Create your own supply list for your creative project with this tutorial!
P/S: Just a layout of the nephews working hard to score some chocolate from their aunt! :)


Share/Bookmark

Monday

How to create a supply list for your creative project.


Growing-into-you-journal-page-by-Do-More-With-Less

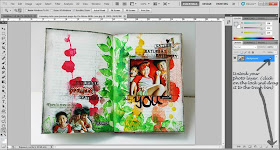
A lot of you have been asking me about how I create the supply list for my creative projects. Here's a tutorial of how I do it using my latest journal page and Photoshop.


1. Start by opening a new file. Ensure that the new file is large enough to fit your photo plus text. You can crop it down later. If you like, you can also name your file.


2. Open your project photo. Unlock your photo layer. Click on the lock and drag it to the trash bin.


3. Use your MOVE tool to move your photo to your new file.


4. Select TEXT tool. You can also choose a colour for your text.


5. You can also choose your text font and size.


6. Type out your text. I start a new TEXT layer for each line [see right column]. You can use the MOVE tool to adjust your text to desired position.


7. Select BRUSH tool. You can adjust the brush size and hardness. When you start using the BRUSH tool, the layer must be rasterized so you can no longer edit the text.


8. Use your mouse [or tablet and pen] to start drawing your arrows. You can undo each step with Undo Brush Tool.


9. Once you are happy with your image, you can crop it to size with your CROP tool.


10. Resize your image and save. I usually save one version in .PSD [so that I can edit later] and another for web. 

There you have it, how to create a supply list for your creative project. :)


Share/Bookmark

Thursday

Happy birthday Do More With Less! :)


Hello friends! This month is Do More With Less's birthday! She's four! :)

To be in the running for this giveaway...leave a comment telling me a little about yourself AND one tutorial you would really like me to share on this site [flattery of any kind is acceptable...*winks*].

I will pick a winner at the end of the month [I hare long giveaways....so mine are always short!*LOL*]


Share/Bookmark

Wednesday

The real photoshoot...


You-make-me-happy-when-skies-are-grey

If there is a skill I would like to pick up, it's the ability to get kids to cooperate and pose for pictures for just one minute! *winks* The nephews would promise me anything to get me to bring them to the playground...and then these are the shots I would get in the real photoshoot...*LOL*


Just wanted to share my layout that was published in Feb/March issue of Scrap365. Incidentally, they also used my layout sketch for this month's challenge at their challenge site Sketchbook365


So fun to see my layout turned into a sketch. :)

Create your own supply list for your creative project with this tutorial!

Share/Bookmark

Tuesday

Finger-painting is currently my fave way to paint...


Canvas-for-Ujjwal

Finger-painting is currently my fave way to paint. Just last month, I was all about the palette knife....*winks* Now, I love using my fingers..smearing random bits, dabbing little blobs...and unifying everything with gesso and metallic paint. :) 


Nothing quite like scrunched up wrapping tissue for amazing texture. 


Just wanted to share a canvas I made for my friend Ujjwal [and her lovely family pictured here]. :)

Create your own supply list for your creative project with this tutorial!

Share/Bookmark

Monday

Rediscovering stamps I own...


Cheeky-always-cheeky-journal-page

Woohoo! I'm into Week 3 of my art journal and going strong [pats self on back]! It's been super fun playing with mists and inks....And rediscovering stamps I own. :)


Hmmm....I'm thinking I may "need" more background stamps...*LOL*

Create your own supply list for your creative project with this tutorial!


Share/Bookmark

Friday

Have you tried metallic paint colours?


Sparkle-mini-album-cover 
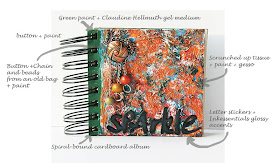
I recently added metallic paint colours to my collection. A natural progression from my obsession with gold and silver glitter eyeshadows...[they do the whole come-hither look without looking like you got sand in your eyes*LOL*]


Love that I got to use my beads + chain from an old bag....they were sitting in my "save-it-for-rainy-day" stash screaming for attention! :)


I had a little trouble adhering the stickers on the textured base so I used glossy accents and decided to add them on top of the letters too...*winks*

Create your own supply list for your creative project with this tutorial!

Share/Bookmark

Thursday

5 masks = 10 different backgrounds


I talk a lot about not wasting residual mists left on masks when working on projects but using the leftover mists to create new backgrounds for other projects. Today I'm sharing how you can use 5 masks to create 10 different backgrounds. :)

When you have a mask that has more detailed cut-outs, what you get when you press a clean cardstock on the mask with residual mist is a negative image of the original mask.


The impression you get will vary with the intensity of the mist colours you choose and how much mist is actually applied. 

Mixing vibrant colours can get you very cool results especially if you let the colours mix a little on the mask first.

Sometimes the results can be unexpectedly different. Because I sprayed a lot of mist on the script mask, I got some really interesting effects after.

Remember that you can always cover up parts you don't like with patterned paper so have fun with your masks and mists!

There you have it, 5 different masks = 10 different backgrounds. What do you think? Ready to give this a spin?


Share/Bookmark