Pages

Thursday

Tutorial Thursday: Pinboard on a box cover


So I haven't done a pinboard project in ages...


But when I got this cool mooncake box (yep, that's a frame on the cover of the box!) and my cute seat cushion no longer gave me much cushioning (my poor behind! *winks*)...I decided it was time to make a pinboard on a box cover. :)


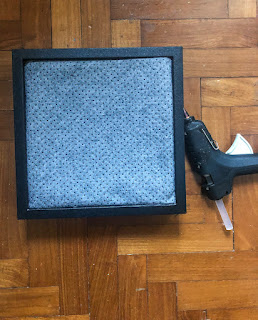
I removed the large faux bloom on the box cover, then measured the sponge from the cushion to fit into the frame on the box cover.


The underside of the seat cushion looked pretty good to me so I wrapped up the sponge with it and glued the entire thing to the box cover. I also cut some patterned paper for the sides of the box cover.
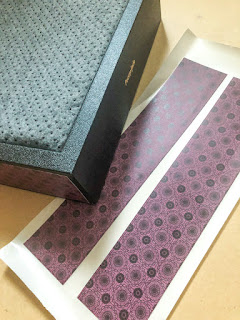


I ran the patterned paper pieces through my trusty Xyron creative station for an even layer of adhesive, then adhered them to the sides of the box to cover up the name of the restaurant. After that, I decorated the perimeter with some bling. ..(yep, couldn't decide on which one so I went with both! *LOL*)


The last step was to embellish a little....the gray bloom was from my mum's dress and I also added the "nervous" lip bag accessory for a whimsical touch...you know, long to-do list in a limited time...*hahaha*


I tested out my new pinboard on a box cover with my to-do list for today. :)


I haven't decided where to put this yet. I might use it with the actual box for storage so it serves a double function. Or use the other part of the box for another project. 

What do you think?


Share/Bookmark

Tuesday

Another birthday layout: Mummy Yam's birthday 2019


Hello friends! Ready for another birthday layout? Well, here it is...Mummy Yam's birthday 2019! :)


Do the photos look familiar? That's because I shared the photos on the decorated heart-shaped chalkboard post back in July.


This is possibly the best photo I've got of the family (except for the fact that nephew #3 is looking at the food as usual) in 2019 (so far...*winks*) Love the setup of the food spread (that I made) and that there were no sullen faces!


It was tea-ner so I made chicken pasta with cheese, mango frangipane tart and carrot cake with cream cheese frosting.


I incorporated lots of stickers...yep the "pasta night" one was crooked and drove me nuts for a bit; I tried to fix it but some cardstock came off with the sticker so I just left it as is...because I was just too lazy...*LOL*


Another birthday layout done! Go me!


Share/Bookmark

Monday

Make Stuff Monday: Baby boy gift bag


Today's share is a quick baby boy gift bag.


I started with this sturdy bright red paper bag.


I adhered cute baby boy patterned paper to the front and back of the gift bag. I added some washi tape at the sides for a little more interest (okay, I did a terrible job trimming down the paper at the sides so the washi tape is a total coverup attempt...*grins sheepishly*)


I replaced the bag handles with blue ribbons. And once the gift (baby clothes) was in the bag, I added some twine to enclose the bag.


Happy week ahead friends! :)


Share/Bookmark

Friday

Another attempt at the perfect shot


It is now standard protocol to pose at our fave fire hydrant after a good time at the playground. Except for the sad fact that the perfect shot still eludes Aunt Y (aka me). This was May 2019's attempt at the perfect shot...no need to zoom in...I shall supplement with more photos. *winks*


This one looked promising...at least all eyes are on the camera. But check out nephew #2's sullen expression (clearly marked with arrow pointing at said expression).


Most of the shots I got in my attempts at the perfect shot looked like this... *insert dramatic sad music*


But on a brighter note, the photos are totally reflective of how the Gangster Gang (aka nice + nephews) are when they hang out together.


Pretty happy to have used up quite a stash from the scrap pile....stickers, diecuts, chipboard. :)


Happy weekend friends!


Share/Bookmark

Thursday

On my desk: first attempt at watercolour abstract florals


Hello friends! Greetings from Saigon! I brought my Kuretake watercolour set and watercolour journal to "force" myself to get out of my comfort zone and try something different. Presenting my first attempt at watercolour abstract florals! No sketching, no planning...just in with the one watercolour brush and water spritz bottle I brought along with me. There is a strong temptation to go in to refine it with my coloured pencils...but I shall stay strong. *LOL*

Hope you are having a great week so far!


Share/Bookmark

Tuesday

Papa Yam's birthday 2019


So when you are running out of storage on your iPhone, the first thing you do is print out the family photos you want to scrapbook so that you can safely delete them to free up storage, At least that's my modus operandi. Never mind that I have a gazillion food photos on my phone,,,nope those are staying in my phone. *LOL*


Anyway, it's when you go through the gazillion photos on your phone that you realize how far behind you are in your scrapbooking. Like a good 10 months. *winks*


And of course, a lot of them are birthday photos. Which of course I have to scrapbook because I baked every single birthday cake this year.  So bear with me, you will be seeing a lot of birthday pages from me in the next few weeks. 


Let's start with Papa Yam's (my dad) birthday back in June. For his birthday celebration, I baked a blondie with almonds and cranberries, a pineapple frangipane tart and made panna cotta, And yes, I use real food (mostly candies and drinks from the fridge) as props for birthday photos, *hehehe*


I was pretty happy with this photo as nephew #3 was actually cooperating and smiling for the camera. You know that most of the time he can't take his eyes off the food. *hahaha*


I went with a bright coloured and bold patterned paper as the base to match my photos. Then added bits and bobs around the photos to keep the focus on the photos,


One birthday layout done,,,just 7 more to go...I think. Send help!


Share/Bookmark

Monday

Mixed Media Monday: A page from my sketchbook


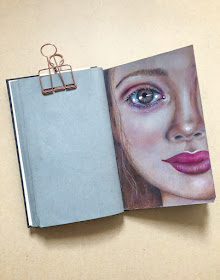
Hello friends! Today's Mixed Media Monday share is a mixed media portrait page from my sketchbook. :)


I started off with an eye drawing.


Then I thought I should add some brows.

And then I decided that maybe I should attempt a whole face so I went in with the nose...


Added a mouth...


Gave her some hair....


Worked on refining the details....


Added highlights on the high points of the face,


I think she turned out quite decent. No photo reference. Just a girl from my imagination. :)

Happy week ahead friends!:)


Share/Bookmark