
So the other day my dad got me a new wireless router for my room and of course, I was more excited about the sturdy box the router came in...*LOL*
Now, don't get me wrong, I love high-speed WIFI for sure but every time my dad tries a new router, it kind of messes with the chi a little and I lose connectivity for a while.

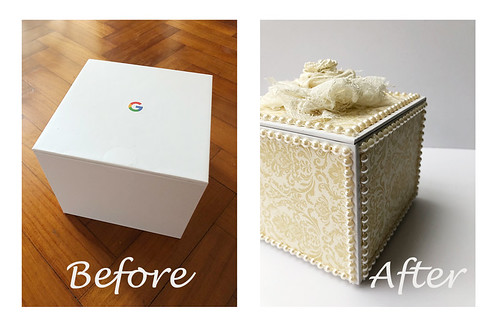
Let's talk about this lovely sturdy box that is all white and only has the Google logo on the top of it. Yep, so totally meant for decorating. :)

I measured and cut out patterned paper for all 6 sides of the box, ran the papers through my Xyron Creative Station and glued them on the boc.

Next I glued Maya Road pearl trim along the edges. There were 6 sides to the box and after my last mishap with the glue gun, you know I went SLOW with the gluing...*hahaha* It took like 2 hours! [Okay, I injured the index finger on my right hand the day before so it's all plastered up and that slowed things down considerably.]

I decided to make a big bloom with some remnant fabric and lace.

A little twisting and gluing of the fabric and lace and you have a decent-looking bloom.

The last step is to glue the bloom to the lid of the box.

I think this box turned out pretty elegant eh? *winks*
Wow..So Elegant !!
ReplyDeleteHa ha..funny how we crafters are more interested in the packaging than the product itself ;)
Wowwwwwwwwwwww! I love how it turned out!!! GORGEOUS!!!!!!!!
ReplyDeleteIt's beautiful!
ReplyDeleteIt's totally elegant and so gorgeous!! I love it!! Have a great day!! Big hugs :)
ReplyDeleteLisa
A Mermaid's Crafts
Looks so classy and elegant.
ReplyDeleteSuch a cool decorated box....love the lace fabric rose!
ReplyDeleteRock star!!! Hope the injury is healing OK!!!!
ReplyDelete