
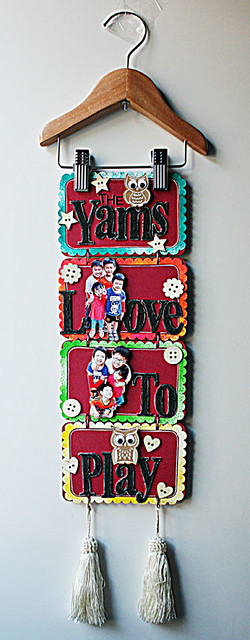
This week, the team at Xyron will be showcasing products from Maya Road with daily giveaways on the Xyron blog. :) I made a wall hanging with a Maya Road chipboard album. Scroll down for the full tutorial.

I sprayed the Maya Road chipboard album with a Dylusions ink spray.

Next I cut some scallop frames from The Crafter's Workshop die and misted them with Dylusions ink sprays.

Then I coloured the Maya Road chipboard alphas with a black Sharpie.

To create texture on the chipboard, I coated them with Art Anthology stone effects paint. Now you can skip the black Sharpie if you want some of the raw chipboard to show through.

Then comes the fun part...the assembly! I glued the scallop frames to the chipboard album using the Xyron Teresa Collins Clear Hold Adhesive.

I like the 3D effect on my photos so I printed two copies and fussy-cut them. For the base layer, I adhered with the Xyron Mega Runner. For the top layer, I added the Xyron foam squares.
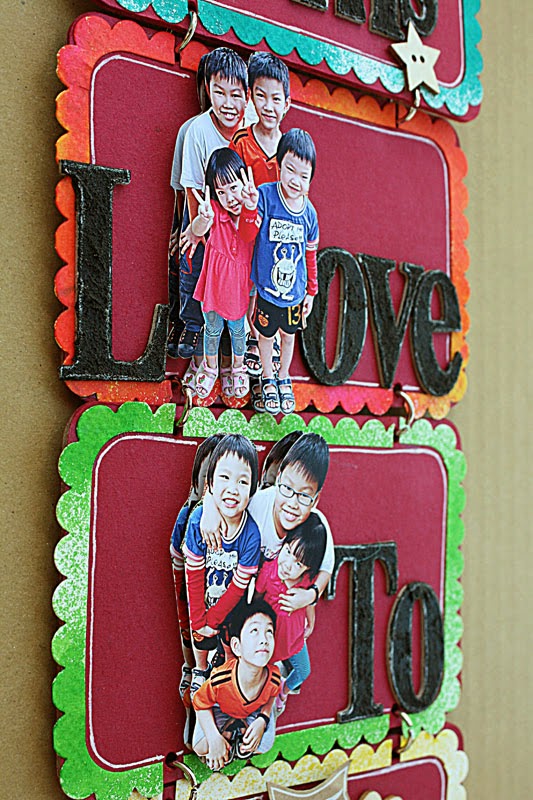
After adhering the photos and chipboard, I outlined with a white pen for more interest.


I used a cute wooden hanger to clip my chipboard album...and added some tassels at the bottom.
There you have it...a fun and easy wall hanging. Don't forget to check out what my teamies did and leave a comment for your chance to win some Xyron products every day this week over on the Xyron blog.
Love how you did the frames & the smiling faces!
ReplyDeleteWow!! Its so cute Yvonne..love the 3d effect of photos and the owl .. :)
ReplyDeleteThat is very cute! Love the bright colors!
ReplyDeleteWOW!!! It looks Awesome Yvonne!! Love the bright colors and 3D effect of Photos. TFS Tute!!!
ReplyDeleteGorgeous, totally gorgeous....& so apt - those kids DO love to play.... especially with Aunty!!! Love this project!!!!
ReplyDeleteThis is adorable. It truly is a work of art.
ReplyDeleteLovely Frames....Cute photos and buttons..
ReplyDeleteWOnderful,full of life n happiness !! I am the tut you are sharing yvonne.Got t o know about using Dylusions ink spray..loved the vibrant colors and the dimensional photos look fun !
ReplyDeleteThis is soooo adorable!!!!
ReplyDeleteVery cool! The white pen adds the perfect touch.
ReplyDeleteOh wow, this is so creative and fabulous, Yvonne!! I love the design and the colors!! What a fun and fabulous wall hanging!! Thanks for the awesome tutorial, too!! Have a great day :)
ReplyDeleteLisa
A Mermaid's Crafts
Okay. Seriously, this is AWESOME!!! Love everything about this wall hanging! <3
ReplyDeleteSuch a fun creation!
ReplyDeleteLove the 3d look of
the photos and all
the layers you did.
Carla from Utah
oh my what will you think of next.. this is so awesome.. great job
ReplyDeletelove this!! I could see this up in my house.
ReplyDeleteThis is so cool! I love the paint effects that you put on the Yams. You use the coolest stuff! :) Love the colors and the owl!
ReplyDeleteThis is just fabulous!!! I LOVE this! Need some of that stone effect paint!
ReplyDeleteA brilliant piece of art Yvonne...a really awesome and great idea as a present, and I love thephotos too. Thank you for sharing your ever creative projects as a tutorial :)
ReplyDeleteHappy Scrappy week :)
This is the cutest project ever, Yvonne!! Totally love it!!
ReplyDeleteThis is uber adorable!!!
ReplyDelete