
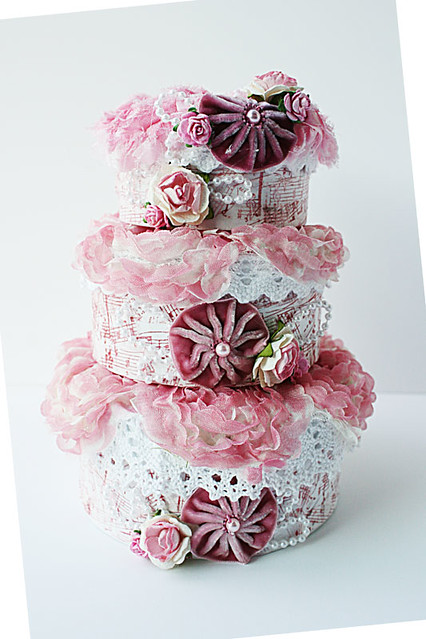
So this is "Not Xyron but should be" week. :) The Design Team got to pick projects from Pinterest to "recreate" using Xyron. Can you tell what I made?

Here's my niece Sophie posing with it....*winks* [Yeah...it's totally missing a cake stand!]

I went with this lovely project from Kimberly Taylor.

I started by stamping on white wrapping tissue.


I tore the wrapping tissue and adhered to the box. Overlapping the tissue creates texture.

I ran some lace through the Xyron 3" Sticker maker, then adhered to the edges of the lids of the boxes.

Then I coloured some white floral trim with a Copic marker and adhered to the lids of the boxes.

The last step is to embellish with pearls and blooms.
So, what do you think?
Oh wow what a stunner Yvonne. I love your 3 D cake. My blog friend Beckie sent me a small Xyron..I love it so much I hesitate to use it as getting the refills is difficult in India.
ReplyDeleteLove your Xyron inspiration..wish the company would expand to India
This is beautiful, Yvonne!! Totally stunning project!
ReplyDeleteBeautiful cake! Looks like your niece loves it too!
ReplyDelete~Kim
Wow, love the cake, Yvonne! beautiful creation
ReplyDeletewow now this is just so sweet.. The perfect birthday..
ReplyDeleteWow!! love the cake Yvonne.. and the decor on lid is so beautiful love the flowers colored with marker.. :)
ReplyDeleteWOWZER... What an awesome project. I LOVE it my creative friend.
ReplyDeleteHugs~
WOW!!! This is AWESOME box project Yvonne!!! Love this alot. Thank you for sharing the tutorial! Hugs <3
ReplyDeleteThis is such a pretty, girly project! The Xyron products seem mighty useful...Looks good enough to eat:D
ReplyDeleteWow !! What a gorgeous cake.I so so love this especially the flower lace and the embellies and pretty colors ..Thanks for sharing the tutorial ..Xyron is definitely on my wish list too :)
ReplyDeleteGosh, I love the 'cake' ! Your trick of printing the tissue and making it adhesive is wonderful. I like the Xyroned lace idea and coloring the trim. So many good ideas on one project....SUPER DUPER!
ReplyDeleteI would NEVER be able to do something like this--fab idea!!! And the music tissue paper....looks great:):)
ReplyDeleteStunning Yvonne!! Love love love it! And I think I need a sticker maker too!
ReplyDeleteLooks YUM!!!.....good enough to eat :)
ReplyDeleteLove that gorgeous cake and your niece is just getting too cute and I see her hair is finally growing!
ReplyDeleteI think it looks amazing, so pretty and lacey!! love it!
ReplyDeletethis is amazing stuff yvonne... It looks good enough to be eaten... and your niece looks adorable in the pic!
ReplyDeleteEEEEEKKKKKKKKKK!! I love love love love this!!!!!!!! PINNING!!!!!!!!!
ReplyDeletewowzer! This is gorgeous!!! Love the step by step how to! THanks so much!
ReplyDeleteAw super cute, love the precious cake... What a keeper for your little niece..... Great job Yvonne!
ReplyDeleteWow, this is gorgeous, Yvonne!! You decorated the boxes so beautifully!! Thanks for the step by step, too!! I've got a small Xyron, but I've got to get the Creative Station!! Thanks for the amazing inspiration!! Have a great day :)
ReplyDeleteLisa
A Mermaid's Crafts
WOW that us one fabulous cake! I love how you used the Xyron for the tissue paper - way less mess than using say Modge Podge. TFS
ReplyDeleteIts Gorgeous..pretty ..beautiful !! I loved the tissue with music notes an the pretty pink blooms wow !!
ReplyDeleteWOW! This is just stunning!
ReplyDeleteWow! I think it's fabulous! So, so pretty and girly girl, and WAY better than a real cake cause this will last forever! I love your idea of stamping tissue paper for the sides. Never, ever thought about running tissue and trim through a Xyron, so thank you for your amazing tips. Totally love how you colored the flowers with the Copic, too. Gives such a fun, soft look to all those gorgeous blooms!
ReplyDeleteI love them!
ReplyDeleteYou are so creative Yvonne!
Thank You!!
Wow!!!!!!!!!!!! This is absolutely AMAZING!! Soooooooooo beautiful! Just takes my breath away!!!!!!!!!!!!
ReplyDeleteIt's fantastic! Love it!!
ReplyDeleteAMAZING!!! WOW! Love!
ReplyDeleteWhat a feat!! Very cool!!!
ReplyDeleteWhat a gorgeous and inspiring creation! Love how you used the tissue paper!
ReplyDeleteWOW!!! girl this is gorgeous :)
ReplyDeleteI think you are a genius and your work is always gorgeous and inspiring for me.And I also hope that this comment gets published.It has been frustrating for me to keep typing and never getting a published comment.Browser issue.
ReplyDelete