Pages

Monday

Can you tell which letter I ran out of ? *winks*


So I'm slowly working on the photos I've taken with my phone....love that printing them card-size makes them perfect for a 8.5 x 11 layout. :)


I love this My Mind's Eye patterned paper....just included some paper blooms and embellishments to extend on the patterns on the paper as well as add some texture and dimension. A good way to add the bits and pieces you have laying on your craft table.


Can you tell that I ran out of the letter "S" ? I was too lazy to paint the lone chipboard which would make it blend seamlessly with the rest of the chipboard letters...so I coloured it with a pink Copic marker, then added stickles [glitter makes everything better!]. Had to strategically add pink elements around to complete the "illusion" of a planned design...*winks*

Playing along with the recipe challenge at Punky Scraps.

Supplies: My Mind's Eye and Echo Park patterned papers, Heidi Swapp chipboard letters, Maya Mists, Prima blooms, Ranger stickles, MT washi tape, buttons, white pen, ribbon, embellishments.


P/s: I'm really behind in my google reader....[1000+ Yikes!] I'm playing catchup this week! Don't forget to play along with my guest Sonia's recycling challenge...it ends on Friday! Can't wait to introduce my next guest blogger! You'll meet her tomorrow! :)


Share/Bookmark

Friday

The occasional feast...


Lunch at Nick's

I believe that one should occasionally indulge in a feast. Kind of a reward for being good 99% percent of the time *winks*... [okay...80% of the time..but hey I workout! *LOL*].


The pictures say it all. Fresh oysters. Grilled salmon and scallops. Barbecued mini octopus. Yummo! :)

Playing along with the sketch at Creative Scrappers.

Supplies: Prima canvas letters, SRM stickers, Imaginisce embellishment, 7 Gypsies metal embellishment, ribbon, lace, corrugated cardstock, charm, black pen.

P/s: Have a fabulous weekend friends! :)  If you have time, I would love for you to play along with my guest Sonia's recycling challenge and LESSology Challenge #13: Chest of drawers.


Share/Bookmark

Thursday

My "hidden" texture hammer...and a challenge winner!


Thanks butterfly card 

Whenever there's a sale at the LSS, I would head for the tools section. It just seems like money is better spent on something you can use hundreds of times like a cool punch. But therein lies a problem. 


Tools take up space. And if you want to be neat and tidy, you'll have your tools tucked away. Totally out of sight. And you know what they say...out of sight, out of mind...*LOL* 


Glad I "found" my Tim Holtz texture hammer. These brads got pretty hammered...*winks* What tools do you have neatly tucked away? Tell me. So I don't feel so bad about keeping mine in a dark dusty corner...*LOL*

Playing along with the sketch at Frosted Designs.

Supplies: Graphic 45 patterned papers, Prima canvas letters, Ranger distress inks, crackle paint, stickles, Making Memories brads, twine, butterfly bling.

_______________________________________________________________________

A big thank you to those who played along with my guest Chunyuan's rock-and-roll challenge. Chunyuan picked her fave...and the winner is

Wida with this lovely creation. :)

Congrats Wida! Please email me your mailing details so that I can get your RAK out to you!

*Edited* This card made Top 3 at Frosted Designs! :)


Share/Bookmark

Wednesday

Situation under control...


Situation under control

I love it when I've got the situation under control. Like when the 3 nephews and 1 niece are safely sitting in a designated area...usually the bath tub OR my bed. :)


Here, the 4 of them are sitting on my bed...the older 2 distracted by the dvd movie, littlest nephew J happily playing with his trains and stuffed animals and tiny Sophie, the only "professional" model looking at the camera in all the shots! *LOL*


Of course, the situation is really under control for like 10 minutes or so. Sophie will get bored and start wailing....*LOL*

I used the sketch at Sketchabilities.

Supplies: Crate Paper and Studio Calico patterned papers, Crafter's Workshop stencil, Maya mists, Prima canvas letters, American Crafts thickers, Jenni Bowlin number stickers, Ranger distress inks, white pen, twine, red embellishments.


Share/Bookmark

Tuesday

How to make time for online challenges.


I'm sure many of you are like me - you want to play along with as many online challenges as you can but can't seem to find time. Say you have 30 minutes. Can you choose the right patterned papers, photos and embellishments? No? So you end up doing nothing. Until you get maybe a 2 hour block of time. What else can you do?

CHEAT of course. *LOL* Wanna know how I "cheat"?


1. Do prep work in a single session.

Taking the right supplies out for your projects can suck up a lot of time.
So when I want to mist, I'll just work on several backgrounds in one session. This allows me to experiment and clean up just ONCE. Saves a ton of time. [And the need to wash my sink.:)]


2. Work on several projects at once. 

I don't know about you but I absolutely hate it when I get stuck on a project. Is it missing an element of interest? Is it off-balance? Rather than debate with myself all day, I set that project aside and start work on another. This allows me to "view" my stalled project with fresh eyes later on.


Sometimes being creative just entails adding little bits and pieces to patterned paper. A really good way to use up those scraps and found items.


Or adding photos and embellishments.


Or a really quick layout that just needs journaling.

[When my projects are in progress, I start looking around for online challenges that I can play along with by "tweaking" my elements...*winks*]

Sketches via Creative Scrappers and Frosted Designs

3. Use sketches.
  
I almost always start with a sketch. It may not end up looking a lot like the sketch though...*LOL*. But a sketch really helps me to place the main elements on the page. Less fiddling. More time. Another time-saver. 

There you have it. My tips for how to make time for online challenges. What other nifty tips do you have to help me save time? Let me know by leaving a comment. :)


Share/Bookmark

Monday

Hello sunshine!


Hello sunshine 

Hello sunshine! :) Can you tell that I'm a totally day person? *LOL* 


Attempting to use some of the premade flowers in my stash...along with a handmade felt one...*winks*

Playing along with the challenge at CPS.

Supplies: My Mind's Eye patterned papers. SRM sentiment sticker. The twinery twine. Spellbinders die, 7 Gypsies velvet bloom, American Crafts glitter cardstock, handmade felt bloom, brad, pom pom trim, corrugated cardboard.

P/s: Come play along with my guest Sonia's recycling challenge and LESSology Challenge #13: Chest of drawers

 
Share/Bookmark

Friday

The story about the belated birthday celebration.


Cupcakes

Hello friends! Today I want to share with you the story about littlest nephew J's belated birthday celebration. Yes, this aunt dropped the ball and celebrated her fave nephew's birthday 12 days later *Gasp* [bad, bad aunt!!!]. Not only did this aunt blame the heavy rain for ruining her trip to the cakeshop, she even attempted to....[wait for it, it's so bad it's good]...quietly "manufacture" a fake birthday memory for her nephew's scrapbook!


Oh yes, my intent was to let the nephews pose with the 3 angry birds cupcakes and then make a layout about J's birthday...even though I was totally late for it [sheepish grin]. The older two nephews weren't too happy about having to sing the birthday song again but perked up immediately when they were told that henceforth, all their birthday celebrations will be month-long! I think they were thinking about month-long cakes and presents! *LOL*


J was very happy about munching off the angry bird's head and then sharing his cupcake with his sister S. :)


I went a little crazy with the stickers...*winks*

Playing along with song title challenge at The Studio [mine's "Happy birthday to you! "] and the sketch at Creative Scrappers.

Supplies: Echo Park patterned papers and stickers, Crafter's Workshop templates, Maya mists, American Crafts thickers, SRM stickers, Ranger distress ink, ribbon, washi tape, foam, black pen, white pen.

P/s: Happy weekend friends! I would love for you to play along with my guest Sonia's recycling challenge and LESSology Challenge #13 Chest of drawers!

Share/Bookmark

Thursday

The last of my weathered tin boxes! :)


Butterfly tin box

So I finally finished decorating the last of my weathered tin boxes.Yay! :)


Just layered some Graphic 45 paper scraps. Some twine and ribbon action. And coated with Ranger crackle paint and stickles in rock candy! :)


Here are the rest of the tin boxes! All made from paper scraps and little knick knacks! Now they are sitting pretty in my drawer! :)

Supplies: Graphic 45 patterned papers, Ranger crackle paint and stickles in rock candy, twine, ribbon.

P/s: Come play along with my guest Chunyuan's rock-and-roll challenge....it ends on Friday!


Share/Bookmark

Wednesday

Tub for 4! :)


Tub for 4

I am a stickler for cleanliness. So I hate it when the nephews and niece come over before they are all sweet-smelling and clean. This was one of the many times...[Grrr....]...so into the tub for 4 they go! :)


Tub for 4 is a tight squeeze but they still managed to have a lot of fun! :)


Little Sophie couldn't decide which toy she liked best...


A little misting and masking. Twirling with the twine, clothespins and a vellum pinwheel with an upcycled chopstick.  :)

I was inspired by the challenge at Punky Scraps.

Supplies: Crate Paper, Pebbles, Studio Calico and American Crafts patterned papers, Maya mists, Fancy Pants chipboard, American Crafts thickers, Fontwerks stamps, SRM stickers, button, twine, embellishments, clothespins, chopstick, ink, brown pen, white pen.

P/s: Come play along with my guest Chunyuan's rock-and-roll challenge....it ends on Friday!


Share/Bookmark

Tuesday

Recycling with Sonia Suprabha Venugopal! :)


My guest today is the fabulous Dr Sonia Suprabha Venugopal of Cards, Craft and Kids Projects. She makes the most awesome projects from found objects around the house. She has amazing green ideas which she so generously shares in tutorials on her blog! I love her attention to details as well as her fun ideas for crafting with kids! Today she shares how to make a beautiful dollhouse! She's also hosting a fantastic challenge with a really special prize for the lucky winner! :)

Let's check out some of Sonia's fave projects....


Doll House Making
Hi friends! I am so honoured and terribly flattered to be featured here on Yvonne's blog. I love recycling and am fascinated by Yvonne's blog because of this common passion we share! We also have another common factor we feature regularly on our blogs--kids!
I made this doll house with my 5 year old daughter who loves to craft with me.We decorated our doll house with handmade punchcraft flowers and some quilling .


Doll House Making
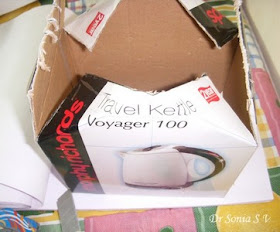
How to recycle a Box into a House
You can recycle any box into a doll house! At the top part of your box draw a horizontal line and drop a vertical from its center to reach the roof as shown. Draw sloping lines from the sides to meet the top center and you have made the shape of your doll house
Doll House Making
Use a knife or scissors to cut down from the top corner to meet the horizontal line as shown.Bend the flap  inwards at the line earlier drawn as shown to make the front of your doll house

Doll House Making
Do the same cutting and folding for the other 3 top corners of your box and you will have 4 triangular flaps as shown
Doll House Making
Bend the side wall at the level of the horizontal line and fold down the rectangular shaped flap as shown
Doll House Making
Stick the side wall flaps to the triangular flaps from the front and back of the house and the basic frame work of your doll house is ready.
Doll House Making
Make a roof by bending some cardboard over your doll house or measure out 2 roof pieces and glue them   over the doll house
Doll House Making
Our roof has 2 pieces of corrugated card glued down in the middle with pattern paper. We added some homemade fabric bows and punchcraft flowers on our doll house roof.
Doll House Making
These houses are quick and easy to make and I wanted to make a whole city of houses as a special project for Yvonne but due to a recent burns adventure I had to settle for only one doll house.
Doll House Making
I am so excited Yvonne let me choose a challenge theme for you to play along-- I felt there is nothing better than Recycling!!!
Do link up any project which involves recycling-- the more you recycle the better it is!!
As the prize for the challenge instead of crafty stuff which may not be universally appealing,I thought I will feature the winner on my blog: Cards Crafts and Kids Projects .I have never featured anyone at my blog before but realized that in blog land guest blogging is such a wonderful act of goodwill and friendship and I should continue the cycle !Thank You so much Yvonne!
_____________________________________________

Ready to recycle something found in your home? Please link your newly created project that features something recycled via Inlinkz [located at the end of the post] by Friday May 4. No backlinks please.

As always, please leave a little love for my guest Sonia.


Share/Bookmark